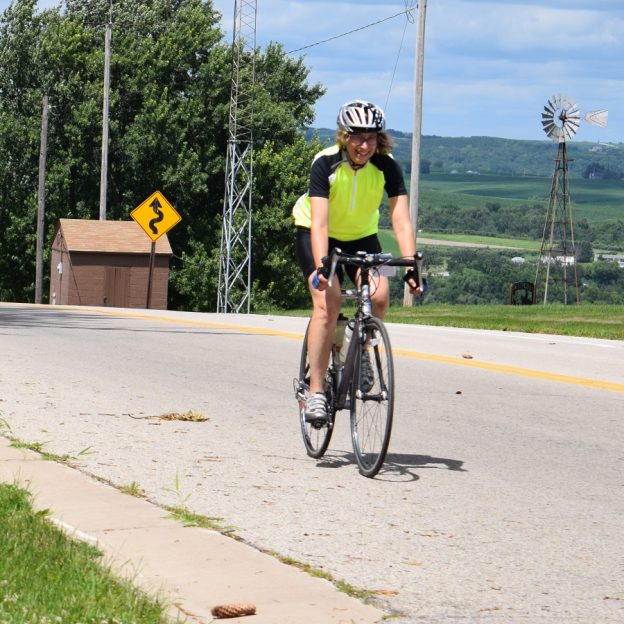
Welcome. We're your premier source for fun places to explore by bicycle or on foot. Offering guides, maps and articles on road and trail riding for the novice to seasoned cyclist - helping you find your #NextBikeAdventure
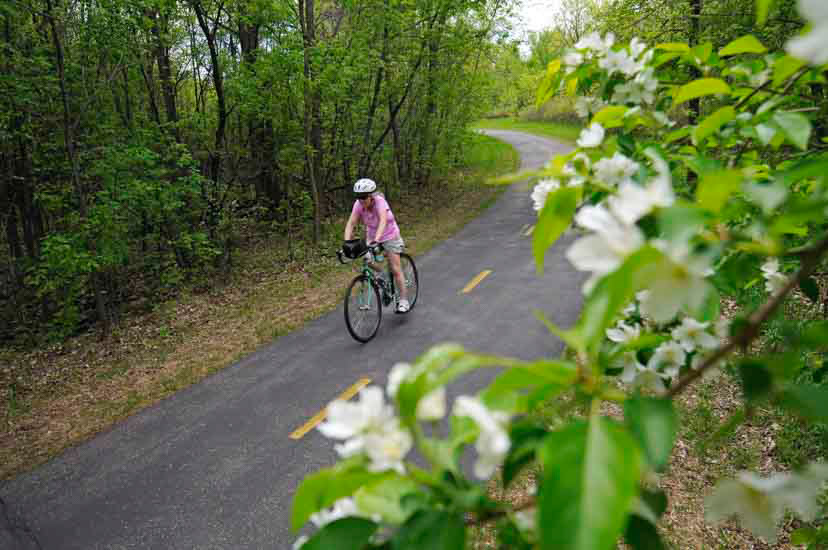
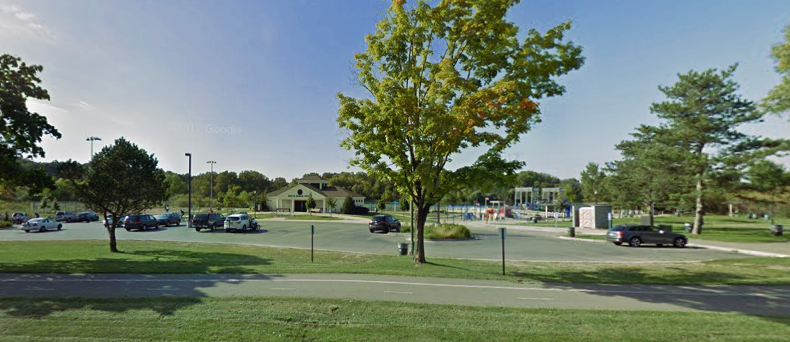
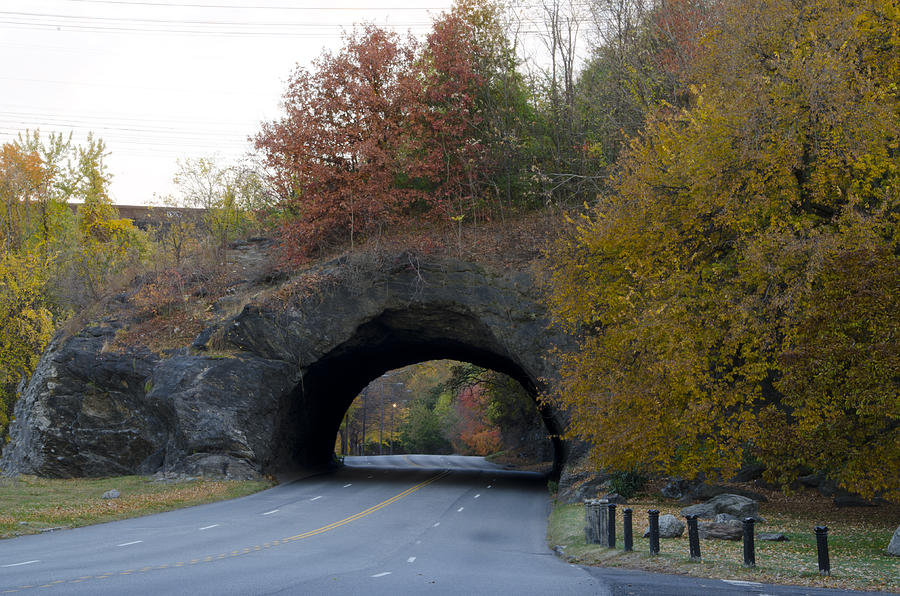
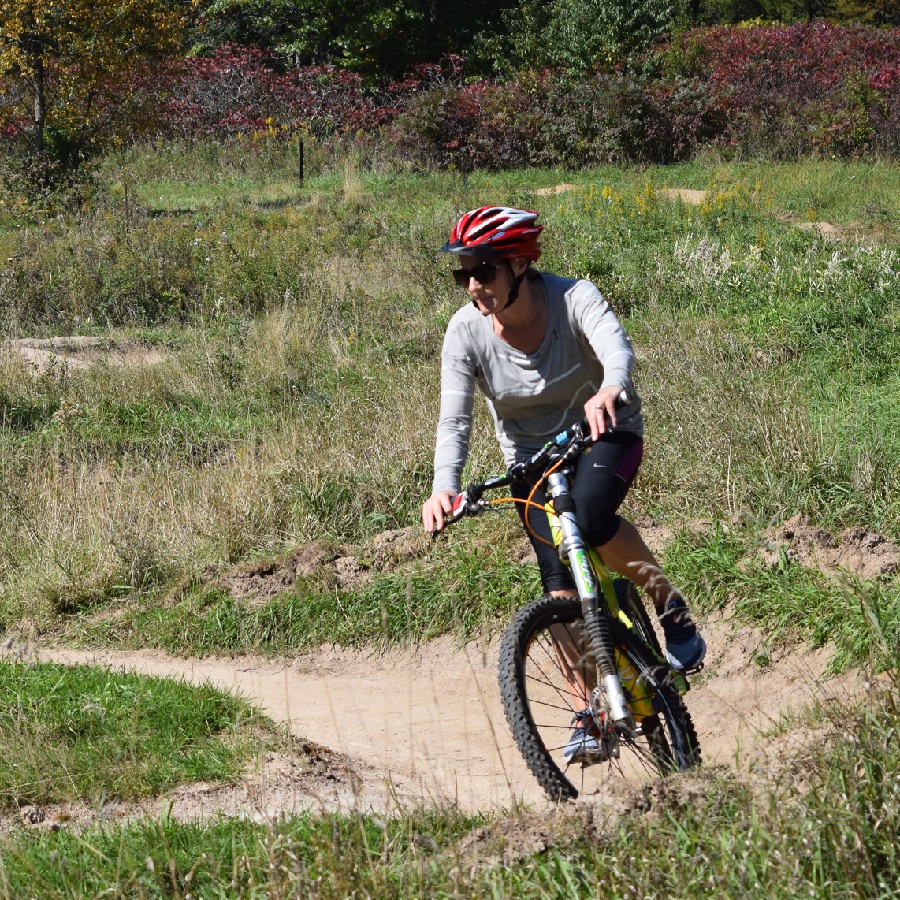
In the western part of Bloomington Minnesota over 1,000 acres of parkland act as the Twin Cities best destination for active families, recreational riders, and beach goers. The Hyland Park Reserve encompasses over 8 miles of paved bike path, A family friendly beach, breathtaking prairies, a Ski resort, seven miles of cross country ski trails, a spectacular playground, and countless other attractions. Read on to learn about what possibilities you could explore.
Biking Hyland Park
While not a loop, the trail system in Hyland Park is well laid out to get you to every corner of the park. However, there are small loops within the trail system. The trails in the southernmost part of the park loops around through dense forest and winds along the Hyland Lake. As you move further north, the trails navigate through the most developed portion of the park, passing the Shoots and Ladders Playground and the visitor center. While traveling north, Hyland park reveals it’s true beauty while sending you through vast prairies. In the northernmost part of the park, the trails pass under the shadow of the Hyland Ski and Snowboard area. Even though the trails pass through very different topography, they all are well maintained, relatively flat, and wide enough to offer comfortable riding for all ability levels.
Attractions
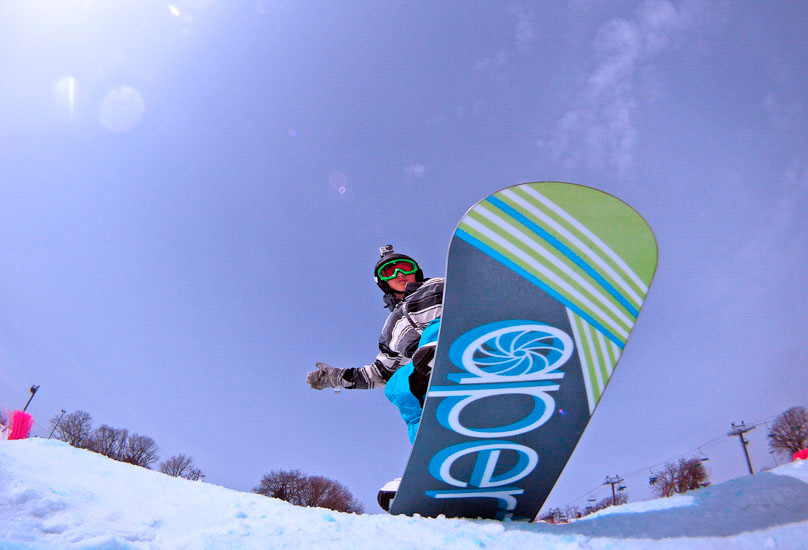
Hyland Ski and Snowboard Area
The Hyland Ski area is a downhill ski area with two terrain parks, Ski jumps and a park featuring an 18-hole disc golf course. Through the winter, it is a popular place for lessons and cold weather sports for metro area residents. In the summer, the park periodically operates it’s lifts for mountaintop concerts, bonfires and general outdoor merriment.
Shoots and Ladders Playground
Tucked into the middle of Hyland Park is the most amazing playground you could imagine. It’s tallest 3 story tall tower soars over scores of other structures amassed to put your kids in a state of playground frenzy. Most surfaces are covered in soft rubber, woodchips, or sand offering safe areas for kids of all ages. The park is open to all two-legged creatures, but please leave your four legged friends at home. Additionally, when the mercury rises Shoots and Ladders has a water misting play area for the kids and enormous umbrellas over the picnic areas for he parents.
Richardson Nature Center
Hidden in the dense foliage of Hyland Park is the Richarson Nature Center, a stunning natural gateway for visitors young and old. After parking in their ample lot, stroll a few feet down the path up to the nature center. The center is a two story home to Raptors (upstairs) and amphibians (downstairs). They have classrooms and events in the center throughout the year for anyone looking to learn more about the ecosystem. One of the best parts of the Richardson Nature Center is the kids park they have cleared just down the path. In an open area of forest, kids can build forts and structures with deadfall collected from around the park.
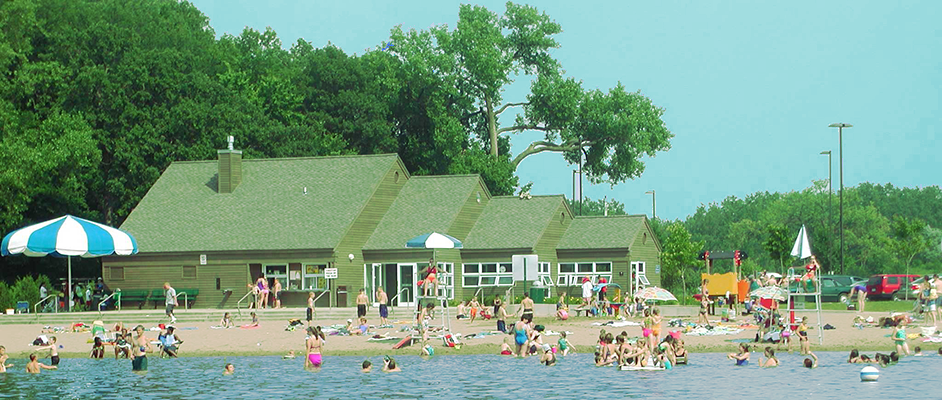
Bush Lake Beach
While not technically in Hyland Park, Bush Lake Beach sits adjacent to Hyland. It is a man-made sand beach on the east shore of Bush Lake. The entrance to the beach just off East Bush Lake Road and just south of the Richardson Nature Center. Through the summer season, you can purchase a one day or season pass for parking. The Aquatic Center at Bush Lake Beach has a snack area and great bathroom amenities.
Year-Round Fun
What is best about Hyland Park is the number of events it has. Throughout the year Hyland Park schedules outdoor and indoor fun for every kind of nature lover. I’ve enjoyed the “Movie Nights on the Hill” a few times and the 4h of July celebration is spectacular. I strongly recommend making the Hyland Park your first stop, when planning an outdoor excursion.
Find more information about this park and the many other fun activities Bloomington has to offer, here.
In the western part of the Twin Cities, nestled between Golden Valley and Minneapolis is Theodore Wirth Park. A space almost as large as New York City’s Central park. With in Wirth (as it’s known to the locals) you will find several scenic, natural areas around Birch pond and Wirth Lake, plus two golf courses and a fabulous mountain bike trail system.
For Twin Cities cyclists, it’s a natural playground you should be exited too explore.
Theodore Wirth Park History
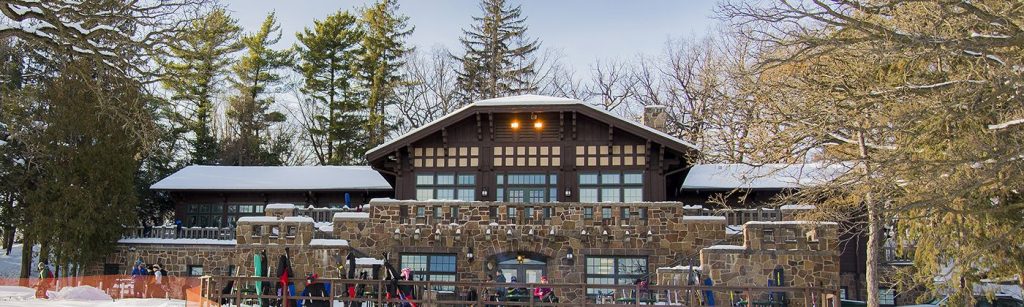
What would become Theodore Wirth Park started in 1889 when 66 acres were purchased and established as a park. Now Theodore Wirth park (named after the park system’s superintendent from 1906 to 1936) has over 750 acres. The Central to the park is the Wirth Chalet, a stone and timber structure that offers events, and product rentals for snow sports.
Where to go in Theodore Wirth Park
If you are interested in riding the mountain bike trails of Wirth park, I find it easiest to park at the beach house off Glenwood avenue. From there it’s a quick spin west over to the trailhead. If your interest are in the golf courses or Grand Rounds and Luce Line trails, the Golf Clubhouse on Theodore Wirth Parkway is your best starting point.
What are the trails like in Theodore Wirth Park
The trails at Wirth are predominantly designed for the intermediate rider. As you enter the trails at southern entrance you are greeted with a twisting climb up thorough rolling prairie and into well established woods. The trails themselves are well manicured and smooth with ample bermed turns. Expect to see narrow ribbons of brown winding through ample green surroundings. When you find your way into the northern trails, more rocks get introduced. The majority of the rocks are well embedded into the trails and act as exciting obstacles to manage. The northern trails also exist in denser forests, with far fewer field areas. Overall, the Trails at Wirth are fun and flowie, offer challenges for the most advanced riders while being accessible to casual riders.
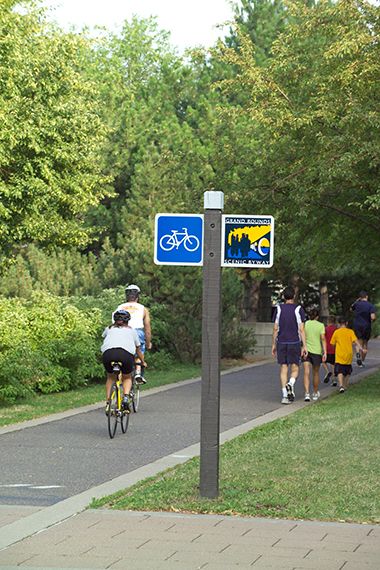
Grand Rounds Trail
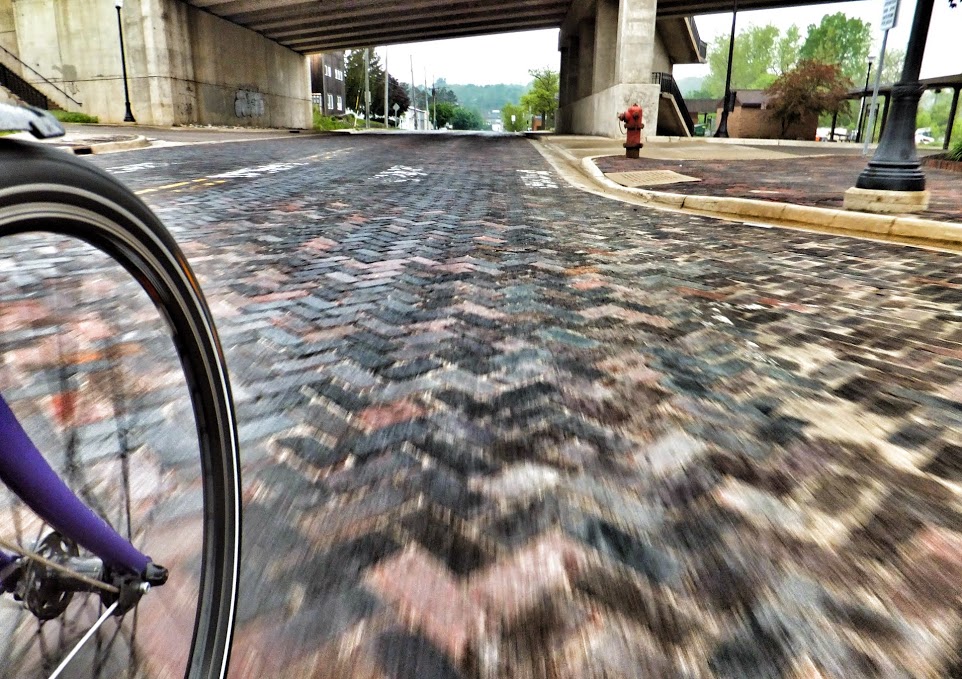
The Grand Rounds Scenic Byway is one of the countries longest continuous urban parkways. It is a connecting trail to more than 300 miles of regional trail around Twin Cities Metro Area. It also acts as the connecting trail between most of the parks in the Twin Cities area. That said, you can enjoy a day trip on the Grand Rounds Trail all over the Twin Cities via protected and paved bike lanes. The Grand Rounds travels through 7 districts: Chain of Lakes (13.3 miles), Minnehaha (12.6 miles), The Mississippi River (9.2 miles), Downtown Riverfront (1.2 miles), Northeast (6 miles), Victory Memorial (3.8 miles) and Theodore Wirth Park (4 miles). Additionally, this trail is cleared by 6am every day through the winter if you choose to use it for commuting.
Luce Line Trail
The Grand Rounds Bike trail here connects to the binning of the Luce Line trail.
The Luce Line trail is a 63 mile limestone path stretching from Cosmos in western Minnesota to Wirth park. It is available for Biking, hiking, running, jogging, and snow activities in specified areas. This trail is an exceptional way to explore neighborhoods and destinations west of the city.
How to help
If you ride and enjoy the trails at Wirth, consider volunteering for trail maintenance. The Minnesota Off Road Cycling organization (MORC) schedule trail work sessions on Wednesdays through the summer. Consequently, the group meets at 6 O’clock and welcomes anyone interested in helping. Wear long pants, boots, and work gloves because you will be doing hard labor. Moreover, you will find that the hard labor is enjoyable because you are giving back to fellow riders.
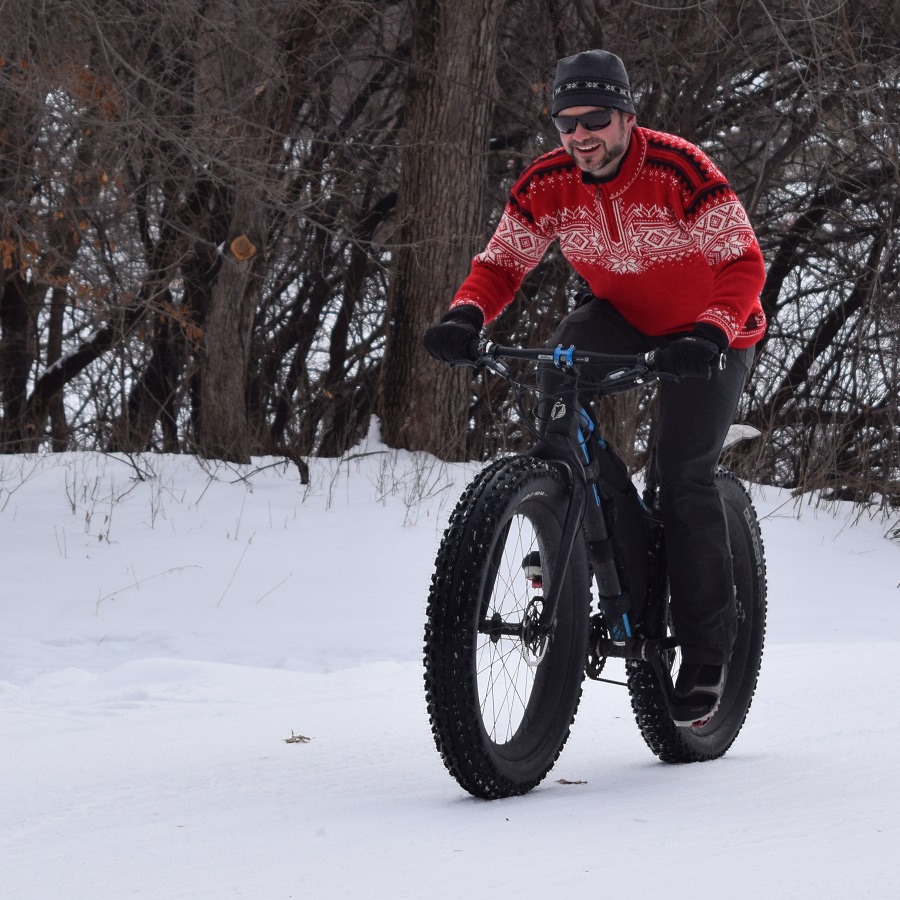
Winter riding in Wirth
The mountain bike trails in Wirth Park are extra fun in the winter on a fatty.
While the trails are open through the winter, Fatbiking is not the only sport you can enjoy at Wirth. Therefore, snowshoeing, cross country skiing, tubing, sledding, skating, and, ice fishing are all available within the park. When planning a ride in the fall and spring, be sure to check the MORC website for trail conditions.
Nothing spoils a great ride like a bad accident, but most accidents are avoidable. The easiest way to eliminate accidents is to assess road hazards in advance and avoid them. Read on to learn about the most common road hazards and how to manage them.
Road hazards broken and uneven pavement
The easiest road hazard to spot is broken or uneven pavement. Oftentimes starting at the roads edge (where many of us ride), pavement begins to break and crumble from annual hot/cold cycles. The first and best option is just avoid loose sections entirely, but anyone can tell you that’s not always possible. When you are riding through bad pavement, try to raise your body off your saddle by an inch or so and allow your legs and arms to absorb impact. Concentrate on being loose, allowing the bike to move around underneath you, and keeping your momentum directed to where you want to go. Focusing on where you want to go is the most important part, focusing on objects you don’t want to hit increases the chance of hitting them.
Narrow roadways
Sometimes the road narrows, and doesn’t allow for you and drivers to occupy the road together safely. In these situations, it is important to take control of your safety. Do not try to be off to the side as far as possible, this will only encourage drivers to attempt to make an unwise pass. Instead, give yourself space on the road, and try to be as visible and deliberate as possible. Narrow roadways are the ideal place to use hand signals. Additionally, be aware of what is behind you by looking back more frequently than usual. Looking to see who is behind you will give you the information you need, and let drivers know that you see them. Oftentimes drivers will be more patient if they know you are aware of the situation.
Blind turns, driveways, and alleys
You can’t easily avoid what you can’t see, especially if you are going fast. When approaching any blind road or path section, slow down and assume there is someone coming around the corner. Approach the corner with caution, and only accelerate once the coast is clear.
Loose debris on hard surfaces
Sand, Gravel and dirt on pavement can be a recipe for disaster. Any loose debris on the road robs you of the traction you need to ride confidently. Shy of vacuuming every road or trail before your ride, there is no way to avoid the inevitability of debris. What you can do however, is use good judgement when you do encounter it. First, don’t slam on the brakes. Braking shifts your weight forward onto the front wheel making you more unstable in loose conditions. Instead, apply your brakes gently and evenly while trying to remain loose on the bike in case your tires break free. Second, try to keep the bike as vertical as possible and turn only if necessary.
Ice and water
Water and its colder cousin ice are a serious road hazard. You will find that roads and paths that are wet offer far less grip than when dry. Therefore, keep your overall speed down on wet days and brake before turning. If ice is in the forecast, the best measure is to avoid it. Start by ditching the polarized sunglasses that will make the ice difficult to see. Polarized glasses eliminate most glare, and glare is a prime means to identify ice. If you do find yourself on ice, be careful! It takes almost no side motion to put you on the ground when riding on ice. I find it best to do almost nothing until you make your way off the ice, that means no braking, no turning, no movement, Just coast.
Paint and slippery surfaces (metal, marble, tile) train tracks
The last set of road hazards worth mentioning are slick surfaces. These surfaces include metal (train tracks, manholes, and sewer grates), painted pavement, and smooth aggregate (like marble or tile often found in industrial zones). For metal, try to avoid it when wet (it’s as slick as ice) and cross train tracks as perpendicularly as possible. Painted surfaces and smooth aggregate need to be avoided when wet as well. While they have more traction when dry, it’s still worth being careful.
After reading this, you may feel like everything on the road is out to get you. Nothing could be further from the truth. In fact, you have probably encountered all these hazards on your last ride and survived. Overall, road hazards rarely cause an accident but are something to be cognizant of.
In the late 1920’s, in France, there was a bike race under way and it wasn’t the Tour De France. Instead, this race was a technological race that brought the derailleur into the light. Before 1928, bicycles had a maximum of two speeds, and you needed to remove the rear wheel to change those gears. As there was need for quicker shifting, the bicycle derailleur was born. Initial derailleurs consisted of nothing more than paddles that were actuated by steel rods located between the rider’s legs. Needless to say, there was a lot of finesse that went into shifting those bikes. Then after the second world war parallelogram derailleurs, what we use today, were developed so riders could shift their gears with ease. Read on to see how to get the most out of 100 years of technological advancements. You will find adjusting your front derailleur is easy if you follow these steps.
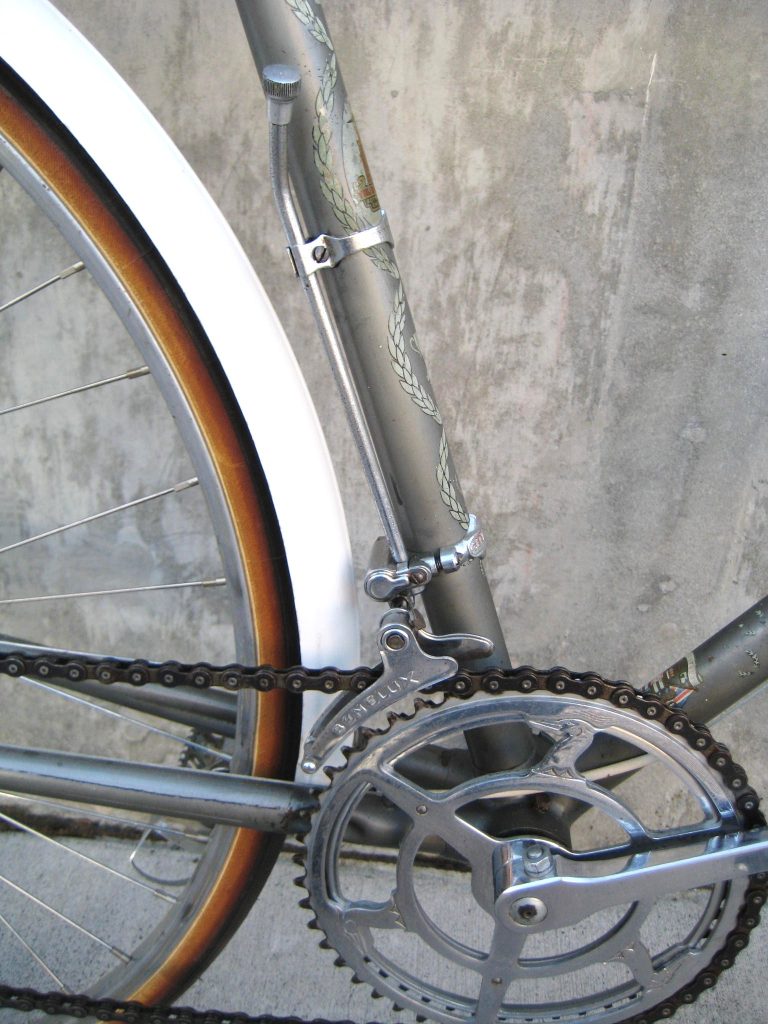
Early “Rod Style” Benelux front derailleur – Yikes
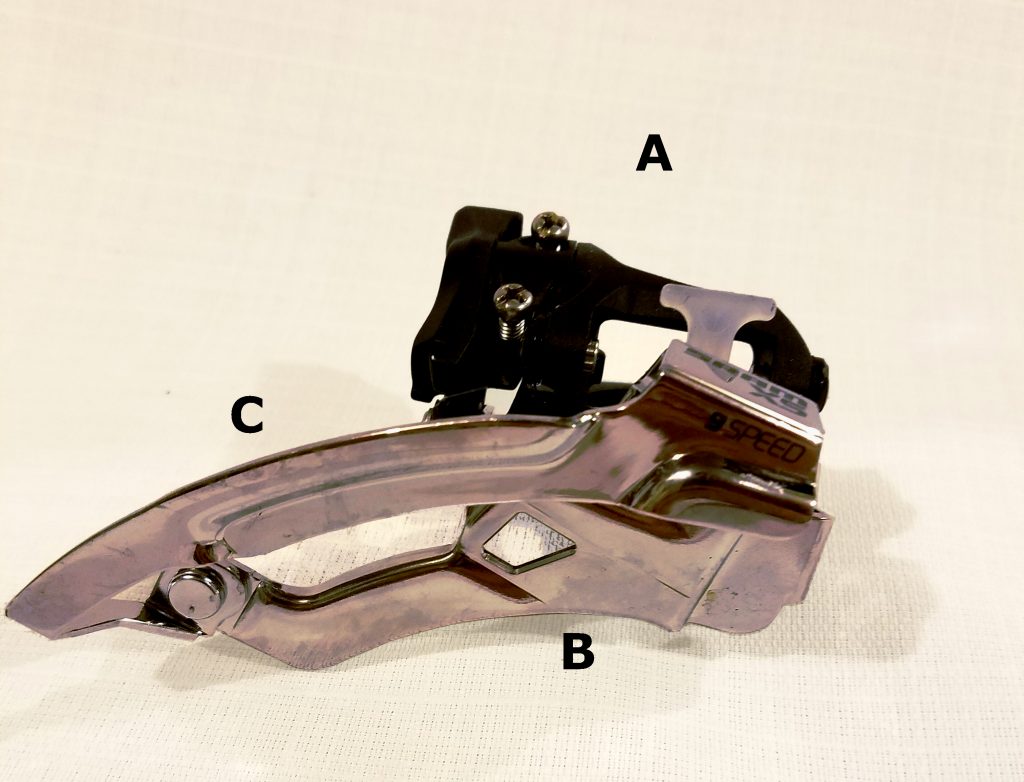
Front Derailleur parts
Limit screws (A) – The front derailleur needs to work within the largest and smallest ring. Limit screws work to stop the front derailleur from shifting outside of its intended range. They are adjustable as to match different types of cranks.
Derailleur Cage – The cage is what holds the chain on gear and what presses on the chain to move it from one gear to the next. The outer portion of the cage (C) is what helps the chain move from larger gears to smaller ones. In contrast, the inner portion of the cage (B) forces the chain from smaller gears to larger ones.
Common parallelogram front derailleur found on Hybrid and Mountainbikes
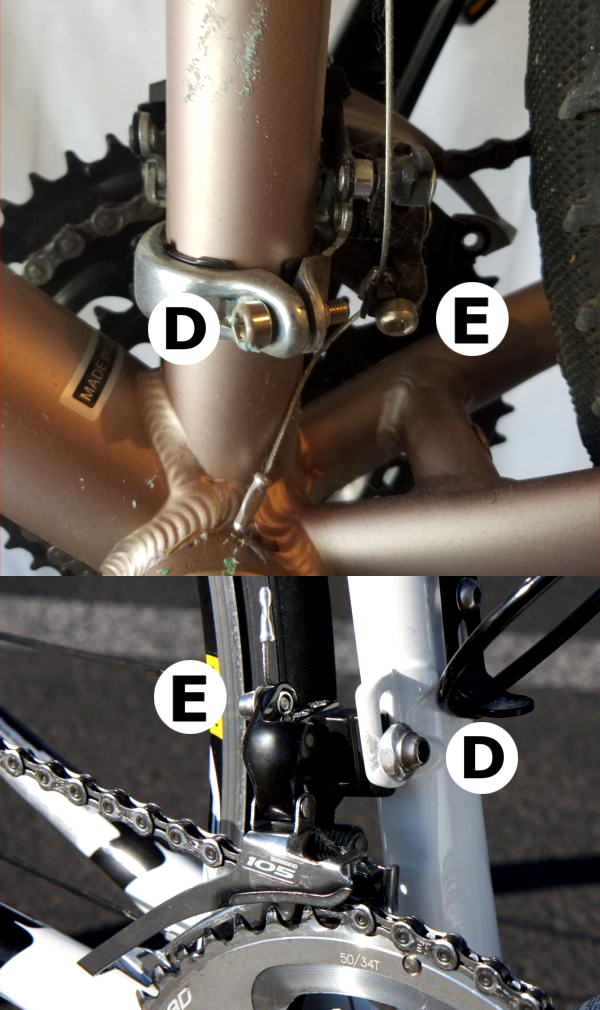
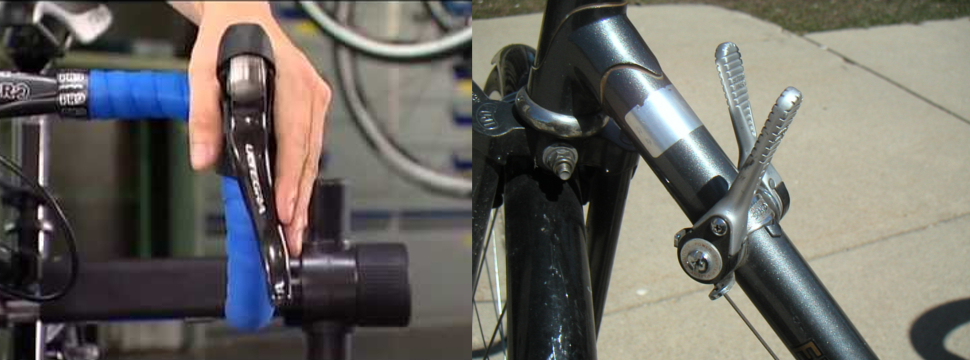
Derailleur Fixing Bolt (D) – The bolt that holds the derailleur in place on the frame. By loosening this bolt, you can re-position the derailleur for angle and height.
Cable Pinch Bolt (E) – The Cable that controls shifting needs to be held firmly in place. The pinch bolt does that job.
Different Pinch bolt and fixing bolt position for MTB/Hybrid (above) and Road (below) derailleurs
Location, location, location
You guessed it, the most important part of adjusting the front derailleur is its location. If the derailleur is not positioned properly, you will never achieve proper, noise free, shifting in all gears. The reason location is so important is that the front derailleur cage is formed to position the chain in very specific locations.
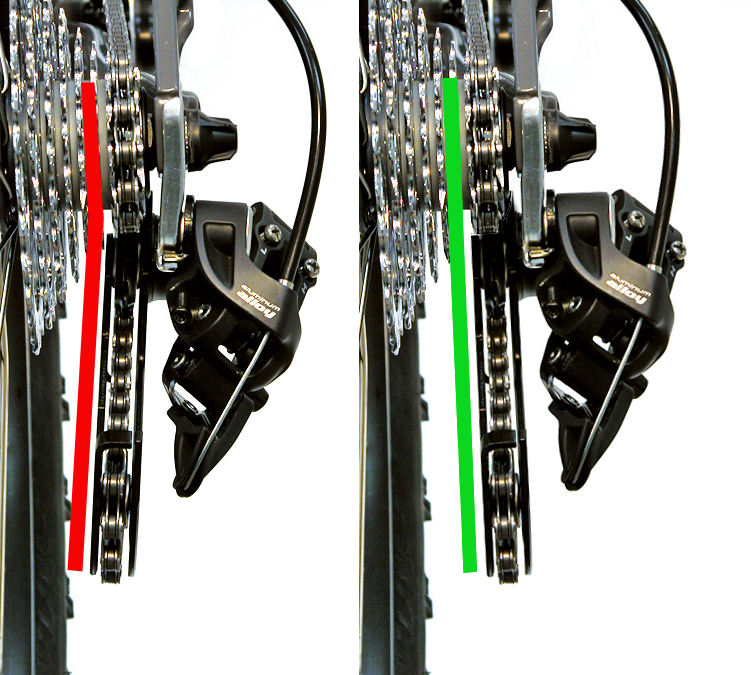
First step in adjusting the front derailleurs location is to set its height. You need enough room to fit a Nickel between the teeth on the largest chainring and the bottom of the outer cage when they are lined up. Any more clearance than that and the derailleur tends to have issues pulling the chain down from larger gears.
you should be able to fit a Nickle between the derailleur cage and chainring
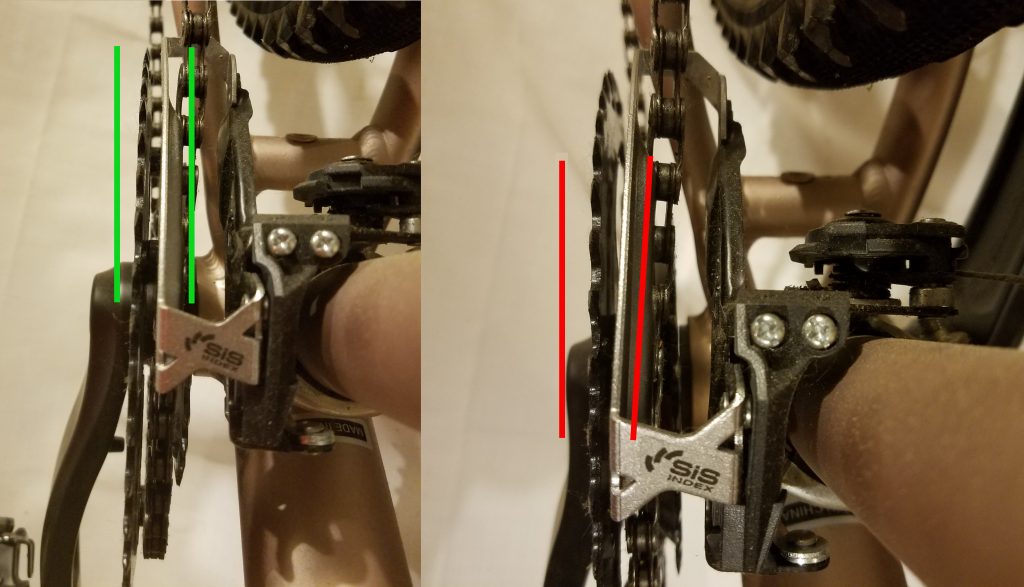
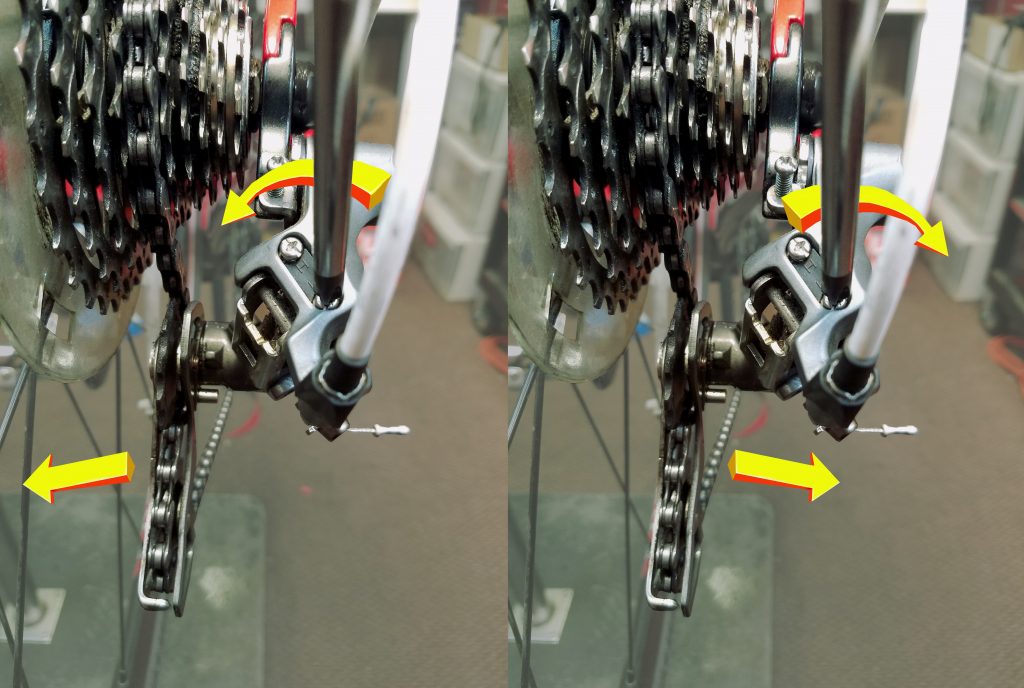
Once you have the height set, adjust the angle of the front derailleur so that the outer cage and chainrings are parallel. Any misalignment will result in poor shifting and excess noise.
Proper alignment on the left, and misalignment on the right
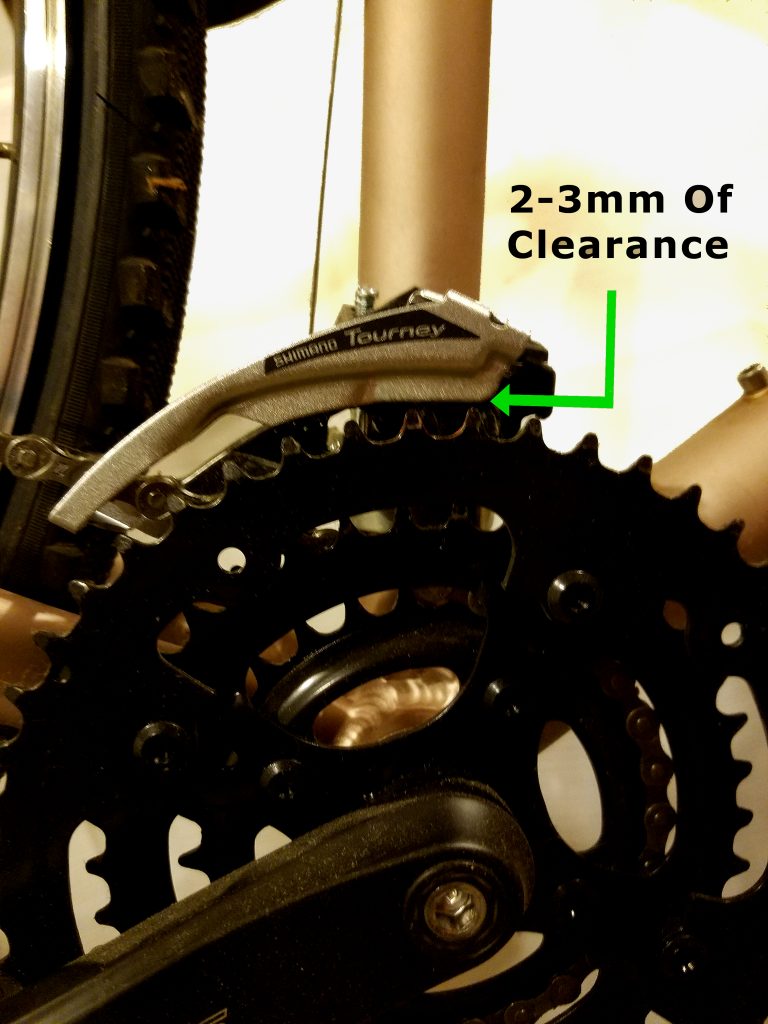
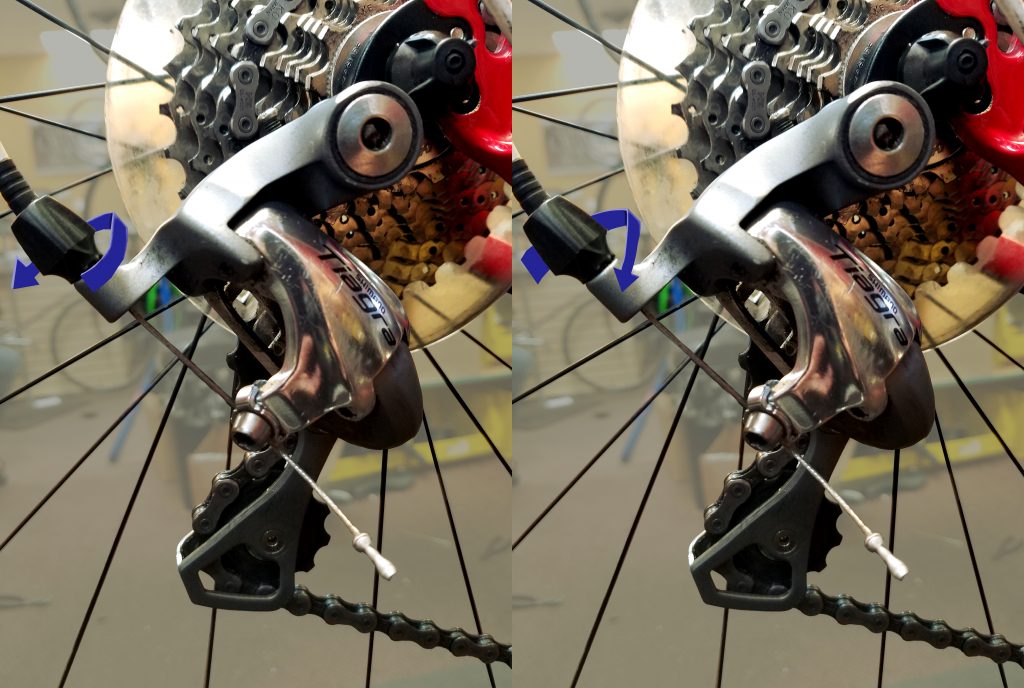
Lower Limit
Set the lower limit by adjusting the screw marked “L”. To do this, shift the rear derailleur all the way up into the largest cog. Next check to see if there is clearance between the chain and the front derailleurs inner cage with the chain on the smallest chainring. If the chain is running on the inner cage, thread the limit screw out until you have 2-3mm (that nickel distance again!) between the chain and inner cage. When the opposite is true and you have too much clearance between the inner cage and chain, thread the limit screw in until there is 2-3mm of clearance.
Cable tension
Your Front derailleur should be properly aligned and the lower limit should be set at this point. The next step is to attach the cable to the Pinch bolt. Attach that cable by first making sure your shifter is in its lowest gear, Then pull the cable tight, and finally tighten the pinch bolt onto your cable. Usually, you can shift smoothly up from the smallest ring into the next gear right away, but if there is hesitation going up add cable tension either through a barrel adjuster or by loosening the pinch bolt, pulling the cable tighter, and tightening the pinch bolt down again. If the chain wants to shift up from the small ring over the next ring, release some tension. You know you have it right when the chain can pass from one gear to another smoothly and confidently without any banging or skipping noises.
Upper Limit
Setting the upper limit is as easy as getting the chain onto the largest chainring and threading the limit screw to offer 2-3mm of clearance between the chain and the outer cage. While shifting, ensure the chain cannot be shifted over the large ring and off the crank.
Trouble shooting
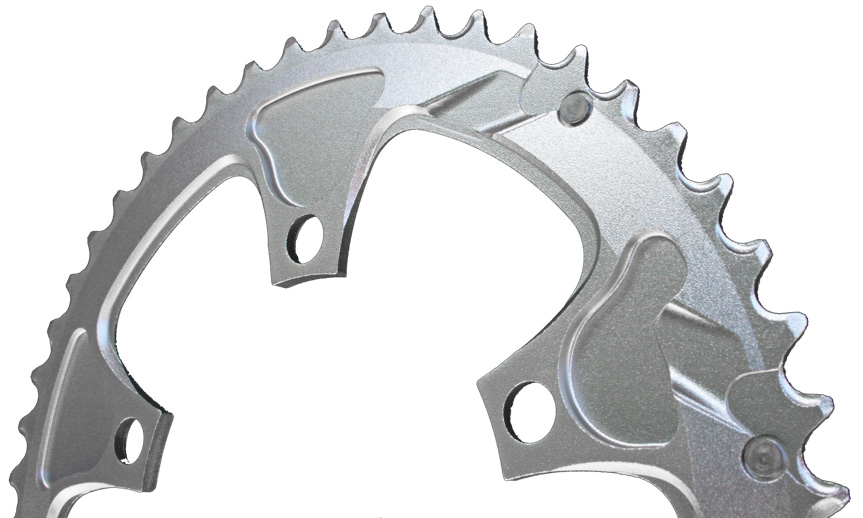
This guide is great if all the parts are new, but won’t overcome many issues related to worn or dirty parts. The most common shifting issue with older gears is poor upshifting. Chainrings are built with ramps on the inner surface to easily guide the chain from smaller to larger rings. As chainrings wear, these ramps wear as well. If you are having serious issues going from smaller to larger gears, but the gears are silent and problem free otherwise, you may want to consider replacing the chain, chainrings, and gears in the rear.
These Praxis Works chain rings have some of the best shifting thanks to carefully placed ramps.
Another key wear item is the front derailleur itself. Derailleurs are designed to pivot off a parallelogram design that requires each pivot run smooth and precisely. As the Front Derailleur wears, these pivots can begin to bind, while they generate play, leading to poor shifting.
Finally, dirty or corroded cables are a key cause in poor shifting. Replace cables once a year and lube them intermittently to keep them running smooth and freely.
When is enough, enough
Working on your bike is fun, but can be frustrating if things aren’t going according to plan. When things get out of hand, don’t be afraid to start from scratch and go back to step one. Any missed initial steps will make further steps impossible to complete. Also, remember that if it gets too tough, your local bike shop is happy to walk you through the process. You will pay a fee, but the one on one instruction is well worth it.
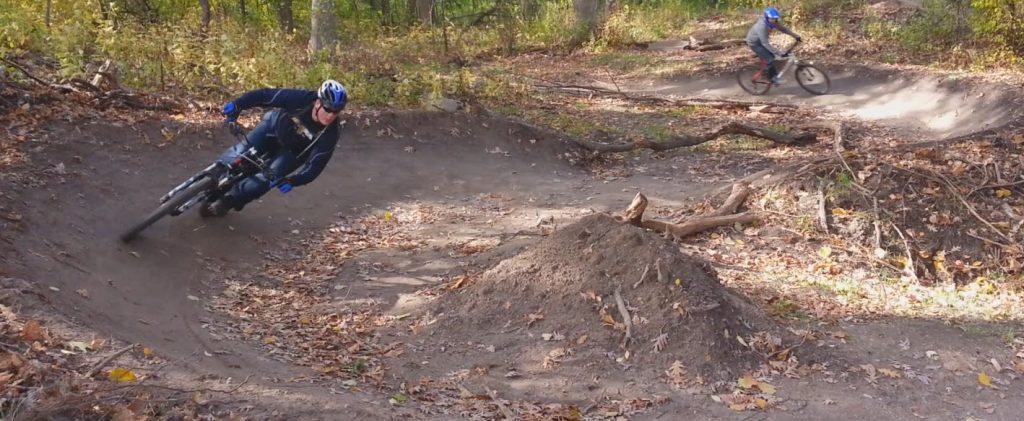
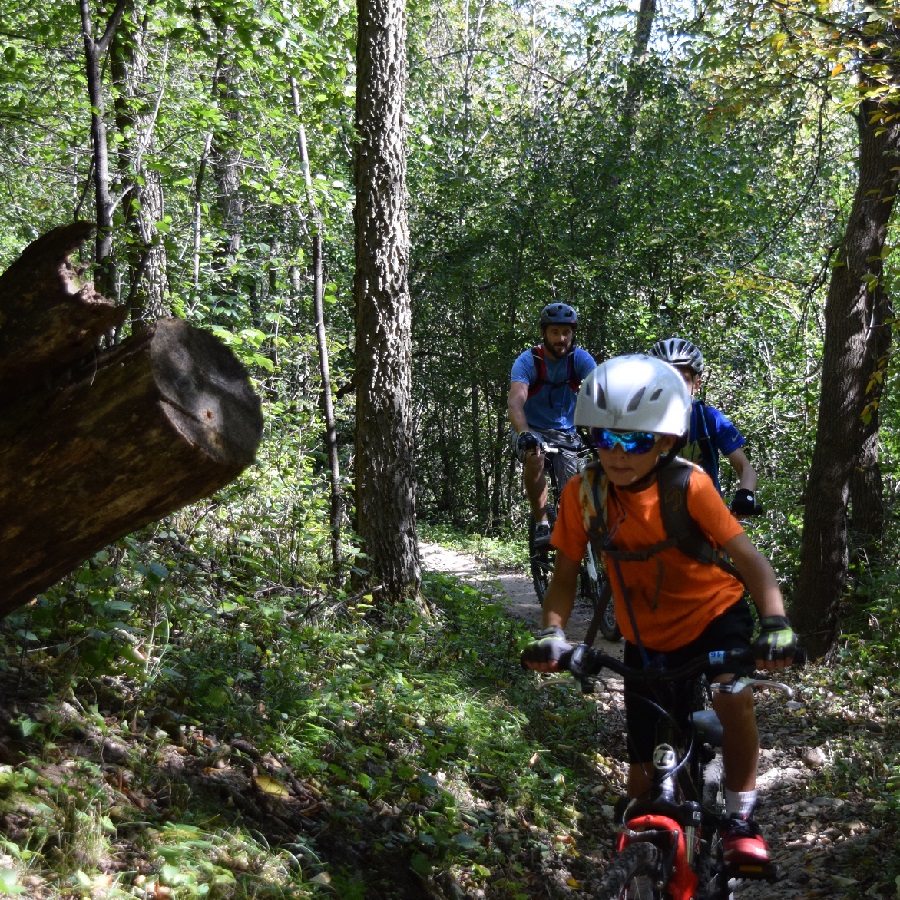
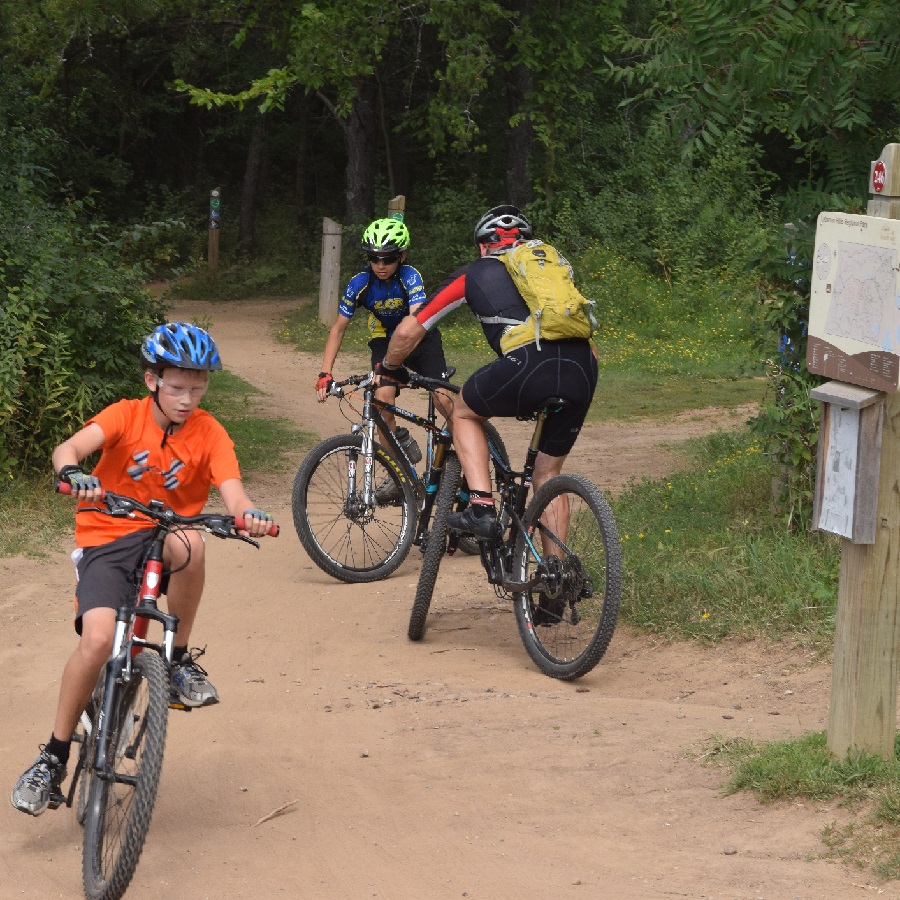
The newly expanded trailhead of Lebanon Hills acts as a gateway to some of the most enjoyable trails in the Twin Cities Area. With nearly 12 miles of one way singletrack trails, Lebanon Hills has become one of the go-to trails in Minnesota. The trails feature riding for all skill levels combined with world-class facilities to enhance your riding experience. All the bike trails are built and maintained by the Minnesota Off-Road Cyclists (MORC).
Where Lebanon Hills is
Another happy mountain biker riding through the forests of Lebanon Hills Park.
The Lebanon Hills Mountain Bike trails (Leb to the locals) are located in Eagan Minnesota off Johnny Cake Ridge Road. The newly expanded trailhead boasts ample parking, clean bathrooms, public grills and picnic areas as well as a skills course appropriate for all ability levels. Leb is a part of the larger Lebanon Hills Regional Park system that includes two swimming lakes, nearly a dozen hiking areas, three camping areas and close proximity to the Minnesota Zoo.
What to expect in Lebanon Hills
The first thing you will notice about riding in Leb is the amazing condition of the trails. Thank the Minnesota Off Road Cyclist organization (MORC) for the smooth berms, clear trails and exciting features. Ride into the first trail and enjoy the sweet smell of pine trees while you wind through a healthy forest. First, you are given the choice of staying on the beginner trails or hanging a hard right onto the intermediate loop. Staying on the beginner trails will lead you to five 8’ tall berms that are a total blast to ride. From those berms you can branch off into another intermediate loop or head into a skills section that including a berm, roller, and jump line.
Another fun run through an open meadow in Lebanon.
If you choose that first right onto the intermediate loop, you are rewarded with twisty sections, a rock drop, and high speed downhill sections. That intermediate section brings you out to the far end of the park. Once out there, you can enter into the truly advance loops built on rock gardens, step climbs and steep descents. The trails on the far side of the park meet at one point, perfect for a quick break between loops.
Here on the advanced trail in Lebanon Hills you will find some obstacles to challenge you.
Best part of the trails
Leb gives its riders amazing trails as well as awesome views. The best part of Leb is how well it integrates into nature. Even though the trails of Leb are well trafficked, Places like the “lake loop” give the impression of sanctuary for hundreds of riders a weekend. Because all the trails are directional, there is a great feeling of isolation even though other riders may be just a few hundred feet away. Overall, Lebanon hills is a great way to enjoy the beauties of nature in the Twin Cities area.
Here in Lebanon Hills is a place for all ages to build on their skill levels.
How to help
If you ride and enjoy the trails at Leb, consider volunteering for trail maintenance. The Minnesota Off Road Cycling organization (MORC) schedule trail work sessions on Tuesdays through the summer. The group meets in the parking lot at 6 O’clock and welcomes anyone interested in helping. Wear long pants, boots, and work gloves because you will be doing hard labor. You will find that the hard labor is enjoyable because you are giving back to fellow riders.
Best seasons to ride
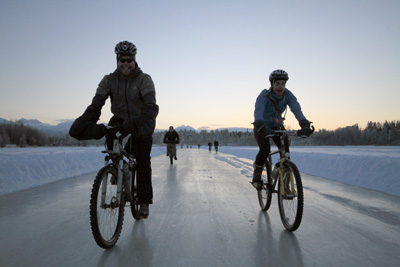
Those with fatty’s are finding Lebanon Hills the perfect trail system year round.
If you love the trails at Leb during the summer, rejoice, they are open through the winter as well. Not only are the trails open when the snow falls, but well traveled. Because of that traffic, the trails stay clear and ride-able right up until the spring thaw. With that said, once the thaw begins, the trails are usually closed for about six weeks while things dry out. A quick check on MORC’s trail conditions website will let you know when the trails are open.
It goes by many names, the rear derailleur. It is also known as the “s,” the “hangdown,” or the mech. Here in the U.S. we refer to it as the rear derailleur. The device that moves your bike’s chain from gear to gear letting you traverse hills with ease. Even though derailleurs are sturdy and relatively maintenance free, they do require attention occasionally. Look below for the step by step instructions on how to adjust your bike’s rear derailleur.
Rear Derailleur Terminology
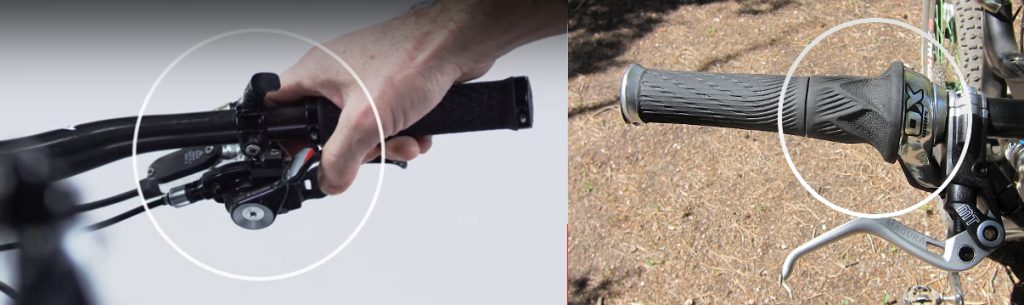
Twist shifter – A shifting device that rotates around the handlebar like the throttle of a motorcycle.
Trigger shifter – A Shifter that activates by pushing or pulling a set of paddles with your thumb and index finger.
STI shifters – Technical this stands for Shimano Total Integration and speaks directly about one brands type of road bike shifter, but it has become the generic term for any drop bar shifter/brake lever combo.
Thumb shifter – A shifter that can be mounted in many places like; the stem, bar end, brake lever, or top of the bar. These shifters are the most rudimentary type of shifter, and operate by simply actuating a lever with your thumb.
Derailleur parts
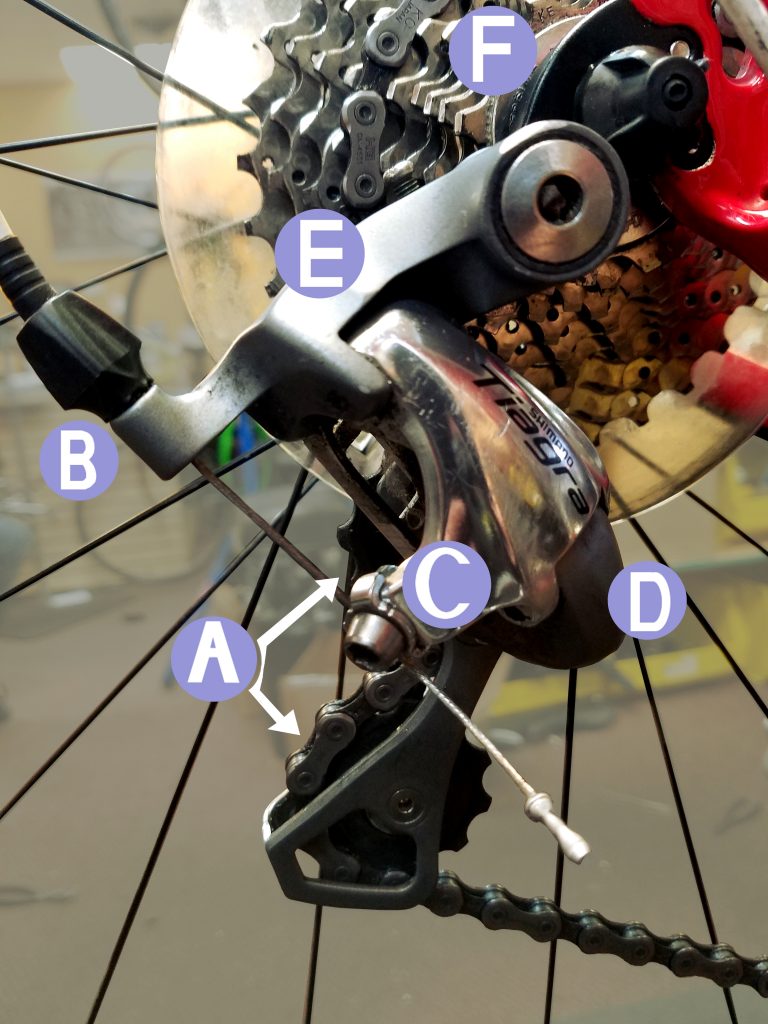
(A) Jockey Wheels- two small wheels on the derailleur on which the chain run. They are mounted onto the derailleur cage
Limit screws- The limit screws control the area of motion a derailleur has. On most derailleurs there are three limit screws: the upper limit, Lower limit, and B-limit. The upper limit screw sets the maximum distance the derailleur can shift in high gears. The lower limit screw sets the maximum distance the derailleur can shift in the lower gears. The B-limit screw sets the distance the upper jockey wheel sits from the cogs.
(B) Barrell adjuster – This is an adjustment device on the back of most derailleurs. It is the area where the derailleur cable enters the derailleur and can increase or decrease the cable tension by threading it in and out.
(C) Pinch bolt – The pinch bolt is where the derailleur cable gest secured.
(F) Derailleur hanger – The portion of the bike frame where the rear derailleur is mounted.
Not defined above is the Upper Knuckle (E), and lower knuckle (D)
Is everything straight?
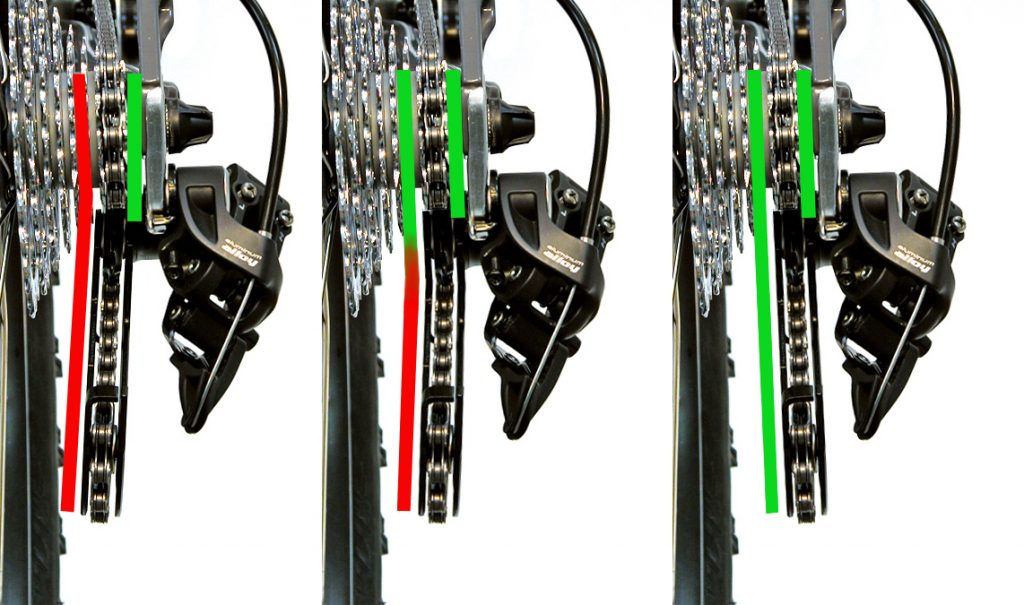
The cogs your rear derailleur shifts across can have as little as 2.14 millemeters of spacing between them. Considering the spacing is so narrow, look to see that everything is aligned properly before you start adjusting your rear derailleur in vain. Look first at the derailleur itself from behind. You should be able to see if the derailleur itself is aligned properly. A tell-tale sign of damage is when the two Jockey wheels don’t line up with the cogs or each other (see picture).
Next assure that the derailleur hanger is aligned properly. This is easily seen when the derailleur appears straight, but not in line with the cogs. Consequently, if either the derailleur or derailleur hanger are bent, it’s best to take it into your local shop for a remedy.
Step 2, A man has got to know his limitations
Before attempting to adjust the derailleur properly, set its usable range. First, loosen the pinch bolt and let the derailleur run on the smallest cog. Next, pedal forward while visually and audibly inspecting how the chain runs on the smallest cog. The chain should run smoothly without any clicking, or skipping noises. If it runs smoothly, don’t worry about the upper limit. when you do experience skipping or noise, look closely at how the chain runs on the cog (looking from behind is easiest). If the chain isn’t coming directly off the upper jockey wheel and going straight onto the small cog you need to adjust the upper limit. By threading the limit in or out you can adjust where the derailleur sits in relation to that smallest cog (note: the limit screws don’t need to get “tightened” down, they simply act as a stop for the derailleur).
Once the upper limit is set, pedal forward and push on the derailleur lower knuckle until it moves the chain into the largest cog. If the chain has issue getting into the largest cog, or jumps over that cog into the wheel spokes, you need to adjust the lower limit screw in a similar fashion to the upper limit screw.
Rear Derailleur Tension
With the limits set, you can now move on to tightening the cable and trying to shift. Make sure the shifter is in its lowest gear by shifting down while gently pulling on the shift cable. With the shifter in its lowest position, ensure all housing ends are settled into the frame properly then pull the cable taught through the derailleur. With the cable taught, tighten the derailleur pinch bolt onto the cable. Trim any excess cable so that only about one inch of cable extends beyond the pinch bolt and crimp it off as not to fray.
While pedaling, shift one gear up. Ideally, the chain will easily move from the smallest cog up to the next cog. It should stay on the second cog and run quietly and smoothly. If it hesitates to get to the second cog, increase cable tension by rotating the barrel adjuster out. If you cannot increase tension enough with 3 or 4 turns of the barrel adjuster, thread it back in, loosen the cable pinch bolt, pull the cable taught, and tighten the pinch bolt again. Once you have the chain shifting up the cogs easily, check to see if it will smoothly move back down the cog stack by shifting from the largest cog down and inspecting. The only difference is in the adjustment. If the chain hesitates to move down the gears, turn the barrel adjuster in (relieving cable tension).
Rear Derailleur Trouble shooting
What happens if you can get the chain to move up the cogset well, but can’t get it to move back down the cogset easily. In some cases, the cable and housing can be corroded and causing drag. This drag won’t affect the shifting moving up the gear set, but it will stop the derailleur from returning. In tis case, you can clean and lube the cables and housing, or just replace the cable and housing all together.
Additionally, there may be a grinding/banging noise in only the largest cog. That noise is caused by the upper jockey wheel running on the largest cog. To remedy this, tighten the b-limit screw until the noise subsides.
Finally, a common problem is if you get skipping while pedaling up steep grades or under load. If your derailleur is adjusted properly, and you’re getting skipping, it may be related to a worn out drivetrain. As your chain ages, it stretches slightly. As the chain stretches, the front face of the gears will wear in unison with the chain stretching. Once the chain stretches beyond the point where it will mesh with the gears, you will experience skipping under load.
Working on your own bike is fun. Also, your appreciation for the technology and engineering that goes into what is considered a simple machine will grow with each turn of the wrench. Periodically, you will run into a problem you cannot solve. If that is the case, bring your bike to your local shop, talk honestly with the mechanic about what you tried and what you are trying to accomplish. As a result, you will find that most mechanics will be happy to teach you what you need to know.
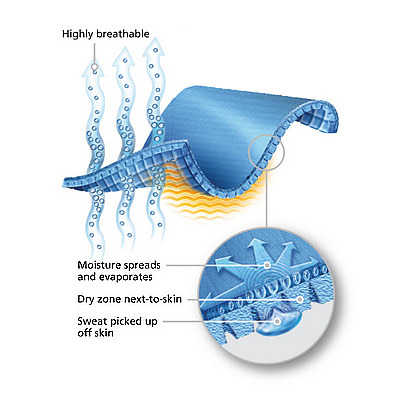
This is the time of year where the days are long, hot and the sweat begins to pour into your bike gear. While we spend a lot of time focusing on bicycle clothing like shorts, jerseys and gloves, we sometimes overlook how to keep them clean. They absorb our sweat, act as an impromptu tissue and sometimes clean grease and dirt off our bikes. While your gear is still soaked with sweat, let’s review some great tips for cleaning those articles in your bike bag.
Along with sweat and other body fluids, wet weather can also play a toll on your bike gear.
Most cycling apparel is made of synthetic material that can be machine washed. The only time where very special care needs to be taken is with your gloves if they use natural leather palms. For the most part though, it’s a good idea to review the manufacturers recommendation before you wash any cycling gear.
Why does bike gear and clothing need to be cared for differently
Cycling clothing and gloves use fabrics woven specifically to quickly move perspiration off you. Additionally, these materials are designed to glide and stretch comfortably over your body while riding. So to keep these synthetic materials in the clothing clean, special care needs to be taken so the material breaths properly.
When washed incorrectly, cycling clothing won’t preform properly. The fabric that should move moisture off your body may become clogged. So rather than moving moisture away it will trap it against your body making your gear wet and sticky. Also, washing synthetic fabrics in the wrong conditions can make what was once a soft and flexible material rough and brittle.
Tips to wash bike gear
Keep it cool. Try to avoid excess heat when washing and drying your cycling clothing. In my experience, heat from washing and especially drying can transform soft materials into feeling harsh.
Use a perfume and dye free detergent. There are several types of detergents on the market that will clean your gear. For the best results look for a product like Tide (free & gentle). This product will not clog the moisture wicking properties and will neutralize the bacteria that creates odor.
Cycling clothes use delicate materials that can be damaged easily. To avoid damage, zip up zippers on your jackets, jerseys and tights, and close Velcro on gloves and shorts. Additionally, if you are machine washing, be sure to run the delicate cycle as to avoid harsh agitation. For the same reasons, resist the urge to throw your gear in the dryer, hang them to dry instead.
Cleaning on the go
On trips when you don’t have access to washing machines, There’s no need to just endure dirty and smelly clothes. I find it easy to clean cycling clothes while showering after a long day. Use a dime size drop of detergent and scrub your gear, then rinse it with fresh water. Because cycling gear dries so fast, you can just hang it up and it should be dry and clean for the next day’s adventure.
It’s no secret that cycling gear is expensive, but, with a little effort it can work well for a long time. Beyond avoiding crashes, the best thing to do for your gear is wash it properly.
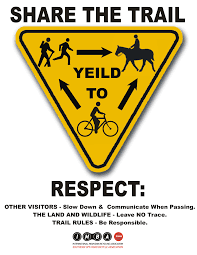
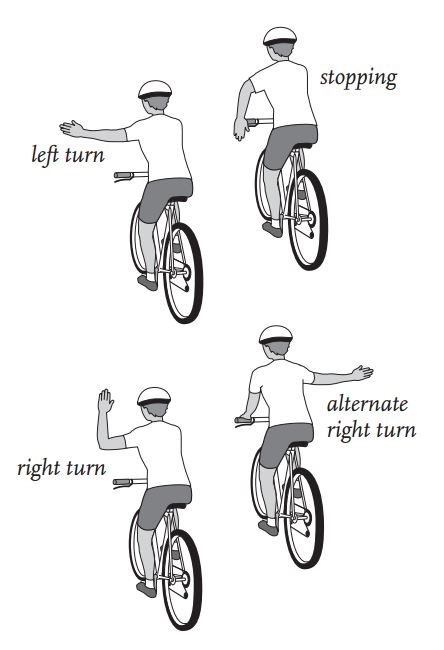
Did you know that bicycle traffic laws are different in many states? While these laws guide how you should operate on your bicycle, they also regulate how drivers should treat you. Laws are designed to keep both drivers and cyclists safe. Then there is offroad riding and most trail systems have guidelines that match up with the published list of rules from IMBA (International Mountain Bicycling Association). Beyond the laws and rules, we should also employ some common courtesy toward each other on both the road and trail.
Offroad Courtesy To Other Riders
Courtesy offroad is all about sharing the trail, leaving the environment as pure as possible, and not negatively impacting others experience. The simplest way to share the trail is to maintain control. Careening down a trail at Mach 5 with no ability to stop in time is a quick recipe for disaster. If you can’t control yourself, you are more prone to run into others or at the very least scare them. In order to maintain the environment, consider the trails off limits when wet. Trail systems that are wet are far more susceptible to damage from riders by leaving deep ruts in the dirt. In addition to leaving ruts, leaving any trash behind is unacceptable as well. Take care to pack any trash, like powerbar wrappers, inner tube boxes, or gel packs out with you. Finally, be concerned with others experience. There is nothing easier to reach that goal than to yield the trail when appropriate. If an overtaking rider wants to pass, slow down and make room for them to get by. When others are climbing up a steep grade, wait at the top of that trail for them to pass, before heading down.
Trail Courtesy To Other Riders
Be courteous on the trail especially when a one-way merges into a two-way.
While riding on the bike paths, small amounts of courtesy can go a long way to keep you and those around you safe. To begin, always pull off the trail when stopping. Making yourself a big roadblock in the middle of the trail puts all those who must get around you at a risk. Don’t assume others know where you are going, hand signals help for those looking, but also feel free to tell people (especially people you are passing) what is going on. A simple “on your left” can make a pass far safer.
Road Courtesy To Other Riders
While stopping along a road pulling off to the shoulder is being courteous to motorists and the safest thing we can do.
Road riding courtesy is most needed when riding in a group and drafting. Safety in a group is about two things – Consistency and communication. For Consistency, be sure to ride a steady line, don’t swerve from side to side. Also, try to keep a consistent pace, If riders are drafting behind you, it can be difficult and tiring if you constantly speed up and slow down. For communication, be sure to signal If you are stopping, where debris in the road is, and what direction the group is turning.
Trail and Road Courtesy To Traffic
Courtesy to traffic is as easy as being predictable. Try to ride at the same distance from the curb as consistently as possible. Also use hand signals when turning, and be clear when stopping (by placing your open palm down at your side). Using a bell is also a great way to signal your approach to parked cars. Ultimately, you want drivers to know where you are and where you are going so they can make safe choices as well.
Keeping Yourself Safe
Riding courteously is just another way to keep you and those around you safe while riding. Once you begin to employ these tips, and make them second nature, you will find that your rides become less stressful. Eventually, I hope you help remind others what courteous bike riding can do for everyone.
Please pass this information on to friends and family – Thanks!
Riding and maintaining your road bike can be easy with some basic maintenance and by practicing the right skills. Plus, while you ride your bike, you should do everything you can to feel comfortable. That includes the right fit, the right clothes, and above all else, the right touch points. Touch points on a bike are anywhere your body touches the bike (specifically hands, feet, and saddle). The easiest touch point to freshen up on your road bike is the bar tape. Read below for a step by step instruction on installing bar tape.
How to Start Installing New Bar Tape
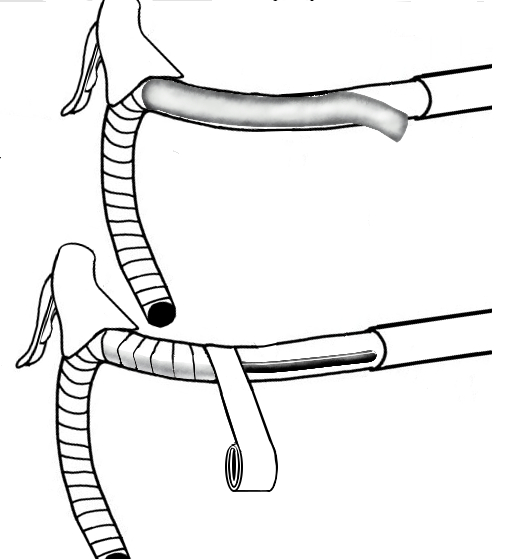
The first choice you have when wrapping your bars is, will you wrap from inside out, or outside in? Either choice is fine as long as you start from the bottom of the bar rather than the top. Wrapping from the top down, will position the edge of the bar tape so it easily unravels with normal use.
The bars on the left are being taped from inside to outside, while the ones on the right are going outside to inside.
To begin. position the end of the bar tape about 50% off the end of the bar. While holding the end of the tape tightly, begin stretching the tape and winding it around the bar. When winding it, make sure that each section of tape, covers 25% of the previous wrap. It is important to stretch the tape. While most bar tapes have an adhesive backing to help hold itself in place, stretched tape will constrict around the bar as you wrap it, and stay in place better.
From left to right you can see how to start, how to wrap the tape, and the hood clamp detail
Wrapping levers
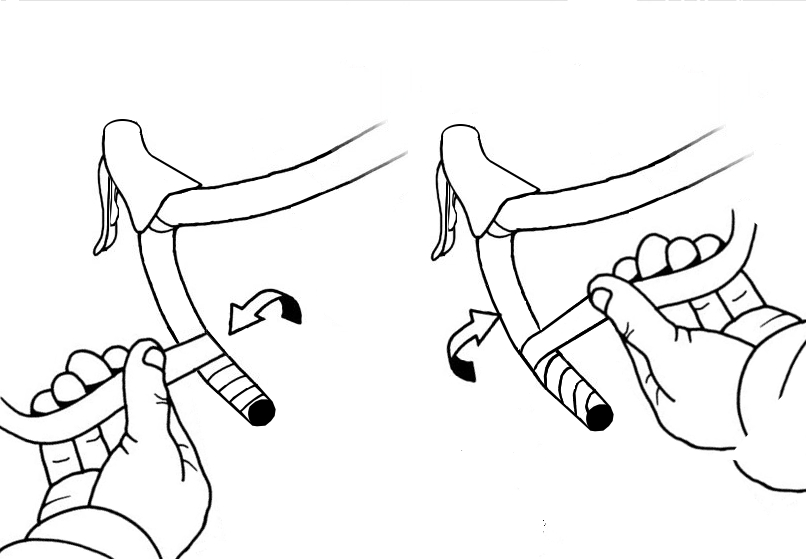
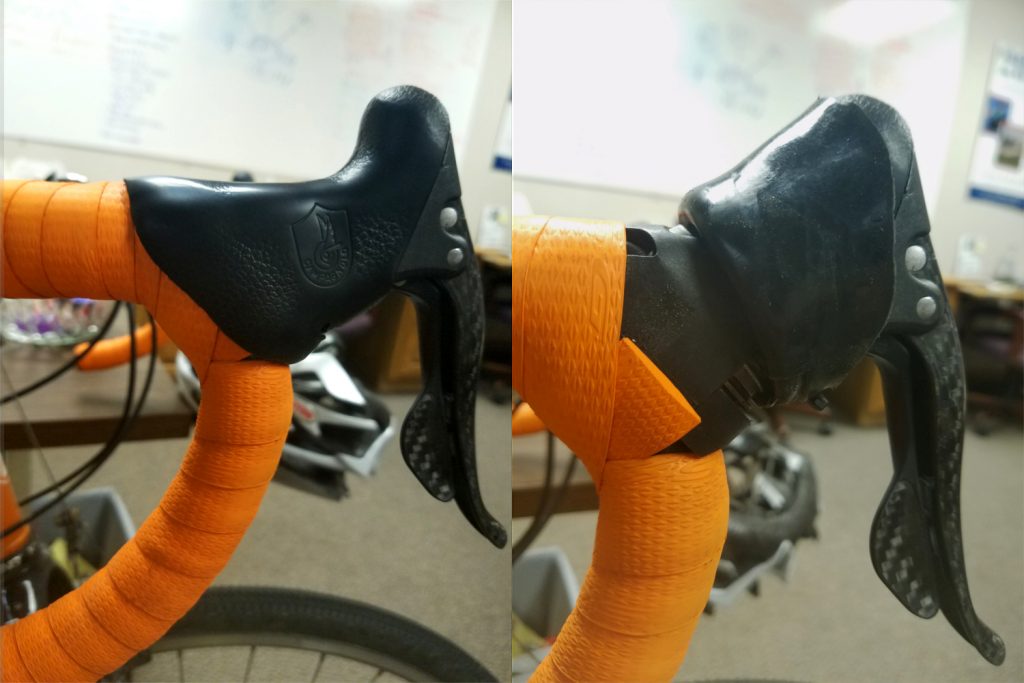
While winding the tape up the bar, the only real difficulty is the brake hoods. First thing you want to do is flip the back of the brake hood forward, exposing the hood clamp band and a portion of the hood body.
The soft rubber hoods flip forward to tape bars, or replace cables
The most common ways to wrap around the hood are either, maintain the standard, spiral, winding pattern, or wrap the lever in a figure 8 pattern. For a standard wrap, first place a small piece of bar tape to cover the clamp band, then continue wrapping up the bar. For the figure 8 pattern, start winding as normal, once the tape gets over the hood, wrap the tape back down the side of the hood winding it around the bottom of the hood and crossing the tape in a figure 8 pattern across the back of the hood strap. You have done it correctly if no bar is showing once you flip the brake hoods back into place.
On the left, the tape is being wrapped in a helical fashion while the bar on the right is using a figure 8 pattern
Finishing Your Bar Tape
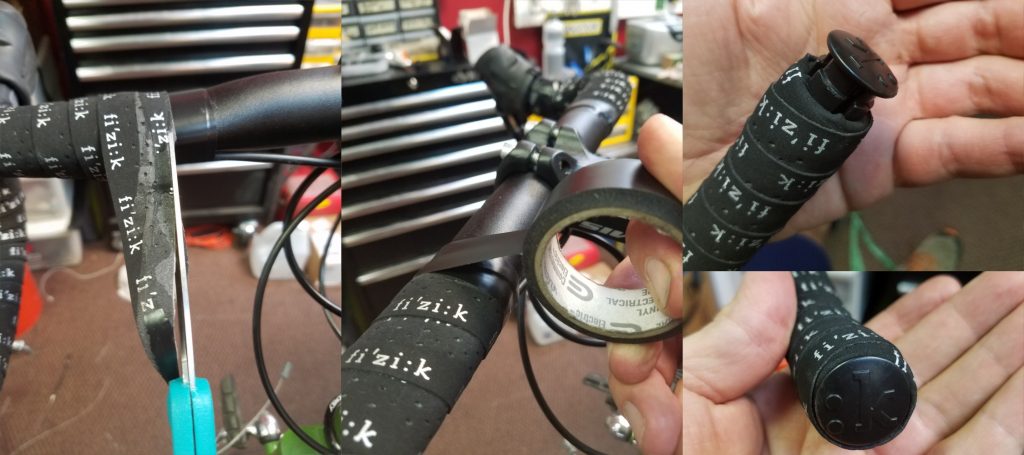
Once you have taped up the bar, past the hood, and are about 2” from the stem clamp, it is time to finish the tape. Most bar tapes come with vinyl finishing tape to hold the tape in place. Whereas bar tape is quite flexible finishing tape is a lot more ridged. When cutting the bar tape, cut it on an angle so that when wrapped, it leaves a sharp flat edge. Before using the finishing tape, I find it helpful to use a vinyl electrical tape to secure the bar tape, then wrap the supplied finishing tape on top in the opposite direction. When you have finished taping, go back to the open end of the bar, tuck any spare tape into it, and tap the bar plug into place.
An easy sign of a good tape job is a clean finish and bar plugs that face upright. It’s O.K. to sweat the small stuff!
Tips and Tricks
Before you begin taping the bar, be sure to have scissors, electrical tape, a small section of bar tape, and the bar plug within reach. There is nothing more annoying than getting to the top of the bar and having to let it go (unraveling the bar) and go get scissors or tape. If you want a little more cush, take some spare bar tape and run it length wise along the top of the bar all the way to the hood and wrap over it. This method gives you added padding without increasing the bar diameter too much. If you want to change the profile of the bar you can use some spare brake housing under the tape to give the bar more of a wing profile. Simply secure it in place with liberal amounts of electrical tape.
Simple things like additional tape (above) and a section of spare brake housing (below) can customize your bar shape
Hopefully by following the above instructions your new bar tape will go on quickly and neatly. However, if you don’t have the time or feel uncomfortable visit your favorite bike shop and they can get the feel your looking for.
Most mountain bikes today are coming equipped with a suspension fork, many others are offering suspension for both the front and rear wheel. Additionally, the technology being employed in these suspension systems has become truly amazing. As good as suspension is, it does nothing unless setup correctly. Read on to learn how the right suspension setup can have you riding longer and in greater control.
Suspension Setup Terminology
To properly set up your suspension, it is first important to know what all the parts are called, and what they do. While shaped very different, suspension forks and rear shocks use the same terms and functions
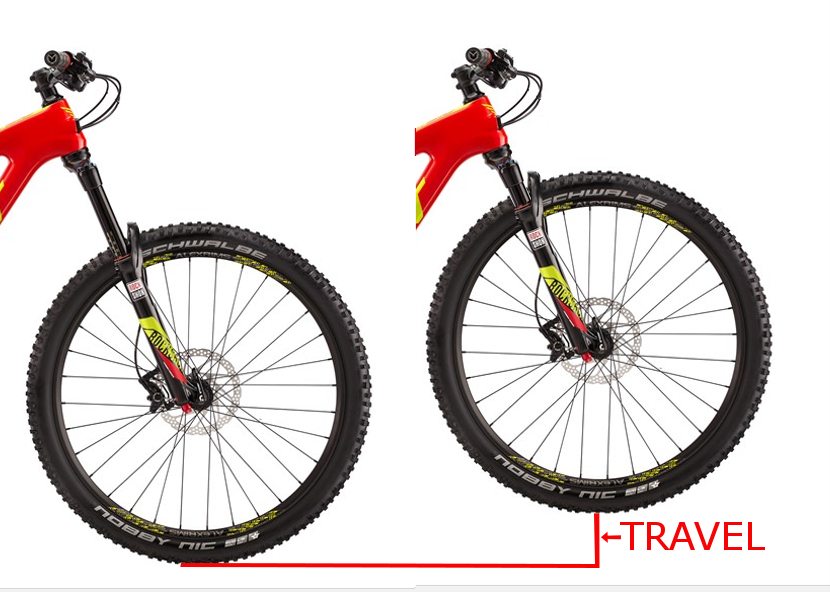
Travel
Suspension travel is simply the distance your wheel can move. On suspension forks, this is easily measured on the fork itself, while measuring rear wheel travel is far more difficult. ON the bright side, most manufacturers publish the amount of rear wheel travel a bike has.
Spring
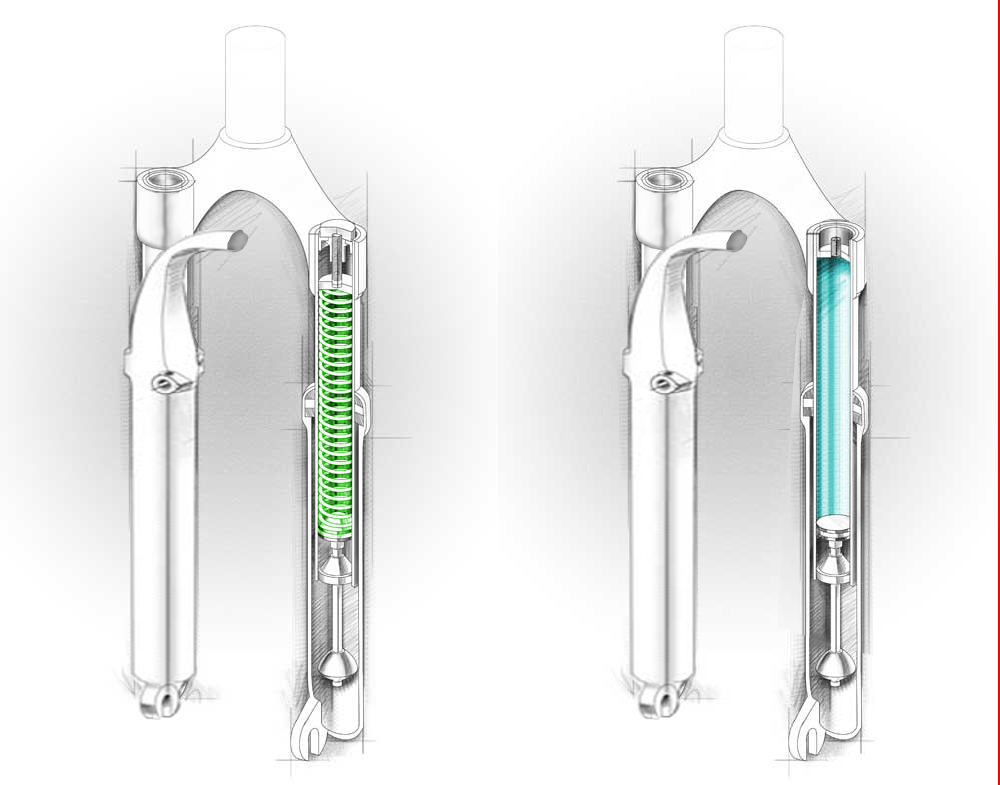
Suspension springs can be made of metal (coil spring) or air. Coil sprung suspension is great because it offers smooth motion from the initial movement to the end of its travel. Air springs are great because they are lighter than a coil, and have a wider range of adjustment (just add air to make the suspension stiffer, or remove it to make the suspension softer). The downsides of an air spring is that they suffer from a greater static friction (stiction) in the initial part of its movement than a coil spring. Additionally, to change pressure in an air spring, you need a specific shock pump.
These cutaway pictures show how a suspension fork works. Coil spring on the left (green) and air spring on the right (blue)
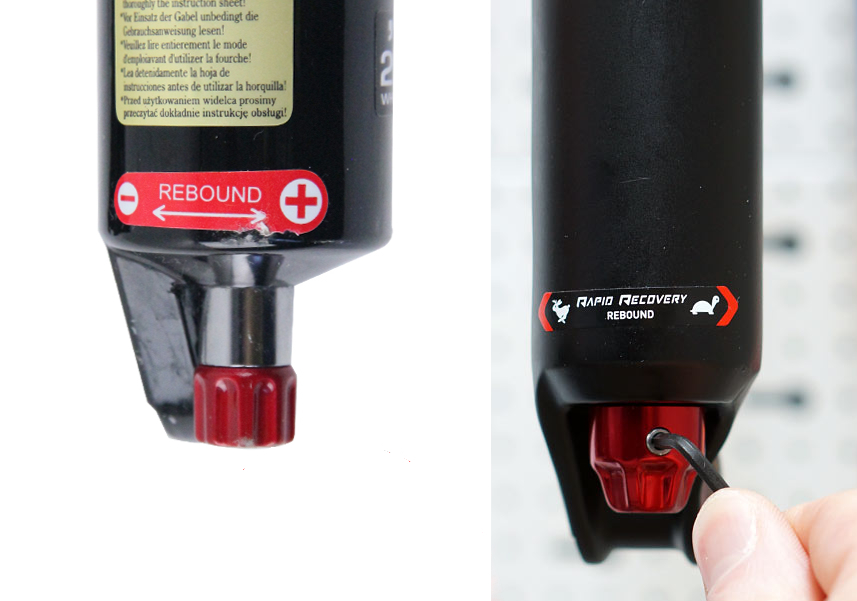
Damping
Damping is a way of controlling how fast the suspension can move. As an example, if a fork is un-damped, it would rebound as quickly as it was compressed, making your bike bounce around the trail like a pogo stick. A damper is the mechanical device inside the suspension that allows it to compress quickly when you hit an object, but return at a controllable rate. Damping comes in two common forms, Compression and Rebound. Compression damping controls how fast a suspension can be compressed and rebound damping controls how fast the suspension can return to full extension.
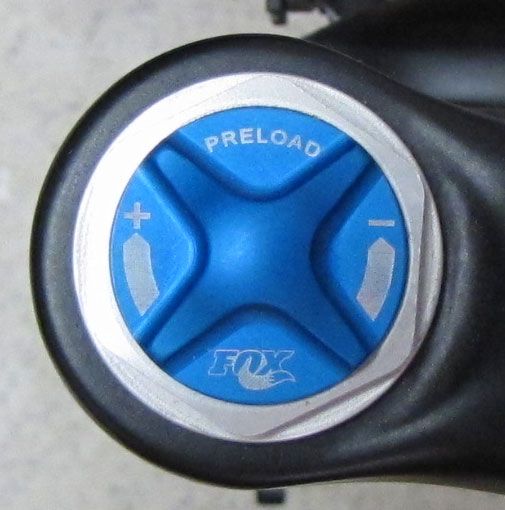
Preload
Preload is a set amount of compression force applied to the spring at its full extension. For instance, a coil spring might have some preload applied if a rider feels their suspension is too active. By applying some preload, you raise the force needed to begin the suspensions movement. In most cases, preload is handled by adjustment knobs on the top of a suspension fork.
Sag
Sag is the amount your suspension will compress when you are seated on your bike. Having some sag allows your wheels to track down into holes in the trail as well as compress if you hit an object. Overall, an optimal amount of sag is between 25-35% of the total travel.
Bottom out
Bottom out is when you compress suspension to its limit. Most suspension is designed with bumpers to protect metal parts from doing damage to one another during a bottom out.
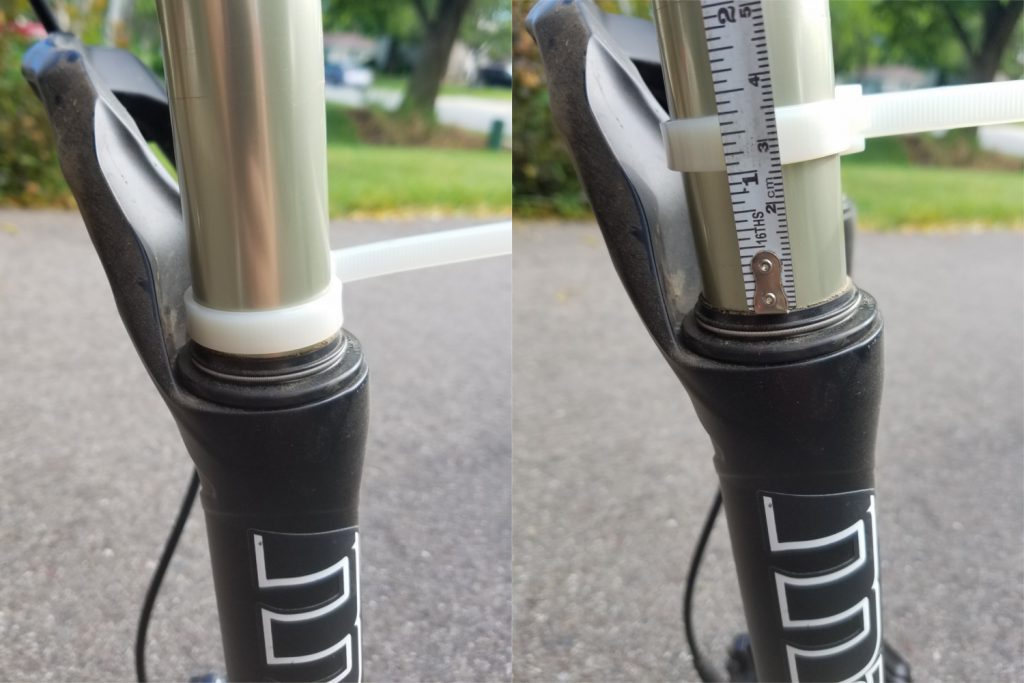
Setting Sag
First, you will need something to mark your sag point. Most suspensions come with a rubber o-ring installed around the fork leg or rear shock. If they don’t have an o-ring, you can use a zip-tie that is loosely installed around the leg or rear shock.
Next, lean the bike up against a nearby wall and get on. Stand on the pedals with your hands on the bar and bounce up and down on the bike a few times. Now sit gently on your saddle with your weight forward (normal riding position).
Now push the o-ring down on the suspension against the seal and get off your bike carefully. You should see is some space between the o-ring and suspension seal (see image). That space is your sag measurement. Like stated earlier between 25-35% of total travel is optimal, so suspension with 100mm of travel should have 25-35mm of sag. If you have too little sag, stiffen the spring, too much then soften it.
The zip tie is flush against the fork seal under the weight of the rider, but when the rider steps off, 25mm of sag can be measured (left)
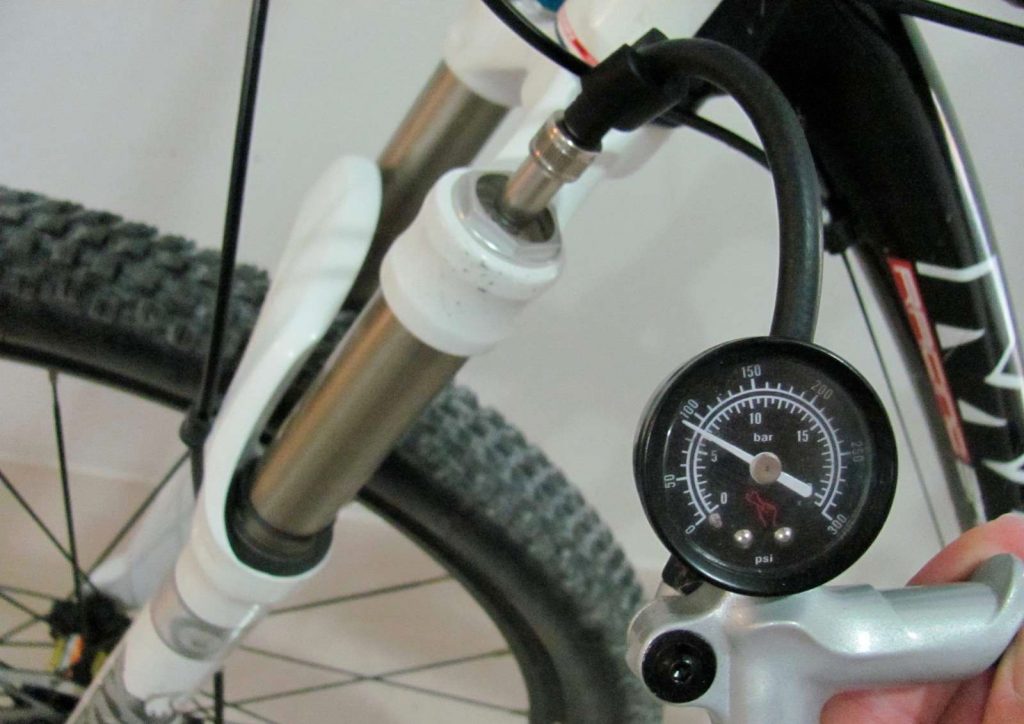
Suspension Setup and Air Spring Adjustment
Most manufacturers have a recommended air pressure based on your riding weight (remember to account for the weight of your gear and pack!). Before checking your sag, start by pressurizing your suspension to those recommended settings. Once you have checked sag, either increase or decrease the air pressure to make your suspension stiffer or softer.
Coil spring.
To adjust the sag amount on a coil spring you have two options. First option is to replace the spring for stiffer or softer versions. Replacing the spring will be necessary if you can’t achieve the proper sag by adjusting the preload setting. To adjust preload, simply turn the knob on the top of the suspension fork to the right to stiffen the fork, or the left to make it softer.
Setting Damping
Most suspensions only offer the ability to adjust rebound damping easily. Compression damping can always be adjusted, but it typically requires some disassembly. To initially setup your rebound damping, first find the adjustment knob usually located on the bottom of the right fork leg. Turn the damping knob to full open (typically represented by a “–“ symbol or a picture of a rabbit). Now, stand over the bars; press down then pull up quickly. You should feel the suspension spring back up as quickly as you compressed it. Turn the damping knob closed a small bit and repeat your compression test. Continue to compress and add damping until you feel the suspension is not quite able to keep up with your hands as they pull up.
Suspension Setup On the Trail
With your suspension setup now at a good starting point, take the bike out on the trail to fine tune it. First thing you want to ensure is that you bottom out your suspension under normal riding conditions a few times per ride. Bottoming out the suspension is a clear indicator that you are using all of your travel. However, be sure you aren’t bottoming out all the time. I know I just told you it’s OK to bottom out the suspension, but if you are doing it more than 2-3 times a ride, chances are you need to stiffen your spring.
If by chance you haven’t slowed the fork’s damping down enough, you will feel as if the bike wants to bounce away through rough sections. An under-damped fork will almost feel like the front end of the bike is trying to get away from you. The solution to this problem is to increase the amount of rebound damping you have.
As you add damping, be concerned with not allowing the fork to “pack up”. When you set your damping, you determined the rate at which the suspension can return to full extension. If your terrain is particularly rough, it is possible to set the damping to rebound slower than you need. As an example, if you go through a rock garden, hitting an object every second that compresses you fork 10mm, you want the damping to allow the suspension to rebound at least 10mm per second. If your suspension can only rebound 7mm per second, you will quickly be riding at less than full travel. The key indicator of this is the fork will feel stiffer through the rough stuff, but soft again when the trail smooths out. If you experience this, speed up the damping slightly until the feeling goes away.
Continuing adjustments
Over the first 6 months of owning your new suspension, never stop focusing on how it performs. As the forks wears in and begins to move more freely, the amount of damping you need may differ. Also, as you adjust your spring, it will slightly change the way your damping works. The best way I can describe suspension setup is as a dartboard. Rather than shooting for the bulls-eye in one shot, you are traveling down a spiral road getting closer to the bulls-eye with every new adjustment. With a little luck and focus, you will realize all the performance your suspension has to offer you.