Cool Products


Latest Product Reviews

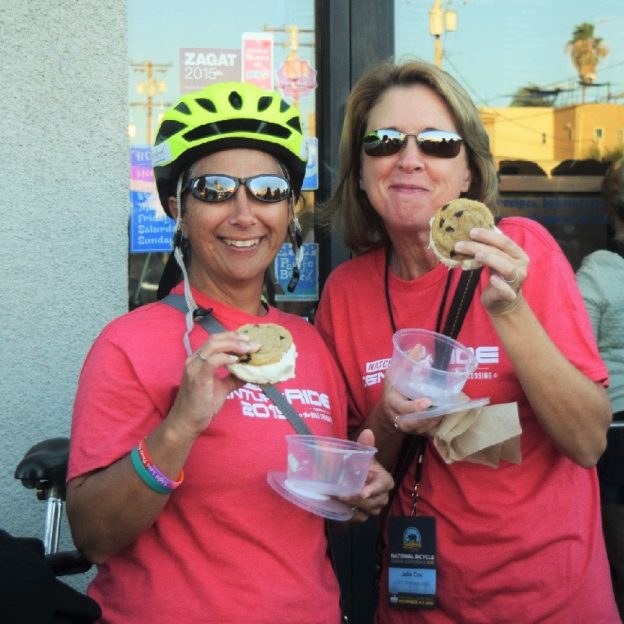
Cycling Nutrition: How to Stay Energized and Make Your Ride Better

Cycling is a great way to get fit, but without proper nutrition, it can leave you depleted. Your body naturally stores enough energy in glycogen to sustain you for about an hours’ worth of effort. With rides that are longer than an hour, you need to think about feeding your hungry muscles as you exercise. Here is some info, history, and tips for riding nutrition.

Types of nutrition; liquid, solid, somewhere in between

-Bars

Nutrition - Power bar

The first commercially available nutrition bar (Powerbar) designed for endurance athletes was created in Berkeley California in 1986. Since that time, they have become staple of athletic nutrition. Bars are a well-engineered source of complex carbohydrates, simple carbohydrates, and proteins. Within energy bars, there is two major types, those for during exercise and those for recovery. The bars designed for in-activity, are usually higher in carbohydrates than protein. While the bars designed for recovery are usually higher in protein than Carbs. Carbohydrate bars are 260-300 calories each.

-Drinks

Nutrition - Gatorade

In 1965 the University of Florida football team began using a new drink formulated by their schools medical department. That drink was called Gatorade after the school mascot – the Florida gator. With that drink, sports nutrition was changed forever. Initially, sports drinks were designed to replace fluids and electrolytes that are lost during activity. As the products have progressed over the years, many products have been designed for calorie and protein replacement as well.

Gels and blocks

In 1994 Gu Energy labs launched the first commercially available energy gel. Gels were the solution to riders who wanted calories that can be absorbed quicker than a bar. Gels and blocks (think of a really dense jello) are a great way to get quick, easily digestible, energy. Each gel is about 100 calories.

Breakdown by ride duration

-A quick word on hydration

On warmer days, the key to maintaining energy is fluid and electrolyte replacement. The most basic trick to doing this correctly is to drink when you are thirsty. It sounds easy because it is. The only difficulty comes when you add sport drinks to the equation. While water is readily absorbed into your body, electrolyte drinks require more time to enter the blood stream. Typically I find that plain water works well for the first hour, then for each successive hour, use an electrolyte drink.

-Before you ride

A small meal (mainly carbohydrates) of fruit, bagel, or cereal is great to get your body ready for your ride. If possible, give your body 1-2 hours to fully digest before you ride.

-First hour of riding

Assuming you will be riding longer than one hour, it is important to start consuming calories in the first hour that you will need in the second. A good rule of thumb is to consume 40 calories per mile over one hour. So a 20 mile ride, spread over 2 hours would require you to eat 400 calories (one bar +one gel).

-Second hour and beyond

Follow the 40 calorie per mile rule, but understand that what you eat can have an effect on your how you feel. I find that if I eat nothing but bars and gels, my stomach doesn’t feel well after the second hour. To combat that feeling, I mix in standard foods into rotation with the sport foods.

Practice what you eat

Sport foods have a lot of energy and nutrients packed into relatively small packages. Whereas this density is great, it can also affect your body differently than normal foods. Before using bars, gels, blocks, or drinks during a ride, try them sparingly off the bike. If you feel comfortable with a product, try to incorporate it on the next ride. By Testing products to see what works off the bike, proving that they work on the bike, and then using those products in your own rides will have you feeling stronger for longer.


When the weather outdoors is questionable, indoor biking in the comfort of your home is the next best thing.

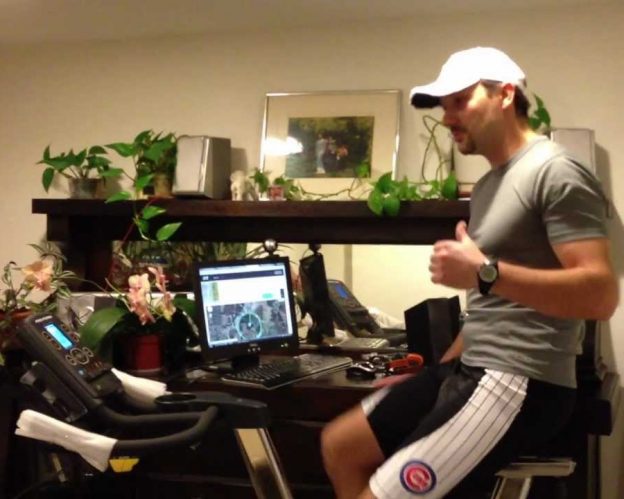
Indoor Biking: Continue the Pedaling Fun When Weather Wins

by John Brown, HaveFunBiking.com

No matter how brave you are sometimes weather conditions keep you from conquering those trails. This is especially true as the mercury drops and turns our beloved Earth into a Hoth clone. Luckily, there are plenty of ways to have fun with indoor biking.

Indoor Biking with a Spin Class

Most gyms offer spin classes. These classes use a stationary bicycle, music, and instructors to guide a class through about a 1 hour workout. Spin classes are a source of indoor biking, and it gets you out of the house.

There are, however, a few downsides with spin classes to keep in mind. One issue is that a spin bike won’t fit the same as your own bike. To fix this, many riders will install their own saddle and pedals on a spin bike before each class. The other potential problem is that the classes are not tailored toward your personal goals. The classes are usually high tempo, high effort workouts that might not fit with your training plan. Some riders find they like the community of spin class but not the specific ride, so they opt in or out of certain portions.

Riding your bike indoors spin class

Indoor biking with a spin class

Using an Indoor Trainer

Riding an indoor trainer has gotten much more popular for riders of all ability levels, and it’s the kind of indoor biking where you can use your own bike. A trainer is a device that holds your bicycle upright, creates resistance when pedal, and simulates an outdoor ride while riding your bike indoors. Using an Indoor trainer, you can ride from the comfort of your own home, or in a group setting (most bike shops have trainer nights through the winter).

Riding you bike indoors trainer class

Indoor Trainer Group Ride

There is usually a leader when riding with a group, but if riding alone, you can still have fun. It’s best to start with a plan. If you intend to just get on the trainer and ride for 60 minutes while watching TV, I hate to break it to you, but that quickly gets boring. So how do you keep the ride fun? First, you cannot rely on terrain to supply stimulus so you must create your own intrigue. There are no hills, descents, turns, or beautiful vistas to keep you interested. But you can use your trainer to mimic the efforts of a great outdoor ride.

How to Build a Ride

As an example, let’s describe a normal outdoor ride, then create a workout to mimic that ride on the trainer. The ride starts by carving through a neighborhood on our way to open roads. Snaking through our neighborhood would require some turning, braking and acceleration (a great natural warm up), so on the trainer you would do something like:

  • Pedal in an easy gear for one minute
  • Then for the two subsequent minutes, increase your pedaling speed (called Cadence)
  • Follow that by slowing that cadence down over the next two minutes.
  • Repeating that two or three times is a great way to get your legs moving

The next obstacle on our imaginary ride is a hilly section of road. To mimic hilly terrain when riding your bike indoors, try the following:

  • Shift into a harder gear and pedal at 80% of your maximum effort for 2 or three minutes
  • Followed that by one or two minutes of soft pedaling (hard effort for the climb, followed by no effort on the descent).
  • Repeat this type of interval in groups of three.

Finally, our ride concludes with a series of city line sprints (earn those bragging rights over your friends). To simulate this action, try the following:

  • Shift your bicycle into a difficult gear
  • Ride at 80% effort for one minute
  • Then sprint all out (max effort) for fifteen to twenty seconds.
  • Follow each effort with some soft pedaling.

Workout Example

A written cue sheet of this ride would look like the following:

5Min warm up

1Min 50% effort low cadence                                                                                                                       1Min 50% effort medium cadence                                                                                                           1Min 50% effort High cadence                                                                                                                 1Min 50% effort Medium cadence                                                                                                               1Min 50% effort low cadence                                                                                                                                     Repeat 3x

4Min soft pedal

3Min 80% effort                                                                                                                                             2Min soft pedal                                                                                                                                                          Repeat 3x                          

4Min soft pedal

1Min 80 effort                                                                                                                                               15Second sprint                                                                                                                                             45Second soft pedal                                                                                                                                                  Repeat 4x                           

9 min Cool down with drills

A ride like the one above takes one hour, keeps you moving, and only involves hard effort for ¼ of the ride. By switching up different intervals of effort and rest, indoor biking can be beneficial and very fun.

Trainer Pitfalls

Time on the trainer can be very beneficial to your riding, but it can also be very hard on you if done improperly. When riding outdoor, you have natural portions of rest while coasting or descending, but on an indoor trainer you cannot coast. People tend to pedal at effort on a trainer throughout the entire ride and overdo it. A good rule of thumb is to balance high effort with rest at a three to one ratio. If a ride calls for 10 total minutes at 80% effort, be sure to include 30 total minutes of low effort work.

riding your bike indoors tired

Too Tired!

Low Effort, High Benefit Drills

How do you keep the ride interesting without effort? Try including drills like one leg drills, high cadence drills, spin up drills, top only drills, and toe touch drills. These require very little effort but build new skills.

bike indoors

One leg Drill

  • One leg drills – Like they sound, these drills are done with one leg (see above). Clip your right leg out of your pedal, hang it away from the bike, and pedal with only your left leg. Try to get the pedal stroke to be as smooth as possible, without any noise or bumps.
  • Spin-up drill – With your bike in an easy gear, try to spin the pedals as quickly as possible. Keep increasing your cadence until your upper body begins to bounce, then taper back to a normal speed. Repeat, each time trying to get faster while keeping your upper body still (this whole drill takes about 30 seconds per spin-up).
  • High-cadence drill – With your bike in an easy gear, spin at the fastest cadence you can without your upper body bouncing. Hold that cadence for one or two minutes.
  • Top only drills – Try to pedal using light effort and attempt to keep the top of your foot in contact with the top of your shoe throughout the pedal rotation. You won’t actually be pressing down on the pedal during this drill, but instead pulling up.
  • Toe touch drills – While pedaling, attempt to touch your toe to the front of your shoe at the top of each pedal stroke. While this isn’t possible, it will help teach your body to begin the pedal stroke earlier in its rotation.

With a little research and a little experimentation, indoor biking can keep you satisfied while you wait for the weather to get better.

The Minnesota Ironman Bike Ride is a test of both physical and mental endurance that requires preparation. Here are some tips to help you prepare and brag.

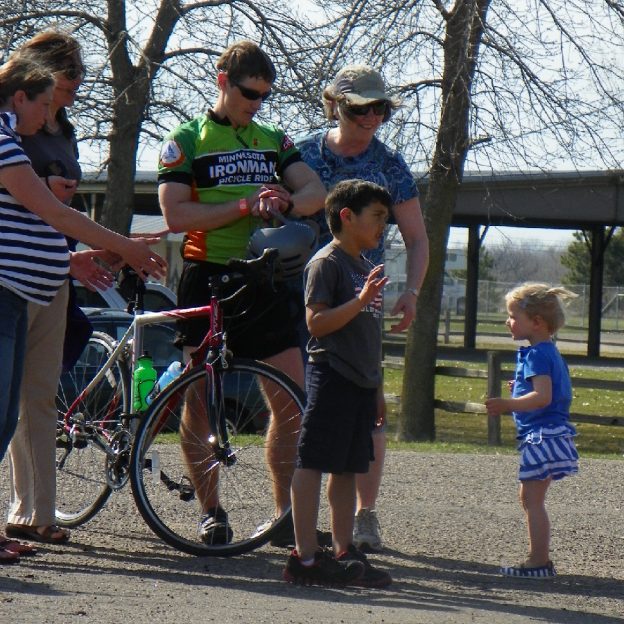
The Minnesota Ironman Bike Ride: How to Start Preparing 90-Days Out!

by John Brown, HaveFunBiking.com

The Minnesota Ironman is going to test you both mentally and physically. For many, just the idea of an event like this is so intimidating it keeps many from even trying. However, you’ve decided you will be at there with your feet anxiously waiting to pedal either the 19, 25, 45, 55 or 100 mile route, with no running or swimming expected. So, how do you prepare? Well, we’re here to help you out with that.

Get the Minnesota Ironman Bicycle Ride into Your Mind

Minnesota Ironman Bike Brain

It’s been proven countless times in history – the mind drives the body. So, set your mind on the Minnesota Ironman by registering to guarantee you’ll have spot. Registering also makes the ride a real goal you can prepare for. It’s best to break the preparation process into small parts and focus on them individually. Start by making a realistic plan for the ride. The Minnesota Ironman has many different distances you can choose while riding, but choosing one in advance will help you get ready. Further solidify your plans by getting others to commit with you. Make post-ride dinner reservations, and book your rooms if you’re staying overnight.

Get Your Body Ready

Training starts now. Make a training plan based on the distance you intend to ride. Your plan can be as simple as committing to ride 2 times a week or as detailed as planning the mileage, date, and time. Just be sure that plan matches with your mileage goal (example: riding for only one hour a week wouldn’t give you the fitness you need to complete the longest version).

Minnesota is currently locked in a winter freeze, so conditions may not coincide with your availability to ride outdoors. But keeping yourself physically active is paramount for this time of year, and it’s especially crucial for your training. You can go snowshoeing, running, swimming, cross country skiing, indoor riding (on a trainer), take spin classes, or anything that raises your heartbeat.

The Minnesota Ironman team realizes that undertaking an event of this difficulty can require help. For that help, they have partnered with Coach Bob McEnaney at Total Cycling Performance (link). Bob is available for individual coaching services and also runs bi-weekly indoor trainer rides (Monday & Thursday) at Penn Cycle’s Woodbury location. He publishes weekly workouts (Link) on Wednesdays that are a great way to stay motivated.

How to Fit Riding into Your Daily Routine

Most people don’t have time to do the things they need to do, (like that home project you swear you will finish this summer). So how do you fit in time to train for the Minnesota Ironman? To start, try not to add too much separate riding time to your schedule. Instead, you can make riding part of your commute to work. Drive part of the way and ride the rest. A normal 30 minute drive could turn into a 15 minute drive and 30 minute ride with a little planning. That way, you only add 15 minutes to your schedule, and still get a ride in. Do it in the morning and the evening and you bought an hour of riding while only adding 30 minutes to your daily schedule.

Also, try adding a ride to your normal downtime. If you have an indoor trainer, ride for one hour a night while watching TV rather than sitting on the couch. It may seem counter-intuitive, but being active is a great way to wind down from a busy day. You will find you sleep better and generally feel more relaxed.

Make Sure Your Equipment is Ready

First step is to bring your bike out of hibernation. Put air in the tires, take it for a spin around the block, and check to see if it’s functioning properly. Minnesota Ironman is great because it is the annual kickoff to the riding season, but it also falls around the time when many people begin to think about riding their bike. If you wait until the las minute to drop your bike off for service, chances are, you will be waiting longer than you like for you bicycle. Click the link to read about some of the benefits of servicing your bike in the winter (link).

When you’re bike is being serviced it’s also a great time to think about making sure your bike fits you properly. It will lower the chance of repetitive motion injuries, and make you more comfortable and efficient. You can have a friend help you (bike-fit ) check the basics or have your shop take a professional look. Both Eric’s and Penn Cycle are Ironman sponsors and certified bike fitters.

While you’re having your bike serviced and fit you can also find the right clothing and accessories for the Ironman. The weather in late April here in Minnesota can be a mixed bag, so make sure your clothing options include something to keep you comfortable in the rain, wind, cold or sun.