Tag Archives: #shimano

Here in today's bike pic, we see more and more people around the world looking at and taking an e-bike for a test ride. For those who may need a little, electric assistance on their #NextBikeAdventure

Bike Pic May 12, it might be time to test ride an e-bike?

Here in this bike pic, we see more and more people around the world looking at and taking an e-bike out for a test ride. For those who may need a little, electric assistance on their #NextBikeAdventure it may be time to visit your favorite bike shop and test ride an e-bike to continue your commute to work or for that next bike tour.

Get into the zone when continuing your time outdoors and your #NextBikeAdventure. View all the great ideas and bike destinations in the latest Iowa or Minnesota Bike/Hike Guide. Then plan your next outing with family and friends in one of Minnesota’s HaveFunBiking Destinations. And now, check out more stories at Let’s Do MN.

Thanks for viewing our latest bike pic  

Now rolling through our 18th year as a bike tourism media, enjoy! As we pedal forward, our goal is to encourage more people to bike and have fun while highlighting all the unforgettable places for you to ride. As we continue to showcase more places to have fun, we hope the photos we shoot are worth a grin. Enjoy the information and stories we have posted as you scroll through.

Do you have a fun bicycle-related photo of yourself or someone you may know we should post? If so, please send your picture(s) to [email protected]. Include a brief caption (for each) of who is in the photo (if you know) and where the pic was shot? Photo(s) should be a minimum of 1,000 pixels wide or larger to be considered. If we use your photo, you will receive photo credit and acknowledgment on Facebook and Instagram.

As we continue to encourage more people to bike, please view our Destination section at HaveFunBiking.com for your #NextBikeAdventure. Also, check out the MN Bike Guide, now mobile-friendly as we enter into our 13th year of producing this handy information booklet full of maps.

Remember, bookmark HaveFunBiking.com on your cell phone and find your next adventure at your fingertips! Please share our pics with your friends, and don’t forget to smile. We may be around the corner with one of our cameras ready to document your next cameo appearance while you are riding and having fun. You could be in one of our next Pic of the Day.

Have a great day with a safe, and memorable year ahead!

This Tip Thursday, make sure you check your tire pressure .

Bike Pic Dec 20, better safe than sorry – tire check tip

For bike tip Thursday, make it a habit to have tires properly inflated. You wouldn’t want to end up in an accident along the way from a tire blowout.

Get into the zone when continuing your time outdoors and your #NextBikeAdventure. View all the great ideas and bike destinations in the latest Iowa or Minnesota Bike/Hike Guide. Then plan your next outing with family and friends in one of Minnesota’s HaveFunBiking Destinations. And now, check out more stories at Let’s Do MN.

Thanks for viewing our latest bike pic  

Now rolling through our 18th year as a bike tourism media, enjoy! As we pedal forward, our goal is to encourage more people to bike and have fun while highlighting all the unforgettable places for you to ride. As we continue to showcase more places to have fun, we hope the photos we shoot are worth a grin. Enjoy the information and stories we have posted as you scroll through.

Do you have a fun bicycle-related photo of yourself or someone you may know we should post? If so, please send your picture(s) to [email protected]. Include a brief caption (for each) of who is in the photo (if you know) and where the pic was shot? Photo(s) should be a minimum of 1,000 pixels wide or larger to be considered. If we use your photo, you will receive photo credit and acknowledgment on Facebook and Instagram.

As we continue to encourage more people to bike, please view our Destination section at HaveFunBiking.com for your #NextBikeAdventure. Also, check out the MN Bike Guide, now mobile-friendly as we enter into our 13th year of producing this handy information booklet full of maps.

Remember, bookmark HaveFunBiking.com on your cell phone and find your next adventure at your fingertips! Please share our pics with your friends, and don’t forget to smile. We may be around the corner with one of our cameras ready to document your next cameo appearance while you are riding and having fun. You could be in one of our next Pic of the Day.

Have a great day with a safe, and memorable year ahead!

Now that the market for E-bikes has become mature, there are many options to choose from. Read on for some tips on choosing the right E-bike for you.

E-bikes, what are the differences and what’s best for your riding style

by John Brown, HaveFunBiking.com

The idea of strapping a motor to a bicycle is nothing new. In fact, the first internal combustion engine bicycle was launched in 1885. As the bicycle industry moved forward into the next century, bikes with motors became motorcycles. But, the call for some sort of bicycle, powered by a motor, has never faded away. In recent years bicycles called E-bikes or electric-assist bikes have emerged to fill that void. Now as battery technology matures there are many options you can choose from when looking to buy an electric bike. Read on for some tips on choosing the right E-bike for you.

Motor options for E-bikes

At the heart of any E-bike is its motor. Motors usually break down into two types; Hub motors and Center motors.

Hub motor systems

These options replace either the front or rear hub with an electric motor. The front motor systems are usually an aftermarket system designed to change a standard bicycle into an electric bike. While these systems aren’t used commonly on stock E-bikes, they are another option if you have a bike you love and want to add some battery power. Rear motor systems replace the rear hub with a motor. Additionally, some rear hub systems incorporate the motor and battery into the rear wheel. Some of the benefits of a hub motor system are that they don’t put any additional strain on the chain or gears of a bicycle. The cost might also be a factor.

E-bike

The GeoOrbital (bottom left) and Copenhagen (top left) wheels are aftermarket hub motor options, while the DHM (right) bicycle comes complete with a rear motor wheel.

The Center motor systems

This has become the most popular option for a completed E-bikes in today’s market. A center motor bicycle is purposely built to accept a motor in the center of the frame where a normal bikes pedal crank would go. With two major E-motor manufacturers, either Bosch or Shimano, most bicycle brands build their bikes around one of these two systems. Center motors are usually about 50% more efficient than hub motors and produce more torque. This allows the center motor to have a better range and ride quality. Also, when removing a wheel for transport or fixing a flat, a center motor system is far easier than a hub motor.

E-bike

Here this center motor Raleigh E-MTB is perfect for the off-road trail.

The battery for an E-Bike

E-bikes usually use a battery located in one of two places, over the rear wheel or on/in the frame’s downtube. The batteries use a series of Lithium-ion cells to maximize motor power while keeping the system light. When comparing batteries, the power is measured in Watt Hours, with larger batteries having more Watt-Hours, equaling a longer mileage range.

E-bike

Rear Battery (left) and a downtube mounted battery (center and right)

How the E-bikes works

Most E-bikes come equipped with pedal assist for added power when pedaling. However, there are few models that also offer a thumb or twist throttle for an added boost when you need it.  With only the pedal-assist made most E-bikes only offer power when you need it. Therefore, if you are riding along a flat path or downhill, the E-bike will not offer much in the way of assistance. However, if you are riding against a headwind, along rolling terrain, or uphill, the E-bike’s motor will kick in and assist you when the going gets tough. Additionally, most systems are adjustable, allowing you to customize the level of assistance you may need.

Bosch or Shimano are the two main motor manufactures for E-Bikes.

Bosch and Shimano are the two E-bikes motor manufactures.

Range between charges

Determining the range of an E-bike is difficult due to the fact that the motor only engages when needed. As an example, someone riding a bike on a 45-mile trip that is half downhill and the other half on flat ground might finish their ride with plenty of battery left. On the other hand, a route selected that is 15 miles long but full of steep hills could burn through a fully charged battery sooner. So the published information for any E-bikes range is a bit of a guess. On the bright side, these guesses are consistent across most brands, so the range is still a good way to compare brands.

Buying an E-bike

The best place to start your E-bike buying education is at your favorite bike shop. Usually, I recommend doing some research about various brands before starting a search, but with E-bikes, the ride is more important than the stats. For E-bikes more than any other bike, the sum is greater than the parts, so ride the bikes! In fact, ride as many of the bikes as you can. They will all have drastically different ride qualities. Beyond the different ride qualities, there are also many different types of E-bikes. Those types can include Mountain bikes, Fat bikes, Road bikes, Trekking bikes, as well as trikes and recumbents.

Accessibility for E-bikes

Now that the market for E-bikes has become mature, there are many options to choose from. Read on for some tips on choosing the right E-bike for you.

Now that the market for E-bikes has become mature, there are many options to choose from.

The last thing to consider when buying an E-bike is your state’s laws on the subject. Will they legally allow you on non-motorized trails or road, or treat you as a motor scooter, requiring a license? Considering E-bikes are a relatively new development, the department of transportation in individual states haven’t all agreed on how to treat them. Additionally, your local trails could be off-limits to your new E-bike, so check the laws first. As the E-bike legislation matures, I think there will be more and more options for E-bike riding all states.

Based on our quick MTB review at Interbike’s Dirt Demo, we have a demo Marin B-17 2 for a long term review. Read on for our "out of the box" review.

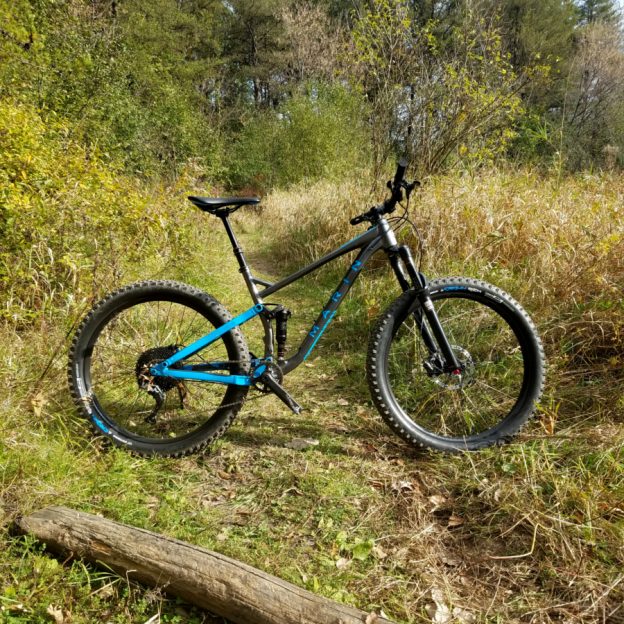
The Marin B-17 MTB review – out of the box and ready for the trail

by John Brown, HaveFunBiking.com

Based on our quick MTB review at Interbike’s Dirt Demo, we have been extended a Marin mountain bike demo for a long term review. This week, a big brown box showed up at our office. What was inside was a Marin B-17, a full suspension trail bike just waiting for me to put together and ride. However, before I ride it and give you a full MTB review let me share with you what is actually coming out of that box.

The Marin B-17 MTB review out of the box

The first thing I have to note about this bike, is that it isn’t a brand new bike. While it’s new to me, It has been to a few demos before. That being said, I have to note the immaculate condition this bike it arrived in.  Whereas the tires show signs of wear  the frame and components were cleaned to a level I have never seen before. Overall, the bike built up quickly and easily for a quick spin around the block.

Marin B-17

The Marin B-17 2 in all its glory. It won’t be so clean soon.

The Frame

The B-17 is an aluminum trail bike that uses Marin’s MultiTrac suspension system for 120mm of travel. The MultiTrac system is tuned to absorb large and small hits equally, while still maintaining pedaling efficiency. It accepts both 27.5” x 2.8” wheels as well as standard 29” wheels. On first inspection, the frame design is clean, with the cables running internally within the frame. The rear shock is tucked neatly in line with  the seat tube allowing for the use of a normal water bottle cage. For additional stand over clearance, the Top tube is welded low on the seat tube and uses a jack brace for strength. Overall, the B-17 frame looks like someone sweat all the details.

Marin B17

Here you can clearly see the cables enter the frame. Also, take a look at how each tube is shaped specifically shaped to its intended purpose.

The Parts

The version of the B-17 I am riding is an early production demo unit. For that reason, the parts are slightly different from the final retail bike. Most notably, my demo unit uses a Rockshox Pike rather than the Rockshox Revalation  suspension fork. For the most part the two forks will ride similarly, with the Pike being a bit smoother in operation. The rest of the bike uses Shimano parts for shifting (SLX) and brakes, which ensures great shifting and stopping. This model B-17 also uses a dropper seatpost, to let me get my weight back and low on the trail.

Throughout the rest of the bike, Marin uses house brand components for the rims, bar and stem. While this may have been an area of concern in the past, most brands are sourcing some exceptional parts. Any remarks of the house brand components would be incomplete if I didn’t remark on how well Marin has tied these products into the rest of the bike. The same graphic touches that make the frame look classy are carried through to the parts. The graphic are clean and understated, without overstating the bicycles brand name.

Marin B-17

Some Classy details as seen on the Marin B-17

What I am looking forward to

I really want to see if this bike handles as well on my home trails as it did in Las Vegas. Our parks have limited climbing and smooth features, so it will be interesting to see if the plus sized tires have the same dominance on these trails as they did in the steep, rocky terrain of Nevada. Finally, I can’t wait to really tune the suspension and see what it is capable of. Stay tuned for the long term review in the next few weeks.


With 20 years in development your disc brakes are more powerful and serviceable than ever before. Read on for some simple steps to keep them working well.

A simple look at your bikes disc brakes function and maintenance

by John Brown, HaveFunBiking.com

Disc brakes were introduced on bikes as early as the 1950’s with Shimano making an actual hydraulic disc in the mid 1970’s. There were versions of the Schwinn Stingray series (released in 1971) that came stock with a rear disc brake. Let’s fast forward more than 25 years to the first market acceptable disc brake -The Hayes Mag disc. From its release in 1997, disc brakes have found their way onto most mountain bike, hybrids and now road bikes. With 20 years in development, disc brakes are more powerful and more serviceable than ever before. Read on to learn the basics on how your disc brakes work and how to keep them working well.

Disc Brake

Original Schwinn disc and 1997 Mag brake, both made by Hayes

How Hydraulic Disc Brakes Work

At their most basic, the brake lever moves fluid through a system and that fluid flows to the pads that press on the rotor. There are more details that make one brake work better than another. However, at the root, all disc brakes are very simple. The reasons the system is so simple and works so well is based on the following. Both the pad and rotor materials produce excellent friction. Additionally, the natural properties of fluids help transfer lever force without compression and absorb excess heat.

How Mechanical Disc Brakes Work

Mechanical disc brakes share the same pad materials and rotors as hydraulic systems; Therefore, they have very similar stopping power. Where mechanical system differ is they use a standard brake cable to actuate the brake instead of hydraulic fluid. Mechanical discs have a small lever on the brake caliper that is pulled by the brake cable, moving the brake pads and stopping the bike. The benefits to mechanical disc brakes is a larger lever shape choice, lower cost, and easier adjustment. On the other hand, because mechanical systems don’t use fluid, they are not as powerful and don’t manage heat as well as hydraulic systems. For that reason, on longer descents, mechanical brakes can under perform compared to their hydraulic counterparts.

Why disc brakes are more efficient

Unlike rim brakes, disc brakes don’t rely on a wheel being straight and round. Even if you were to accidentally dent of bend your rim, with a disc, you can still brake confidently. Another reason disc brakes are more efficient is that they produce a massive amount of friction. That friction, in concert with the venting on the disc rotors clears debris off the rotor and allows the brakes to work through all conditions. Ultimately, disc brakes are more efficient because they require less maintenance. In fact, hydraulic disc brakes self-adjust for pad wear they don’t require you to adjust them.

Why adjust the disc brakes caliper

Adjusting the brakes caliper is necessary if you hear the brake rubbing, or if they aren’t helping you stop well. Before adjusting a hydraulic brake, squeeze the lever to determine if you system needs to bled. If the lever feels spongy when you squeeze it, you need to bleed the system. It’s best to take it to your local shop and have the pros handle it. However, If the lever moves freely through its range, then has a firm feel once the pads hit the rotor, you can proceed without bleeding the system.

How to adjust the caliper to eliminate noise on hydraulic brakes

To adjust the caliper, loosen the two fixing bolts on top of the caliper (they may be under the chainstay on road bikes or in front of the rear quick release). Then snug both bolts up until the caliper stays in place, but is still move able with some effort on your part. WARNING! The rotor can be sharp and cause serious injury to your fingers. While spinning the wheel, keep your fingers clear of any spinning part.

While looking into the caliper, try to position it so there is equal space between each pad and the rotor. Once the caliper is centered spin the wheel slowly – in a perfect world there is no noise. If you are hearing the rotor rub on the pads, readjust until you get no noise. In some cases, you may need to straighten the rotor, this is a job best left to a bike shop professional. Once you are happy with the calipers position, tighten down the fixing bolts and you are done!

disc brake

Here you can see equal between the rotor and pads on both sides.

Adjusting mechanical brake performance

If your mechanical disc brakes have recently lost power, or the levers pull too close to the bar, you can easily adjust them for better performance. Before you adjust the brake, inspect the rotor and pads for any contaminants. Usually, contaminants come int he form of chain lube splattered from an over lubricated chain. If you see any oily residue on the rotor, the rotor needs to be cleaned, the pads will also need to be cleaned or replaced before you can proceed (denatured alcohol works well).

Most mechanical disc brakes have a fixed pad, and a moving pad. The moving pad pushes the rotor into the fixed pad, and creates stopping power.  Because these brakes operate differently than a hydraulic system, they need to be adjusted differently. First, you want to align the caliper so the rotor is as close as possible to the moving pad without touching. Next, thread the fixed pad in until it is as close to the rotor, but not touching. With both pads in place, loosen the cable pinch bolt on the side of the mechanical brake, pull the cable tight, then snug the pinch bolt again. Continue to adjust until you get the performance and lever feel you prefer.

disc brake

The Lever (green) is pulled, pushing the moving pad (also green) into the rotor (red). The Rotor is then flexed into the fixed pad (blue).

Trouble shooting disc brakes

Lever squeeze

Hydraulic brakes have a mechanism built into the master cylinder that auto adjusts for pad wear. It’s a great little valve that eliminates the need to re-bleed the brake continually as the pad wears. This valve can also lead to problems if you squeeze the brake lever without the wheel in your bike. The brake will adjust as if you just wore through 3mm of pad material (the thickness of the rotor) and not leave enough room between the pads to fit the rotor back in. To solve this issue you can either take the bike into a local shop or find a wide, flat, clean, metal tool to fit within the pads, and pry them apart again.

In cold temperatures

In temperatures below freezing, hydraulic discs that use mineral oil as a fluid can behave differently. As the mercury drops, the mineral oil can thicken and make the lever feel sluggish. You will find that once the temps rise, the brake will feel normal again.

Overall, disc brakes are the next step in brake evolution. They are more consistent, more powerful and easier to actuate than any other type of brake on the market. With every new evolutionary step, there will be some hesitation to try “the new”. Even though there may be some hesitation, you should not fear buying a bike with disc brakes. Thanks to years of iteration and market demand we now have disc brakes that are inexpensive and functional.

See how to get the most out of 100 years of technological advancements. You will find adjusting your front derailleur is easy if you follow these steps.

How to adjust your front derailleur for perfect and silent shifting

by John Brown, HaveFunBiking.com

In the late 1920’s, in France, there was a bike race under way and it wasn’t the Tour De France. Instead, this race was a technological race that brought the derailleur into the light. Before 1928, bicycles had a maximum of two speeds, and you needed to remove the rear wheel to change those gears. As there was need for quicker shifting, the bicycle derailleur was born. Initial derailleurs consisted of nothing more than paddles that were actuated by steel rods located between the rider’s legs. Needless to say, there was a lot of finesse that went into shifting those bikes. Then after the second world war parallelogram derailleurs, what we use today, were developed so riders could shift their gears with ease. Read on to see how to get the most out of 100 years of technological advancements. You will find adjusting your front derailleur is easy if you follow these steps.

Front Derailleur

Early “Rod Style” Benelux front derailleur – Yikes

Front Derailleur parts

Limit screws (A) – The front derailleur needs to work within the largest and smallest ring. Limit screws work to stop the front derailleur from shifting outside of its intended range. They are adjustable as to match different types of cranks.

Derailleur Cage – The cage is what holds the chain on gear and what presses on the chain to move it from one gear to the next. The outer portion of the cage (C) is what helps the chain move from larger gears to smaller ones. In contrast, the inner portion of the cage (B) forces the chain from smaller gears to larger ones.

front derailleur

Common parallelogram front derailleur found on Hybrid and Mountainbikes

Derailleur Fixing Bolt (D) – The bolt that holds the derailleur in place on the frame. By loosening this bolt, you can re-position the derailleur for angle and height.

Cable Pinch Bolt (E) – The Cable that controls shifting needs to be held firmly in place. The pinch bolt does that job.

front derailleur

Different Pinch bolt and fixing bolt position for MTB/Hybrid (above) and Road (below) derailleurs

Location, location, location

You guessed it, the most important part of adjusting the front derailleur is its location. If the derailleur is not positioned properly, you will never achieve proper, noise free, shifting in all gears. The reason location is so important is that the front derailleur cage is formed to position the chain in very specific locations.

First step in adjusting the front derailleurs location is to set its height. You need enough room to fit a Nickel between the teeth on the largest chainring and the bottom of the outer cage when they are lined up. Any more clearance than that and the derailleur tends to have issues pulling the chain down from larger gears.

front derailleur

you should be able to fit a Nickle between the derailleur cage and chainring

Once you have the height set, adjust the angle of the front derailleur so that the outer cage and chainrings are parallel. Any misalignment will result in poor shifting and excess noise.

front derailleur

Proper alignment on the left, and misalignment on the right

Lower Limit

Set the lower limit by adjusting the screw marked “L”. To do this, shift the rear derailleur all the way up into the largest cog. Next check to see if there is clearance between the chain and the front derailleurs inner cage with the chain on the smallest chainring. If the chain is running on the inner cage, thread the limit screw out until you have 2-3mm (that nickel distance again!) between the chain and inner cage. When the opposite is true and you have too much clearance between the inner cage and chain, thread the limit screw in until there is 2-3mm of clearance.

Cable tension

Your Front derailleur should be properly aligned and the lower limit should be set at this point. The next step is to attach the cable to the Pinch bolt. Attach that cable by first making sure your shifter is in its lowest gear, Then pull the cable tight, and finally tighten the pinch bolt onto your cable. Usually, you can shift smoothly up from the smallest ring into the next gear right away, but if there is hesitation going up add cable tension either through a barrel adjuster or by loosening the pinch bolt, pulling the cable tighter, and tightening the pinch bolt down again. If the chain wants to shift up from the small ring over the next ring, release some tension. You know you have it right when the chain can pass from one gear to another smoothly and confidently without any banging or skipping noises.

Upper Limit

Setting the upper limit is as easy as getting the chain onto the largest chainring and threading the limit screw to offer 2-3mm of clearance between the chain and the outer cage. While shifting, ensure the chain cannot be shifted over the large ring and off the crank.

Trouble shooting

This guide is great if all the parts are new, but won’t overcome many issues related to worn or dirty parts. The most common shifting issue with older gears is poor upshifting. Chainrings are built with ramps on the inner surface to easily guide the chain from smaller to larger rings. As chainrings wear, these ramps wear as well. If you are having serious issues going from smaller to larger gears, but the gears are silent and problem free otherwise, you may want to consider replacing the chain, chainrings, and gears in the rear.

front derailleur

These Praxis Works chain rings have some of the best shifting thanks to carefully placed ramps.

Another key wear item is the front derailleur itself. Derailleurs are designed to pivot off a parallelogram design that requires each pivot run smooth and precisely. As the Front Derailleur wears, these pivots can begin to bind, while they generate play, leading to poor shifting.

Finally, dirty or corroded cables are a key cause in poor shifting. Replace cables once a year and lube them intermittently to keep them running smooth and freely.

When is enough, enough

Working on your bike is fun, but can be frustrating if things aren’t going according to plan. When things get out of hand, don’t be afraid to start from scratch and go back to step one. Any missed initial steps will make further steps impossible to complete. Also, remember that if it gets too tough, your local bike shop is happy to walk you through the process. You will pay a fee, but the one on one instruction is well worth it.


Tips and Tricks to Adjust Your Bike’s Rear Derailleur

by John Brown, HaveFunBiking.com

It goes by many names, the rear derailleur. It is also known as the “s,” the “hangdown,” or the mech. Here in the U.S. we refer to it as the rear derailleur. The device that moves your bike’s chain from gear to gear letting you traverse hills with ease. Even though derailleurs are sturdy and relatively maintenance free, they do require attention occasionally. Look below for the step by step instructions on how to adjust your bike’s rear derailleur.

 Rear Derailleur Terminology

Twist shifter – A shifting device that rotates around the handlebar like the throttle of a motorcycle.

Trigger shifter – A Shifter that activates by pushing or pulling a set of paddles with your thumb and index finger.

STI shifters – Technical this stands for Shimano Total Integration and speaks directly about one brands type of road bike shifter, but it has become the generic term for any drop bar shifter/brake lever combo.

Thumb shifter – A shifter that can be mounted in many places like; the stem, bar end, brake lever, or top of the bar. These shifters are the most rudimentary type of shifter, and operate by simply actuating a lever with your thumb.

Derailleur parts

(A) Jockey Wheels- two small wheels on the derailleur on which the chain run. They are mounted onto the derailleur cage

Limit screws- The limit screws control the area of motion a derailleur has. On most derailleurs there are three limit screws: the upper limit, Lower limit, and B-limit. The upper limit screw sets the maximum distance the derailleur can shift in high gears. The lower limit screw sets the maximum distance the derailleur can shift in the lower gears. The B-limit screw sets the distance the upper jockey wheel sits from the cogs.

(B) Barrell adjuster – This is an adjustment device on the back of most derailleurs. It is the area where the derailleur cable enters the derailleur and can increase or decrease the cable tension by threading it in and out.

(C) Pinch bolt – The pinch bolt is where the derailleur cable gest secured.

(F) Derailleur hanger – The portion of the bike frame where the rear derailleur is mounted.

Rear Derailleur

Not defined above is the Upper Knuckle (E), and lower knuckle (D)

Is everything straight?

The cogs your rear derailleur shifts across can have as little as 2.14 millemeters of spacing between them. Considering the spacing is so narrow, look to see that everything is aligned properly before you start adjusting your rear derailleur in vain. Look first at the derailleur itself from behind. You should be able to see if the derailleur itself is aligned properly. A tell-tale sign of damage is when the two Jockey wheels don’t line up with the cogs or each other (see picture).

Next assure that the derailleur hanger is aligned properly. This is easily seen when the derailleur appears straight, but not in line with the cogs. Consequently, if either the derailleur or derailleur hanger are bent, it’s best to take it into your local shop for a remedy.

Step 2, A man has got to know his limitations

Before attempting to adjust the derailleur properly, set its usable range. First, loosen the pinch bolt and let the derailleur run on the smallest cog. Next, pedal forward while visually and audibly inspecting how the chain runs on the smallest cog. The chain should run smoothly without any clicking, or skipping noises. If it runs smoothly, don’t worry about the upper limit. when you do experience skipping or noise, look closely at how the chain runs on the cog (looking from behind is easiest). If the chain isn’t coming directly off the upper jockey wheel and going straight onto the small cog you need to adjust the upper limit. By threading the limit in or out you can adjust where the derailleur sits in relation to that smallest cog (note: the limit screws don’t need to get “tightened” down, they simply act as a stop for the derailleur).

Once the upper limit is set, pedal forward and push on the derailleur lower knuckle until it moves the chain into the largest cog. If the chain has issue getting into the largest cog, or jumps over that cog into the wheel spokes, you need to adjust the lower limit screw in a similar fashion to the upper limit screw.

Rear Derailleur Tension

With the limits set, you can now move on to tightening the cable and trying to shift. Make sure the shifter is in its lowest gear by shifting down while gently pulling on the shift cable. With the shifter in its lowest position, ensure all housing ends are settled into the frame properly then pull the cable taught through the derailleur.  With the cable taught, tighten the derailleur pinch bolt onto the cable. Trim any excess cable so that only about one inch of cable extends beyond the pinch bolt and crimp it off as not to fray.

While pedaling, shift one gear up. Ideally, the chain will easily move from the smallest cog up to the next cog. It should stay on the second cog and run quietly and smoothly. If it hesitates to get to the second cog, increase cable tension by rotating the barrel adjuster out. If you cannot increase tension enough with 3 or 4 turns of the barrel adjuster, thread it back in, loosen the cable pinch bolt, pull the cable taught, and tighten the pinch bolt again. Once you have the chain shifting up the cogs easily, check to see if it will smoothly move back down the cog stack by shifting from the largest cog down and inspecting. The only difference is in the adjustment. If the chain hesitates to move down the gears, turn the barrel adjuster in (relieving cable tension).

Rear Derailleur Trouble shooting

What happens if you can get the chain to move up the cogset well, but can’t get it to move back down the cogset easily. In some cases, the cable and housing can be corroded and causing drag. This drag won’t affect the shifting moving up the gear set, but it will stop the derailleur from returning. In tis case, you can clean and lube the cables and housing, or just replace the cable and housing all together.

Additionally, there may be a grinding/banging noise in only the largest cog. That noise is caused by the upper jockey wheel running on the largest cog. To remedy this, tighten the b-limit screw until the noise subsides.

Finally, a common problem is if you get skipping while pedaling up steep grades or under load. If your derailleur is adjusted properly, and you’re getting skipping, it may be related to a worn out drivetrain. As your chain ages, it stretches slightly. As the chain stretches, the front face of the gears will wear in unison with the chain stretching. Once the chain stretches beyond the point where it will mesh with the gears, you will experience skipping under load.

Working on your own bike is fun. Also, your appreciation for the technology and engineering that goes into what is considered a simple machine will grow with each turn of the wrench. Periodically, you will run into a problem you cannot solve. If that is the case, bring your bike to your local shop, talk honestly with the mechanic about what you tried and what you are trying to accomplish. As a result, you will find that most mechanics will be happy to teach you what you need to know.


Shift gears to the terrain you are riding can take you miles from home with ease. Learn the what, how, when and why of shifting your bike.

How to Shift Gears on your bike for Efficiency and Confidence

by John Brown, HaveFunBiking.com

Shift gears to the terrain you are riding can take you miles from home with ease. Over hills and through tough valleys, all thanks to the ability to know how to shift your gears. Learn the what, how, when and why of shifting your bike below.

Shift Gears and Its Terminology

Before we jump into how to shift your bike most efficiently, lets cover the basic parts. Beyond the chain, there are many moving parts that make up the drivetrain on your bike, allowing you to shift gears.

-Cassette and freewheel

The gears attached to your rear wheel are called the cassette or freewheel. While they are mechanically different, for the act of shifting, they operate identically. These gears are built with teeth that sit higher, lower, or at an angle depending on where they are located. The different tooth profiles allow the chain to seamlessly shift from one gear to the next. These gears come in groups of 5 up to 12 depending on the shifting system you have. Overall, the smallest and largest gears are close in size regardless of the amount of gears.

-Chainrings

The chainrings are the gears attached at the middle of the bike where your pedals are. Most bikes have between 1 and 3 chainrings. You will notice that the teeth on the chainrings have similar profiles to those on the cassette. So if you see a tooth that is smaller or oddly shaped, don’t immediately assume it’s damaged. Basic chainrings will be stamped out of steel while more expensive ones are machined out of aluminum. The machining makes these aluminum rings both lighter and shift better.

-Derailleurs

The derailleurs are the mechanisms that physically guide the chain from one gear to another. Most bikes will have two, a front and a rear. The front derailleur has a curved cage that sits just above the chainrings. When moved in and out, that cage guides the chain onto different gears. The rear derailleur has a parallelogram, and a spring loaded arm with two pulleys. When shifted, the rear derailleurs upper pulley guides the chain across the cassette and onto the appropriate gear.

-Shifters

The shifters are designed to pull the cables that operate the derailleurs. Most bikes have them attached to the handlebar, but some older bikes will have them located on the downtube. The shifter on the right side of the bike controls the rear derailleur while the shifter on the left operate the front. For mountain bikes and hybrids there are really only two types, trigger and twist shifters. A trigger shifter uses thumb and trigger finger activated levers, while a twist shifter allows you to rotate a portion of the grip to shift gears. Road bikes usually have the shifter mounted onto the brake lever, but can also have paddle style shifters on the end of the bar or on the downtube.

Flat bar shifters come in two varieties, trigger (left) and twist (right)

Road bike shifters are usually attached to the brake levers (left) but on older bikes can be found on the downtube.

How To Shift Gears

Shifting your bike is easy to do and easy to do wrong. For all bikes that use derailleurs, remember one thing – Shift only when pedaling. The act of pedaling is what allows the chain to jump seamlessly from gear to gear. Also try not to shift both the front and rear derailleur simultaneously as it can lead to problems. To get comfortable shifting, pedal on a piece of flat ground and operate only the right (rear) shifter first. You will find that as you shift into higher numbers (assuming your shifter has a gear indicator) it will become more difficult to pedal but faster moving. Inversely, as you shift into lower numbers it will become easier to pedal but slower moving.

Once you feel very comfortable shifting the rear derailleur, shift into a middle gear and explore what the front derailleur does. You will notice that the incremental changes of the rear derailleur give way to large changes when shifting the front derailleur. Going across chainrings makes a huge difference in how easy or difficult it is to pedal. Once you have mastered the front and rear derailleurs, you are now ready to try shifting in other than flat conditions.

When to Shift Gears

The reason we shift gears is to give ourselves a mechanical advantage over the changing surroundings. With this mechanical advantage comes some idiosyncrasies. First thing is that the gears are designed to allow the chain to move easily from one to the other when shifted, but hold tight under the load of pedaling. What that means is that if you are pedaling with a great amount of effort (say up a hill), and try to shift, you are asking the drivetrain to both hold the chain in place and move freely. Sadly, it becomes difficult for a mechanical device to do both these things. To make sure you don’t run into any issues, always shift while you are pedaling with light load, or shift into the dear you will need just before you actually need it. As an example, shifting into a very low gear at the base of a hill is a better idea than taking a run at it and trying to shift down gears while your climbing under load.

Gear Ratios And How They Affect Your Ride

When we talk about gears, what it translates to is how many times the rear wheel rotates per pedal rotation. So if you are in a very low gear going up hill, you may pedal two complete pedal rotations in order to turn the rear wheel once. Inversely, if you are headed down a steep descent in a high gear, you will probably be spinning the rear wheel 3-4 times per pedal rotation. If you think about gears in these terms, it becomes easier to figure out where and when to shift.

Finding The Perfect Gear

The perfect gear is always changing (and you thought it would be easy). Even though it changes, it can most easily be described as the gear allowing you to pedal comfortably. We all have a natural pace (called cadence) we feel comfortable pedaling at, the goal in shifting I to allow you to continue to pedal at that pace even as the topography changes.

Putting It All Together

Now that you understand the “what, when, why, and how” of shifting, it’s time to practice on the open road. Pay close attention to what your most comfortable pedaling cadence is. Oftentimes people believe that they are comfortable pedaling really slowly in a difficult gear, but find after some experimentation, that they can pedal for longer if they shift into a slightly easier gear and pedal quicker. If you are riding off road, experiment with what gears give you the best traction on loose terrain. Many riders will default to their lowest gear at the first sign of loose conditions only to find that gear has too much torque, forcing their tire to break free and spin out. All in all, body types, muscle mass, conditions, and personal preferences make gearing choices different for everyone. But now that you know the details, you should feel comfortable finding the right ones for you.

Also check out our article on related tips to make your bike more comfortable and faster.