Tag Archives: Snow bike

While I can’t stop the cold from hitting Minnesota, I can prepare for winter riding. Here are a few tips to help you get ready for the winter.

Prepare for winter riding with these fun, easy cold weather tips

by John Brown, 

I can’t fight it any longer; my powers of denial are only so strong. Despite my best efforts, a change is coming, and I can do nothing to stop it. That’s right, winter is here. We just experienced a real cold snap, and snow is coming. While I can’t stop the cold elements from hitting Minnesota, I can prepare for cold weather riding. Here are a few tips to prepare your bike and body for the rest of the winter season here in the upper Midwest.

Is your bike set for winter riding?

Even though your bike will function perfectly in cool weather, there are things you should do to protect it and yourself from the elements.

Lubricants

Not too much care needs to be taken for the sealed parts of your bike, like the hubs, bottom bracket, or headset. Those places are well-greased and sealed from the elements, so there is no need to change the type of grease. What you do need to be concerned with is the chain. It’s best to switch from dry, or wax lubes to synthetic oil (like Park’s CL-1) for winter riding.

Lubing your chain is easy with a wax based lube or synthetic oil.

Frame

For most of the United States, winter roads mean salt. That salt can play havoc with your frame and components. The best way to protect your frame from corrosion is to install fenders. A plastic fender is impervious to salt damage and can stop salt from reaching your frame. Additionally, Fenders keep you dry when moisture is on the road and clean from any debris your tires kick up.

Tires

Thanks to rain, snow, and less road maintenance, there is an elevated amount of debris on the roads during the winter riding season. Coupled with lower temperatures that make tires stiffer, flats are more prevalent in winter. For these reasons, I encourage you to get some “winter tires.” By “Winter tires,” I mean something with a pronounced tread and a puncture-resistant feature. With more tread and protection against flats, you can confidently ride through the winter months. Investing in studded tires is also a good plan if you live in an area that gets below freezing and stays there for several days. For Fatbikes or Mountain Bikes, you can invest in aftermarket studs that thread into your existing tire.

This tire has a reinforced layer (orange) that prevents most flats

Lights

Winter is as dark as it is cold. Therefore, having some additional visibility is important. If you are riding on well-lit roads or paths, blinkers that make you more visible are perfect. In contrast, if your route is not well-lit, I recommend getting a headlight with at least 100 lumens. That light will allow you to see safely.

Your Body and winter riding

For you, dealing with winter riding is simply the basics of keeping you comfortable. As the winter rolls on, you will need to use different amounts of insulation to keep you warm. In early fall, knee warmers and a long sleeve jersey will offer ample warmth but as the temperature drops, knee warmers make way to tights and long sleeve jerseys are eclipsed by jackets. For a complete overview of temperature vs. clothing, check out our article on winter clothing.

prepare for winter riding

This “Rider” has his arm and knee warmers (blue) on

The ride

Riding in the winter is amazing if you are prepared. It’s incredible because there is a calm and quietness to winter that cannot be replicated during any other season. While it may sound difficult or unenjoyable to ride during the cold days of the winter, it is that fear others have that allows you to have most of the trails, all to yourself. Start slow and build up. As an example, try to ride until the temps reach 40 degrees. That temperature requires little additional clothing, and will keep most others off their bike. For the following season, try riding down to freezing and so on.

If all else fails

AAA Road Service now includes bicycles, it like have a SAG in your back pocket and a call away.

AAA Road Service now includes bikes. It’s like having a SAG in your back pocket.

Because winter riding puts you out into the elements, breaking down can be dangerous. Rather than getting yourself stuck in a bad situation, make sure to tell others where you will be and have a contact you can call for a ride home. If you don’t want to rely on a friend for a ride, you can always buy a AAA Road Service membership, with three-inexpensive options, that includes your bike. Its like having a SAG service in your back pocket, if you have a flat or break a chain, call and they will come a get you.

About John Brown, the author

John operates Browns Bicycle in Richfield, MN as a lifelong cyclist and consummate tinkerer. It all started for him in grade school when the bike bug bit, and that fever is still there. Now, and over the past thirty years, he has worked at every level in the bike industry. Starting, like most, sweeping floors and learning anything he could about bikes. He eventually graduated as a service manager and then to a store manager.  Through the years, he has spent extensive time designing and sourcing bicycles and parts for some of the largest bike companies in the world. All the while focusing on helping as many people as possible enjoy the love of riding a bike. In that pursuit, he has taught classes (both scheduled and impromptu) on all things bikes. John also believes in helping every rider attain their optimal fit on the bike of their dreams. Please feel free to stop in any time and talk about bikes, fit, and parts or share your latest ride. You can also see John’s tricks and tips on the Brown Bicycle Facebook Page.

Gaiters may be an added bonus to winter riding warmth

by John Brown, 

Cold, snow, sleet, and ice are normal conditions for my winter bike commute to work here in Minnesota. With the elements being so unfriendly, I am excited to try commuting with a pair of gaiters for added warmth. With that direction in mind, I was excited to try the Hillsound Armadillo LT gaiters. For those who aren’t familiar with a pair of gaiters, they cover your shin and calf, below the knee, and above the ankle. Splash-proof protection works in combination with your winter boots to extend your leg. They are designed to keep snow, slush, and debris off your legs and dripping into your boot.

Hillsound Armadillo LT gaiter

I am wearing the Hillsound Armadillo LT Gaiter for the first time.

A gaiters construction

The Armadillo LT gaiter’s upper is constructed out of Flexia, a three-layer material designed to stretch, be waterproof, conform to your leg and stay in place. The lower section is made of dense nylon, which is extremely tough. The zippers are waterproof, and the straps and clips seem to be more than tough enough for their job. Even though these gaiters exude durability, they are remarkably lightweight.

Hillsound Armadillo LT gaiter

High-quality buckles, zippers, and straps are standard.

A full-length zipper makes for an easy fit.

I have to admit that I have never tried riding with a gaiter. Whereas my point of reference is small, I spend a lot of time on my bike in the cold. For the frigid weather, my riding boot of choice is the 45NRTH Wölvhammer, built with gaiters in mind. The Hillsound Armadillo LT gaiter paired with them easily. Thanks to the full-length zipper, I got my riding gear and boots on, then fashioned the gaiter into place with relative ease. That ease comes from the stretch that the upper material offers and the easily adjustable lower Velcro strap and upper buckle strap.

Warmth on the bike

The addition of a waterproof layer was immediately apparent when I left my house. We had gotten a fresh coating of wet snow overnight, and the salt trucks were out in force. Thanks to the slush created, my legs were immediately doused in slop but stayed dry and warm. This is a far cry from a week prior when I rode home without the benefit of gaiters. This time, I buzzed along my usual route to work and noticed that my legs were warmer than normal. Also, when looking down at my legs (not something I recommend), I saw all the sludge my tires were kicking up and bouncing off the gaiters. When I reached the office, my legs were dry and comfortable, and the gaiter was still doing a good job repelling moisture.

Hillsound Armadillo LT gaiter

Snow and slush are no match for the Hillsound Armadillo LT Gaiter.

Moving forward

With my first foray into gaiters, I want to see where they are best used. I know that hikers and snowshoeing fans love them for their warmth and protection; now, after trying them, I am fascinated to see how they will help from a cycling perspective. Right now, I will reach for them whenever the weather is cold and wet. While I am sold on their benefit for wet conditions, I look forward to blocking the wind chill when temps get colder. Stay tuned for more information on my adventures with the Hillsound Armadillo LT gaiter.

About John Brown, the author

John operates Browns Bicycle in Richfield, MN as a lifelong cyclist and consummate tinkerer. It all started for him in grade school when the bike bug bit, and that fever is still there. Now, and over the past thirty years, he has worked at every level in the bike industry. Starting, like most, sweeping floors and learning anything he could about bikes. He eventually graduated as a service manager and then to a store manager.  Through the years, he has spent extensive time designing and sourcing bicycles and parts for some of the largest bike companies in the world. All the while focusing on helping as many people as possible enjoy the love of riding a bike. In that pursuit, he has taught classes (both scheduled and impromptu) on all things bikes. John also believes in helping every rider attain their optimal fit on the bike of their dreams. Please feel free to stop in any time and talk about bikes, fit, and parts or share your latest ride. You can also see John’s tricks and tips on the Brown Bicycle Facebook Page.

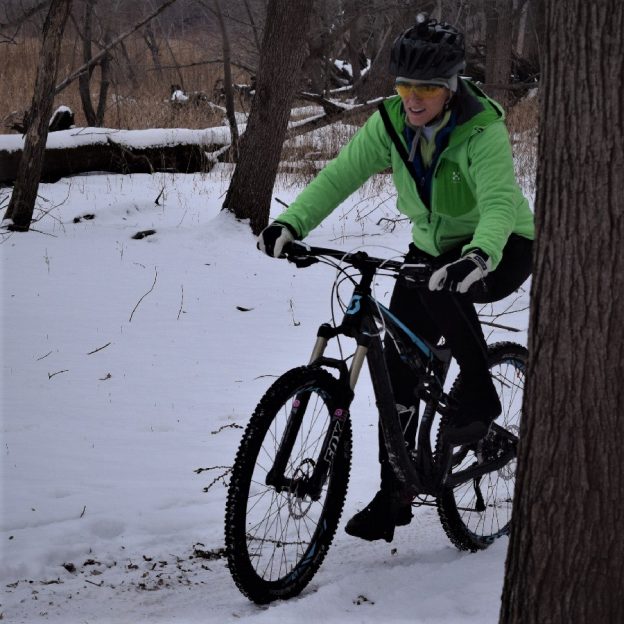
Mountain bike hacks: fat bike tips and tricks for winter fun!

by  John Brown. HaveFunBiking.com

For many of us, riding offroad through the winter is impossible without a fat bike. Our trails get covered with snow in December and don’t see the light of day again until April. While riding a fat bike is a great substitution for riding a mountain bike, it does behave differently than a standard mountain bike. Here are a few quick and easy hacks to riding fat bikes that will get you enjoying the snow in no time.

Why a fat bike

What makes a fat bike special is its ability to ride though deep snow with ease. The reason it is at home in snow is that these tires are between 4” to 5” wide. That width offers traction and flotation on the softest of terrains like snow and sandy ground cover.

Tire pressure

With wider tires comes a larger overall air volume, meaning that fat bikes have more space for air in their tires than a standard mountain bike. Due to that increased volume, fat bikes use a very different air pressure than your standard mountain bike tire. As an example, in very deep snow it’s not unheard of to run the tires as low as 8 psi. By contrast, a standard mountain bike tire at 8 psi would be completely un-rideable. Proper air pressure for a fat bike tire can be difficult to achieve if you don’t know what you are looking for. Basically, you want the tire to be able to deform easily over terrain, but not be so low that the tire “squirms” or collapses under hard turning efforts. I find it easy to get here by filling the tires until they are slightly less than firm, then lowering the air pressure incrementally over the first few minutes of a ride until the tires really perform well. You will know you let too much air out if the bike bobs up and down with each pedal stroke.

Turning

Due to the soft nature of snow, turning can be tricky. While turning on a normal mountain bike you move your body weight forward rely on the tires traction, then aggressively force the bike through the turn. Considering snow is soft and will not support that type of maneuver turning requires a slightly more finessed approach. First, leave your weight in a neutral position centered over the bicycle. Next, shift your weight toward the inside of the turn and begin turning the bars slightly toward the turn. The front wheel is more of a tiller than anything else.  Use it to direct the angle and direction of the bike, but resist the urge to load it up with weight. As the bike angles toward the turn, focus your weight on the rear wheel. If done properly, you will feel as if the bike is turning from the rear wheel rather than the front and your front tire won’t wash out.

fatbike

Weight back and rear wheel doing most the work.

Climbing with a fat tire bike

Climbing with limited traction can be difficult as well. Rather than putting your bike in its lowest gear and muscling up the hill you need to be wary of not letting the rear tire slip. If you drop the bike into its lowest gear, chances are the rear tire will have too much torque. Too much torque will cause your tire to rip through the snow and slip. The best thing to do is move your weight backward and pedal with as even a pressure and cadence as possible. Standing and pedaling, or jabbing on the pedals will most likely cause the rear wheel to break free.

Ice and studs on a fat tire bike

On snow covered trails that get ridden often it is possible for the trails to get packed in and begin to freeze solid. Once ice is on the trail it becomes very difficult to control the bike with standard rubber tires. For this reason, I recommend adding studs to your tires if your trail riding is susceptible to ice.

studded tire

MTB studded tire from Schwalbe (left) and stud detail of 45nrth tire (right)

Overall fun

The biggest tip I can give to fat biking is to keep it fun! Riding a fat bike is a totally different experience than riding a normal Mountain bike, and requires its own skills. Try not to get frustrated because it handles differently than your other off road bikes, just focus on building some new skills. Also, with riding in colder temperatures, enjoy the time you have. While a 4 hour mountain bike ride in the summer is great, you may not be able to stay warm that long through the winter. Beyond the different skills and time, enjoy the unique rewards only Fatbiking can give you.

Is mountain biking in the snow season really here in the upper Midwest?

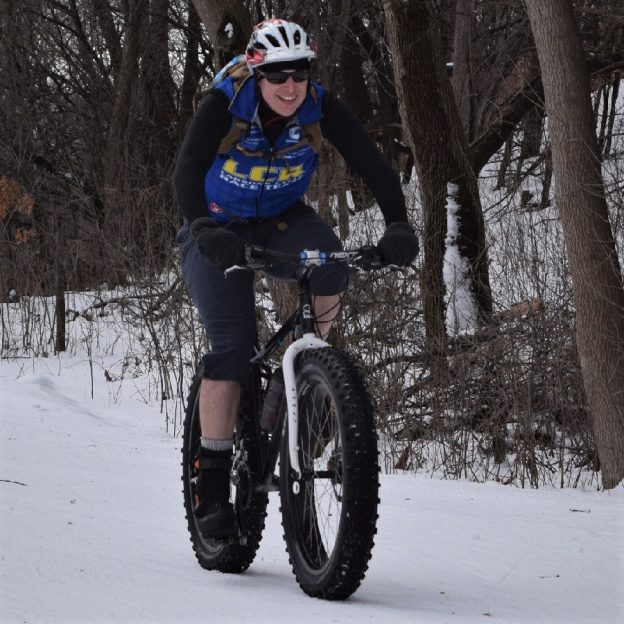
Bike Pic Oct 28, mountain biking fun in the snow is here again!

Is mountain biking in the snow season really here to stay in the upper Midwest? With temps hovering in the low 30’s, including rain and snow over the next several day. it maybe time to get the fatty out and prepare for some winter riding fun.

What better way to continue your fall fun and your #NextBikeAdventure. View all the fun ideas and bike destinations in the latest Minnesota Bike/Hike Guide. Then plan your next outing with family and friends in one of our HaveFunBiking Destinations.

Thanks for Viewing Our ‘Mountain Biking’ Pic of the Day  

We are now rolling into our 10th year as a bike tourism media. As we pedal forward our goal is to continue to encourage more people to bike and have fun while we highlight all the unforgettable places for you to ride. As we continue to showcase more places to have fun, we hope the photos we shoot are worth a grin. Enjoy the information and stories we have posted as you scroll through.

Do you have a fun bicycle related photo of yourself or someone you may know that we should post? If so, please send your picture(s) to: [email protected]. Include a brief caption (for each) of who is in the photo (if you know) and where the picture was taken. Photo(s) should be a minimum of 1,000 pixels wide or larger to be considered. If we use your photo, you will receive photo credit and acknowledgment on Facebook and Instagram.

As we continue to encourage more people to bike, please view our Destination section at HaveFunBiking.com for your #NextBikeAdventure – Also, check out the MN Bike Guide, now mobile friendly, as we enter into our 8th year of producing this hand information booklet full of maps.

Remember, bookmark HaveFunBiking.com on your cell phone and find your next adventure at your fingertips! Please share our pics with your friends and don’t forget to smile. We may be around the corner with one of our cameras ready to document your next cameo apperance while you are riding and having fun. You could be in one of our next Pic’s of the Day.

Have a great day!

While we cant stop the cold from hitting soon, get out and discover how fun it is to fatbike.

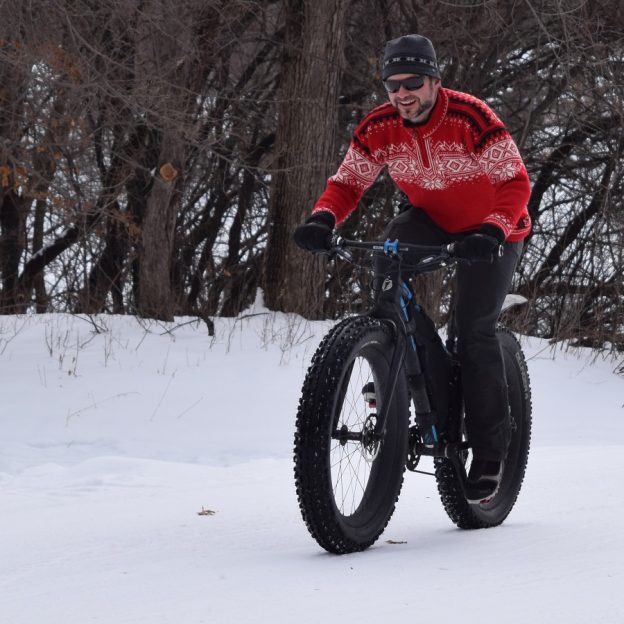
Learning to fatbike for fitness and fun as winter soon returns

by John Brown, HaveFunBiking.com

As the winter winds begin to shift and blow into our office, here in Minnesota, thoughts turn toward the snow covered trails. We are lucky here to enjoy a massive amount of trails that are designed for winter riding. But if you are like me and new to the whole fatbiking thing, how do you get into it and what should you expect?

The fatbike

Fatbikes are more like normal mountain bikes than you may think. As an example, the only parts unique to most fat tired bikes are the crank, tires and wheels. Other than those things, all the other parts are interchangeable with you normal mountain bike. That being said, the parts that make a fat tired bike different are responsible for their namesake. The large wheels and tires give these fatbikes their flotation on soft surfaces like snow and sand. There are now several brands available at most price points so getting into the sport has never been easier. Plus many bike shops offer rental programs.

Interbike E Bike

The Surface Boar is as versatile as it is cool fatbike

The fatbike ride

The best part about a fatbike is that it extends your season with an all new cycling experience. For the most part, when snow was falling, people were kept from riding. Now, with so many fat tired bike options, a thick layer of the white stuff simply means more riding for all! With 4”-5” wide tires and pressures as low as 4psi, a fatbike can easily navigate deep snow. The only issue you will run into is ice. An icy surface doesn’t really care how wide the tire is, it’s still slippery. Once a trail gets slick it’s best to either change your tires to studded versions, or install studs in your existing tires. With studs below you, the game is back on.

Studded (left) and standard (right) fatbike tires

The Gear

I find the hardest part of fatbiking is dressing properly. I am no stranger to winter riding, but most of that has been commuting. Once I got off road, I found that I was chronically overdressed. Off road riding is slower than commuting, so there is less wind chill to contend with. Additionally, I find it is a higher effort (more calories spent) to fatbike than to commute. When winter riding make sure your feet and hands are warm with good gloves and winter shoes. I also find you should wear warm cycling clothes that will wick the moisture away and resist the urge to wear too much clothing.

While I can’t stop the cold from hitting Minnesota, I can prepare for winter riding. Here are a few tips to help you get ready for the winter.

While we cant stop the cold from hitting soon, get out and discover how fun it is to fatbike.

Having Fun

The most fun part of riding a fatbike is experiencing an existing trail you may have used before, in a new way.  With a fresh coat of snow on the ground, features that may normally be difficult get smoothed out and sections that are typically easy, can become difficult. That change in perspective gives all new life to trails that may have become old and commonplace to you. So get out there and try fatbiking this winter.

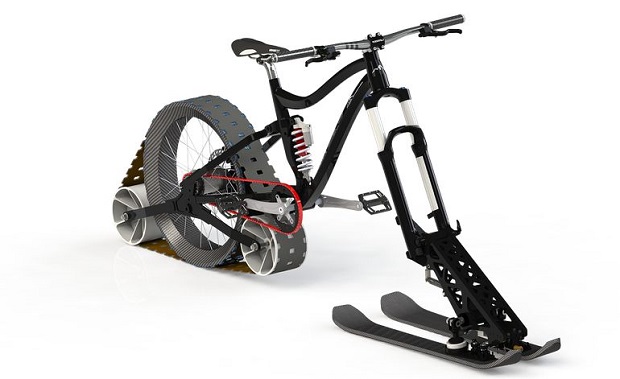
More Authentic Snow Bike May Be In the Future

By C.C. Weiss, Gizmag

Over the years, various manufacturers and inventors have tried different ways of putting “two wheels” to the snow. The rise of fat-tired mountain bikes, not to mention extreme Antarctic fat trikes, has been the biggest news in this area, but we’ve also seen recreational equipment like the KTrak and BikeBoards. A group of mechanical engineering students at Quebec’s University of Sherbrooke is developing a new solution that aims for a smoother downhill ride by combining elements of existing winter bikes. For the Avalanche Project, the group of five Sherbrooke students is tasked with designing and building a new type of downhill bike for snow riding. You can learn a little more about the project and bike design in the video here: [Video].

 Rendering of the planned Avalanche snow bike project.

Rendering of the planned Avalanche snow bike project.

The goal is to develop a bike that better mimics the feel of summer downhill biking, a bike aimed at the experienced downhill mountain biker, not simply the novice looking for a new winter sport to try. In working on the project, the students are going well beyond simply increasing surface contact area with skis or big tires. They’re redesigning traditional bike systems to better adapt the bicycle to snow riding.

The plans for the bike are to use a rear track drive and front ski setup

The plans for the bike are to use a rear track drive and front ski setup

It all starts with the rear track drive. At first, it looks like a KTrak, but there are some key differences. Instead of the rear cogs typical on a mountain bike, the purpose-built snow drive on the Avalanche design uses an internal geared hub driving a central wheel. Notches on the wheel move the track, which provides traction in the snow. The drivetrain uses a Gates Carbon belt drive instead of a chain and two small wheels to help keep the track driving smoothly.

The bike also uses a purpose-built snow-braking system. The front skis tilt and angle inward, creating a V-shaped plow to bring the bike to a stop in the snow. In ski instructor terms, they turn the french fries into pizza.

The skis on the front fork will provide better braking and turning control in snow conditions.

The skis on the front fork will provide better braking and turning control in snow conditions.

The Avalanche bike is still in the early stages, and the renderings suggest that the team is still finalizing design elements like the track and front ski arm. The students are reaching out to the Kickstarter community for help in funding the development of a working prototype, which they plan to complete by the end of the year. Once complete, they will test the bike’s stability, maneuverability, propulsion and braking on the snow, comparing it to the ride offered by a traditional mountain bike. They will also present the prototype at a university exposition in December.

While the students have done some feasibility research as part of the project, this isn’t currently a business venture, so they are not peddling pre-orders in their campaign. Instead, they’re offering rewards like Avalanche Project keychains, T-shirts and supporter levels to those that are generous enough to contribute to the educational project. Pledge levels start at US$5 and the goal is $2,007.

We think they’d raise the money more quickly if they offered demos of the prototype – that thing looks like fun – but we guess they don’t want to risk flunking out of the engineering program because the bike was destroyed on the mountain. Hopefully they’ll at least put out some video to show how it rides.

Source: Projet Avalanche