Tag Archives: bike light

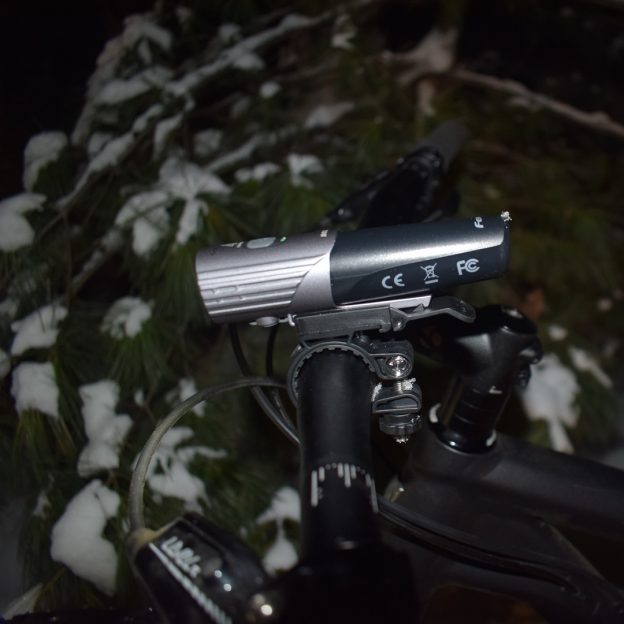
A bicycle headlight that works well on or off the bike

By Russ Lowthian, HaveFunBiking

No matter what time of the year there is never enough daylight and having a bicycle headlight is a necessary item for any cyclist riding on the road or on trails. Over the last couple of months, I have had the chance to test the Fenix BC21R v2.0 bicycle headlight in several applications with memorable success. Retailing at less than $75, the Fenix worked well while commuting by bike and fat biking through the snow. This 1,000-lumens capacity light offered me several beam output settings that I needed at dusk and in the dark to see and be seen. Plus its makes a handy stand-alone flashlight when not on my bike.

This light easily clips-out from the handlebar, in a minute’s notice, to become a handy flashlight.


The Fenix BC21R v2.0 bicycle headlight out of the box

The Fenix bicycle light comes packaged and inside the box, you’ll find:

The light fits well in the packaging with the extra parts tucked behind the form-fitting plastic holder.

  • BC21R v2 Light head
  • Fenix rechargeable Li-ion battery
  • USB Type C charging cable
  • A handlebar mount, with two extra rubber mounting shims
  • Spare O-ring
  • User manual
  • Warranty card

The light fits well in the packaging with the extra parts tucked inside. The Fenix branded 18650 Li-ion battery is pre-installed in the headlight with a small piece of insulation that needs to be removed before charging and using. The housing of the bicycle headlight is engineered to protect it from dust and foreign objects and is perfect for safe cycling on those rainy days.

Bike commuting with the Fenix bicycle light

As the days get shorter (up through December 22nd  with winter solstice) using the Fenix bicycle handlebar light gave me several beam options with the lights four settings. Plus, while commuting or running errands the light was easy to remove at stops, for security and/or to plug it in for an added charge.

Through the woods on a snow-covered trail

Fat biking over the snow-covered trail the beamwidth of the Fenix was more than adequate.

Recently fat biking through the snow-covered forest I found the beam width adequate, the majority of the time in the lights medium mode. But, when the trail became more technical, it was easy to bump it up to the Turbo Mode. At 1,000-lumens, with two-hours of run time, the output was near that of riding in daylight.

A recap of the Fenix BC21R v2.0 bicycle headlight

The Fenix bicycle light is an interesting alternative to most lights in its price range. The light comes with a chargeable battery that can be easily replaced. It offers a high-quality optic lens with four settings for beam spread to make your time in the dark and low-light periods enjoyable. And with the convenient bicycle mount the light easily clips-out, in a minute’s notice, to a handy, multi-mode flashlight. For more information on Fenix and to order a bicycle headlight go to their website here.

Rotllicht "red light" off the bike is great for visibility.

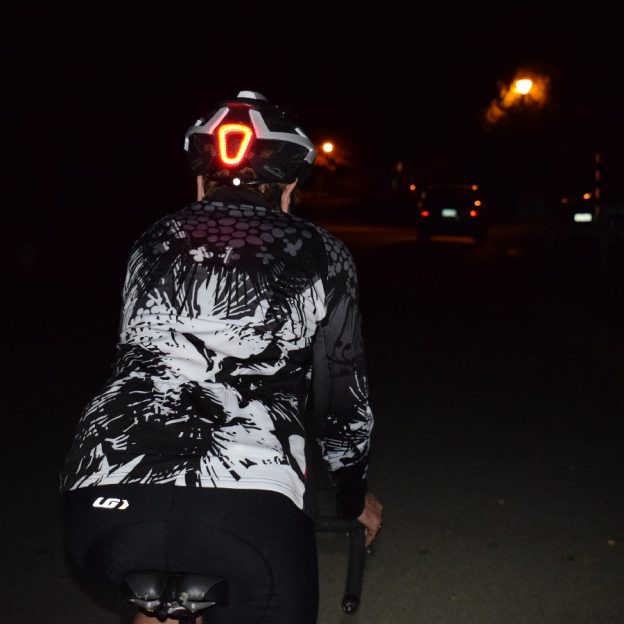
Rotlicht: Out of the box review for a one of a kind rear blinker

by John Brown, HaveFunBiking

Along with Lupine’s SL-A7 we received a smaller package containing the Rotlicht (German for “red light”). While on the exterior it looks t be a normal red blinking light, this little package houses big features. With the brightness of 160 lumens (higher than some front lights) and an internal rechargeable battery, this light might just be the best rear blinker ever made. Read on to see what else is hiding inside.

Unique blinker light features

One thing this light does that is totally unique, it gets brighter when you stop. Thanks to an accelerometer inside, the Rotlicht can sense when you are slowing and increase its output. Additionally, you can preset one of 20 different output settings (4 blink modes with 5 brightness levels).

Construction

As far a blinking lights go, this light is in a class by itself. Most lights are injection molded plastic, with poorly fitted o-rings designed to keep everything water resistant. How the Rotlicht differs is its CNC aluminum case. The lens and electronics are bolted into place and all the seals are snug and sure to be waterproof (although their site doesn’t give specifics as to how waterproof it is?). Also, the USB charging port is located on the back of the light, well protected from the elements, it uses a custom rubber plug to keep it dry.

How it fits

One of the best parts of the Rotlicht is how secure it mounts. The aluminum case acts as a great foundation for the lights long rubber pads. Those pads keep the light nearly immovable when mounted with the included rubber strap. I have ridden this light for a few weeks without it slipping down or twisting on the seatpost.

Moving forward

Like any product tested here in Minnesota, I am really excited to see how it handles the cold and wet winter ahead. So far the Rotlicht has shown remarkable promise even after being subjected to a cold, wet, salty ride. Stay tuned for a complete review.

The Lupine SL-A4 Road Light is by far the brightest, clearest, and most capable 900 lumen bike light I have ever used. Read on to learn more.

Lupine SL-A7 Road Light, out of the box and amazing first impression

by John Brown, HaveFunBiking.com

I really didn’t know what to expect when I heard we were going to be reviewing Lupine’s new SL A7 light. You see, Lupine is a brand I always hear excellent things about, but until now have not had the pleasure of trying one myself. This is by far the clearest and brightest 900 lumen light I have ever seen. It turns out the light uses a custom reflector and lens to focus the light exactly where you need it. Hearing amazing things about their quality and durability as I researched the light. My first experience with their product reinforced everything I have heard and more. Read on to learn more.

Lupine road bike light out of the box

What I did know as I opened the box, Lupine is a German based company. They do all the development and production in house and the light comes in a robust box with ample foam padding. The padding is precisely cut to fit the components and hold them firmly in place. based on their excellent packaging, I would say it’s unlikely your light could arrive damaged due to shipping. In the box you will find the lamp, battery, charger, two straps, mounting hardware and a pair of small wrenches. Overall, the light looked great and was rather light weighing just over ½ a pound. After reading about the light I was saddened to see its output was only a 900 lumen. Typically,  I find most lights below 1000 lumens to be rather dark for my commute. Turns out, I was way totally wrong as you will see.

Lupine

The SL A7 mounted to my handlebar.

My first impression

Like I said, 900 lumen lamp isn’t usually a lot of light. What I have learned with the SL A7 is that the amount of light is not as important as how that light is used. Turns out the light’s lens is as important as the light’s final output number. We will touch more on this later.

First, I mounted the light to my bike. The light uses a handlebar mount that appeared to be delicate. That elegant mounting system is easy to use and surprisingly holds the lamp firmly in place. I then secured the battery with the shorter of the two supplied straps and it showed no signs of moving.

Lupine SL A7

Detail of Lupine’s SL-A7 elegant mounting hardware

First Ride

Upon kicking off for my first ride with the SL A7, I could not believe what I saw. This is by far the brightest, clearest, and most capable 900 lumen light I have ever seen. The light uses a custom reflector and lens to focus the light exactly where you need it and not waste any of the beam.  It is difficult to explain, but the beam almost appears to be a solid bar of light, running horizontally, across your field of vision. In addition to Lupine’s mastery of the beam location, they seem to also offer a better color than I am used to seeing. Again, it’s hard to explain without seeing it, but the light has a color that seems to eliminate excess glare and shadow. I was able to see more than I typically can, and see it clearer.

The battery run time is published to be 3 hours. In my initial test, received every minute of that 3 hours before recharging. The battery itself was really keen with a push button charge indicator that worked well.

Lupine SL A7

Detail of the 6.6 Watt Hour battery included with the SL A7

Future tests

Although designed for on road purposes, I plan to take this SL-A7 light off road for a test. Our trails are pretty smooth, so I don’t think vibration will exceed the lamp’s mounting capabilities. Additionally I want to see exactly how much light this thing can throw in the woods. Another big concern of mine is to see how the light handles cold temperatures in the upper Midwest. So expect a lot of sub-freezing rides comments in my next review. All in all, if this light continues to perform like it did initially, I see a very good final review coming. Stay tuned.

The Genie Helmet is a revolutionary helmet that boasts a headlight and tail light as well as remote activated turn signals. Read on to see some more detail.

A first look at the revolutionary MagicShine Genie Helmet

by John Brown, HaveFunBiking.com

Recently, we reviewed a light from the wizards over at MagicShine, the MJ-900B. Along with the light they also included an amazing Genie helmet. The Genie is a revolutionary helmet that boasts a headlight and tail light as well as remote activated turn signals. Read on to see some more detail.

Genie Helmet out of the box

The Helmet is packaged in a relatively sturdy cardboard box with a foam liner to keep things stable. Within the box is the helmet, remote, instructions, screwdriver, battery cell, and a wedge shaped device. Once I read through the instructions, I saw that I needed to install the battery cell. In order to install the cell, I had to remove the battery cover on the top of the helmet. Removing the cover is done by loosening a single Philips head bolt and using the wedge device to pry the cover off.  With the battery cell installed, activating the light is as simple as pressing the power button once.

Genie

The MagicShine Genie out of the box

Genie Helmet functions

You can tell the helmets system is activated by looking at the rear blinker. Once the system is on, the rear blinker will be lit. In order to power the headlight or turn signals you simply press the corresponding remote button once. To change mode, you press the button again. Here is the only tricky part, In order to turn off the headlight or blinkers, you need to hold the button down for between 2-3 seconds.

Genie

Front light and turn signals with inset of remote

The Genie Helmet fit

The helmet is a one size fits all variety with a dial type retention device. The overall fit is a bit round for my head, so I felt a bit more pressure on the front of the helmet than I would prefer. That being said, I run into the same problem with Giro brand helmets, so I think it’s more an issue with my head than the helmet. It has ample padding throughout so the feel of the helmet is soft.

Genie

Ample, soft padding in the Genie helmet

How it feels

With so much going on within the Genie helmet, there is some added weight. Wearing the helmet feels just like when I attach a GoPro to my standard helmet. That weight can be a little strange at first, but like the camera, you will get used to it.

More to Come

Because there are many different head shapes, there will be more than one person trying out this helmet. We want to give the fit a thorough review. For the function of the helmet, I am really excited to see if cars respect the turn signals, how warm the headlight gets, and how long the battery lasts. Stay tuned for more info.

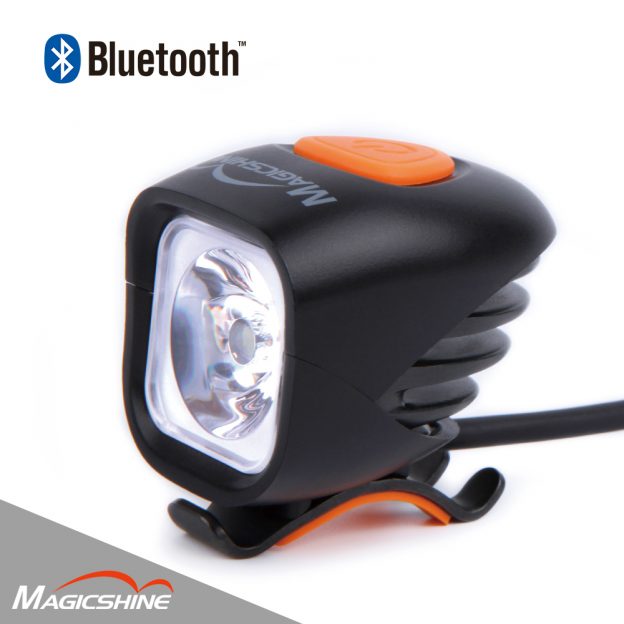
First look at an amazing new bike light, the MagicShine MJ-900B

by John Brown, HaveFunBiking.com

MagicShine might not be the first name you think of when going out to buy a bike light, but maybe it should? The company’s beginnings were humble. In 1999, Minjun Electronic (Magic Shine’s parent company), opened for business in Shenzhen, China with the intent to produce LED light components. As a result of the need for a high quality/low cost light, in 2008 MagicShine was created, bursting onto the scene with the MJ-808 light. In fact, that light produced a startling 2000 lumens at a cost less than ½, of its competitors. Now, almost 10 years later they continue to produce cutting edge lights at approachable prices, like the MagicShine MJ-900B.

What makes this Magicshine Light so unique?

The MJ-900B is a 1000 lumen, single beam, rechargeable LED light. This Smart Light mounts to your handlebar and it recharges with a USB cable. At maximum brightness, the MJ-900B has a runtime of over 2 hours. Overall, these stats aren’t unique to the MagicShine, what is exciting is that this light can connect via Bluetooth with an app on your phone to manage light power and mode. On top of that, it retails on MagicShine’s website for $79.99 (well below any of its competitors).

MagicShine

Out of the Box for the first time

Out of The Box

The MJ-900B comes in a sturdy box, with a clean, die-cut foam packaging so you shouldn’t expect any damage from shipping. In the box you will find the lamp, lamp strap, battery, battery strap, USB cable, and instructions. The lamp is exquisite in design, and uses what appears to be only super durable materials. The lamp in held in place via a rubber strap that hooks the lamp’s steel baseplate. Whereas the rubber strap isn’t unique, the fact that they use steel rather than plastic for the base is special. Additionally, the Lamp has large cooling fins cast into the back of the light which are both elegant and robust.

Lamp details front and side

The battery is well sealed and sports a large, soft, rubber base that should hold well against any type of surface. The 18” battery cord is removable for storage and watertight once installed. There is a rubber cap on the backside that can be opened to expose the charging port. Next to the charging port is a USB port you can plug into to charge other devices and a power button that displays the batteries current charge.

Detail of the USB charging doc, power indicator, and removable battery cable

Bluetooth app functions for MagicShine

I downloaded the MagicShine App to see just how well it worked. The first thing I noticed was that the App started without asking for access to any of my phone’s files (it’s a major pet peeve of mine when apps need access to unrelated parts of your phone). Once the app opened, you add your email address and receive an activation code through e-mail quickly. With the code in, the app connected to my light automatically. From there, it was super easy to navigate. Changing light settings or functions is as easy as tapping the icon and if you find settings you like, they can be saved for later use.

The Bluetooth app is really easy to navigate and expands the amount of control you normally have over your light

Moving forward

I am excited to see how long the light runs and how quickly the battery takes to recharge. As a point of reference, the light came out of the package with a full charge. Considering that package was most likely sealed months ago, it’s a good indication the batteries are pretty stable. Keep an eye out for the extended review coming up soon.