Tag Archives: commuting

Bike commuting is an easy way to increase fitness, jump start your energy level, and enjoy nature. Read and learn about what you need to commute in comfort.

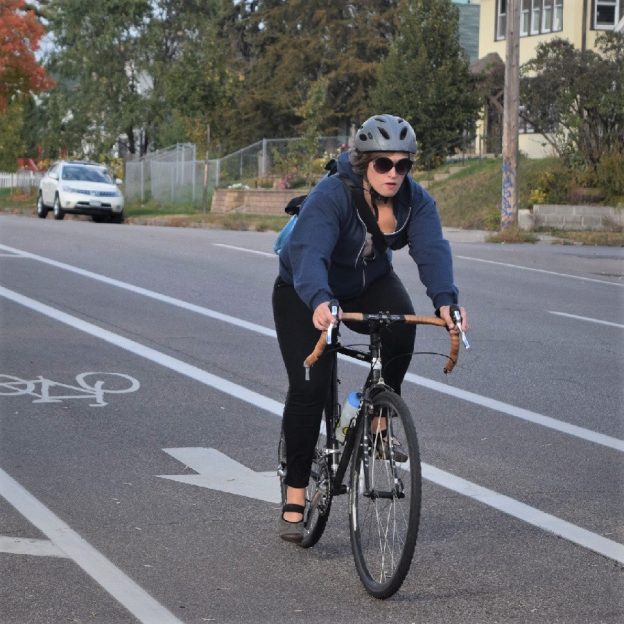
Bike commuting necessities and niceties to make your ride great

by John Brown, HaveFunBiking.com

Bike commuting is an easy way to add miles, increase fitness, jump start your energy level for the day while enjoying nature, especially with warmer weather. Once you start commuting by bike, you will find the hassle factor lessens while your overall trip acts as your workout for the day. You are saving yourself hours in the gym. Here is a list of other beneficial necessities to make commuting by bike much more enjoyable.

Win this e-bike at HFB

Bike Commuting Necessities

While commuting by bike, there are very few items you need to have to get started. Ultimately, the only thing that you have to have is a bike. However, here is a list of items that will make your ride safer and a few that will make it easier to function at work or class properly once you are there for added comfort and safety. Past functioning, you need to stay safe on the bike also, so I consider all these things necessities.

Helmets

First and foremost, a helmet is an essential product you can buy after the bike. While self-preservation typically keeps us upright on our bikes, while commuting, we need to consider many other actions we need to protect ourselves from. Now that you’re commuting, wearing a helmet isn’t just a logical safety choice but can be very comfortable. Read here to learn how helmets protect you, become lighter, fit better, and are more comfortable than ever.

Lights

While the helmet is a crucial safety product, it is not the only important one. Lights, whether it is day or night or your level of bike riding skill, are essential to ensure you have the safest ride possible. Sometimes, when riding in conditions without optimal visibility, you need a little added illumination. That’s where proper lighting comes in.

Locks

When commuting, you can’t be with your bike at all times. You’ll have to leave it unattended for extended periods, making it susceptible to theft. However, that doesn’t mean you can’t help protect it. Here’s some info on the different bike locks and other tips to ensure your bike’s safety.

Waterproof Bag

Being caught in the rain is not possible when commuting; it is inevitable. To protect your possessions, invest in a waterproof bag. For example, a messenger bag made with a PVC liner can easily carry all your stuff and keep them dry. Plenty of waterproof panniers are available for riders looking to take their things on the bike.

Bike Commuting Niceties

The following items aren’t necessary for commuting but make your trip quicker and more comfortable.

Shoes and pedals

Most riders only consider clipless pedals a competitive advantage, but nothing could be farther from the truth. Few things are as practical as clipless pedals and cycling shoes when riding a bicycle. There is a simple equation that always holds: control = comfort. In the quest for more control of your bike, secure your feet in place on the pedal. By doing this, you can use muscles more efficiently, be connected to your bicycle more directly, and relieve excessive strain on your feet. Read here to see how easy it is to learn to ride “clipless.”

Rain gear

The best way to stay dry is to wear waterproof clothing. While most synthetic fabrics still insulate when wet, being wet diminishes their ability to keep you warm. A jacket and pants are a great way to start, but socks and gloves make the outfit complete. In their most basic form, many materials are waterproof, but as soon as they are perforated with stitching, zipped closed with generic zippers, and left to be loose at all the cuffs, their waterproofing goes out the window. Before you go out and buy anything labeled “waterproof,” understand that all waterproofing is not the same.

Cycling shorts

Shorts come in all shapes and sizes. Tight shorts are popular because they offer comfort and unencumbered movement around the bicycle. Baggy shorts are trendy for their casual look and the advent of pockets. Even cycling skirts (called skorts) offer excellent comfort and a tremendous off-the-bike look. The padding will make your ride more comfortable, whatever short you decide.

Fenders

Fenders are a standard option for many. They are light and sturdy and keep you dry when riding in wet conditions. If you don’t want to keep them on your bike at all times, snap-on style fenders are available, while a more permanent option is a bolt-on fender.

For winter, studded tires are helpful.

Like winter tires for your car, studded tires are available for your bike. They usually have a few hundred carbide metal studs inserted in the tire to give you traction in icy conditions. These tires are typically twice as heavy as a non-studded version, so be sure to use them only when necessary.

Bike commuting is a great way to enjoy the outdoors while traveling to and from school or work. It is an excellent exercise that will give you better attention, higher energy levels, and some free time to think without critical or significant distractions.

About John Brown, the author

As a lifelong cyclist and consummate tinkerer, John operates Browns Bicycle in Richfield, MN. It all started for him in grade school when the bike bug bit, and that particular fever was still there. Now, and over the past thirty years, he has worked at every level in the bike industry. He is starting, like most, sweeping floors and learning anything he could about bikes. He eventually graduated as a service manager and then as a store manager. Through the years, he has spent extensive time designing and sourcing bicycles and parts for some of the largest bike companies in the world. All the while focusing on helping as many people as possible enjoy the love of riding a bike. In that pursuit, he has taught classes (both scheduled and impromptu) on all things bikes. John also believes in helping every rider attain their optimal fit on the cycle of their dreams. Please feel free to stop in any time and talk about bikes, fit, and parts, or share your latest ride. You can also see John’s tricks and tips on the Brown Bicycle Facebook Page.
No matter your level of bicycle riding skills, bike lights are essential to make sure you have a safe ride, day or night. Bike lights aren't only needed when the sun goes down.

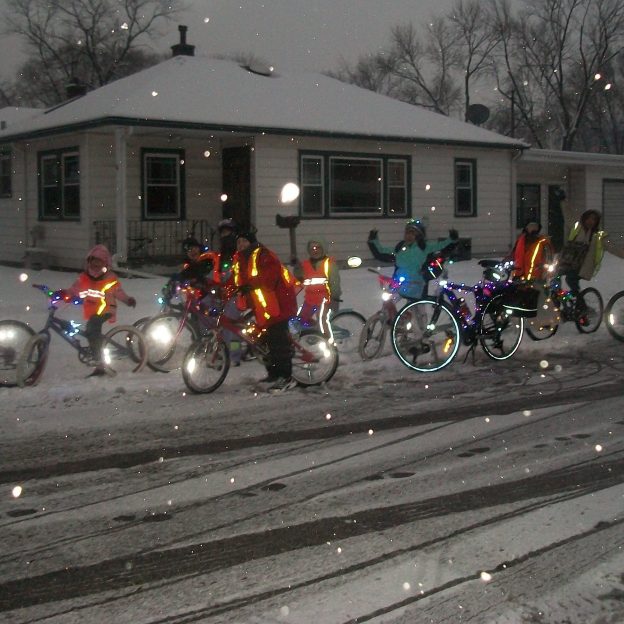
With more darkness then daylight the zen and the art of night biking

by John Brown, HaveFunBiking.com

Seasons change and eventually we are left with more darkness than daylight, thus night biking. day. This annual march to the darkest day of the year was the inspiration Robert Frost needed to write Stopping by Woods on a Snowy Evening.  On occasion my “Little Horse” asks if “there is some mistake”, but of course Frost was talking about the animal and I the machine. The draw of the dark and cold is the same though, snow muffles sound and darkness can be beautiful. If you haven’t tried night mountain biking, I encourage it!

mountain biking at night

Snow, dark, and silence make mountain biking at night great.

Night biking, who turned off the lights?

You will need a good light to mountain bike at night. I recommend to start with something around 1000 lumens, but more if you can get it. Be aware of the beam pattern when you buy a light because while a wide and dim beam would be great to alert passing motorists of your presence. When mountain biking, you need all the light in front of you, so for that reason try to find a light with a rather narrow beam. Another consideration when buying a light is if it can be mounted on your helmet. Many riders prefer to sync their light with their sight line, so they can look around corners and up the trail if needed, while pointing the bike where it needs to go. By contrast, bar mounted lights only point toward where you are going at that moment.

Buddy system is best for night biking

Night riding is not a time to go it alone. It’s not as if the actual riding is any more dangerous or difficult, but if there is an issue, you are far less likely to run into a helpful passerby at night. Therefore, bring your helpful passerby along with you. The only issue I have had riding with others at night is the shadows that more than one light will produce. This issues is easily remedied by spreading out a bit further than you would in the daytime.

Night Riding in groups is fun and safe.

What to expect when night biking

The greatest part of night riding is it’s ability to surprise you. As an example, I find that trails I know by heart take on new dimensions when my light is focused but limited. This change of visual often directs me to take new lines and approach areas differently. Also, you see totally different wildlife in the woods at night. Coyote, owl, and bats are some of my more favorite night time friends. Finally, mountain biking at night gives you the feeling that you are going faster. I don’t exactly know the psychological reasons, but when you can only see 20-30 feet in front of you, those feet seem to accelerate faster than if your vision was unlimited.

Quiet

Riding a mountain bike at night is also a chance to enjoy the quiet. Fewer riders and less commotion helps me eliminate one more distraction and just enjoy the trail. Add in snow to muffle any sound that is there, and you have the recipe for a Zen like mountain biking experience.

mountain biking at night

Surroundings melt away leaving only the trail ahead.

“But I have promises to keep and miles to go before I sleep”

We all have a life outside of our bike, and far too little time to live it. Riding your mountain bike at night is a way to find hours you might not normally have to ride. After the kids are asleep, the dishes are done, lunches are packed and laundry folded, consider mountain biking an alternative to turning in for the night. You might just love what you find!


As thoughts turn to visibility on my daily commute. Here is some info and a few tips on staying visible while riding at night.

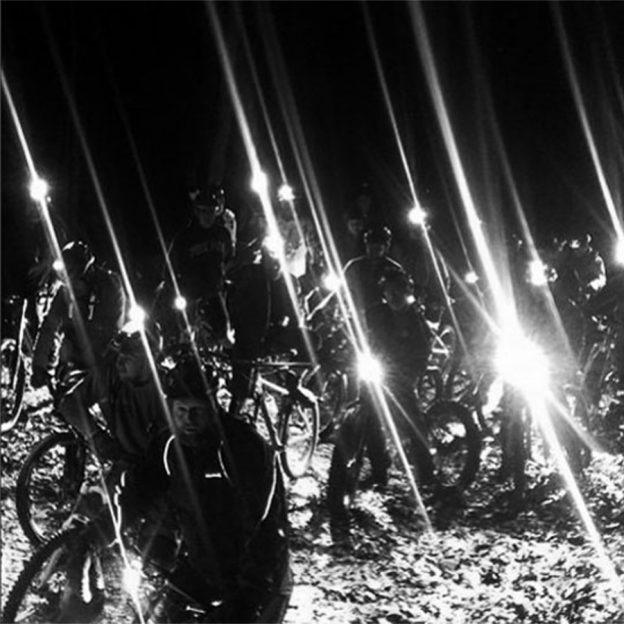
Visibility and you, staying safe while riding your bike at night

by John Brown, HaveFunBiking.com

With Thanksgiving long gone, we are firmly in the grip of winter. With colder days and darker nights, my thoughts turn to visibility on my daily commute. Here is some info and a few tips on staying visible while riding at night.

Types of Visibility

The main forms of clarity we focus on are passive and active. Things like reflectors and bright colors are forms of passive visibility, while lights and blinkers are great examples of an active visual form.

Passive visibility

Many rides start in the light and only devolve into darkness as the ride stretches on. Provided that your ride is under street lamps or some form of light, passive clarity will get you home safely. The lowly reflector is the most common form of passive visibility. Luckily, reflectors are required by the CPSC to be installed on all bicycles sold in the united states. Reflectors come in two colors, white (front and wheels) and Red (rear). Additionally, many apparel companies install reflective materials onto their products and work like the reflector on your bike, taking any light thrown at you and returning it back to the source. Where passive reflectivity falls short, is when there is no light source to activate the visibility.

Visibility

The simple reflector offers great visibility when seen by motorists.

visibility

High visibility clothing can help you stand out also.

Active visibility

When the area is devoid of a light source you need to create that light to keep yourself safe. For cyclists, Lights and blinkers are the most common visibility product. Where the light and the blinker differ is that blinkers are designed to be seen while lights allow a rider to both see and be seen.

Great lights are usually rechargeable and use an LED bulb. For riders who spend a lot of time off-road or on unlit paths, these lights are a necessity. While most mount onto the bars or helmet, there are a few companies who integrate lights into the bike or helmet.

visibility

You won’t get better lighting than the Magicshine Genie helmet with remote.

Blinkers are usually battery operated and use an LED to flash intermittently. These blinkers can easily be mounted to your bicycle and in some instances, are incorporated into helmets, gloves, shoes, saddles and handlebars.

visibility

Good rear blinkers like the Lupine Rotlicht are key.

What to use

Overall, think ahead before your next ride and pack to insure you can see and others can see you. Mount a pair of blinkers to the bike (one front and one back) so when you get stuck in low light conditions, you can simply switch the blinkers on. If your route is going to be unlit for any portion, a front light makes things safer. Additionally, be sure to wear highly visible clothing in combination with any other gadget.

Rotllicht "red light" off the bike is great for visibility.

Rotlicht: Out of the box review for a one of a kind rear blinker

by John Brown, HaveFunBiking

Along with Lupine’s SL-A7 we received a smaller package containing the Rotlicht (German for “red light”). While on the exterior it looks t be a normal red blinking light, this little package houses big features. With the brightness of 160 lumens (higher than some front lights) and an internal rechargeable battery, this light might just be the best rear blinker ever made. Read on to see what else is hiding inside.

Unique blinker light features

One thing this light does that is totally unique, it gets brighter when you stop. Thanks to an accelerometer inside, the Rotlicht can sense when you are slowing and increase its output. Additionally, you can preset one of 20 different output settings (4 blink modes with 5 brightness levels).

Construction

As far a blinking lights go, this light is in a class by itself. Most lights are injection molded plastic, with poorly fitted o-rings designed to keep everything water resistant. How the Rotlicht differs is its CNC aluminum case. The lens and electronics are bolted into place and all the seals are snug and sure to be waterproof (although their site doesn’t give specifics as to how waterproof it is?). Also, the USB charging port is located on the back of the light, well protected from the elements, it uses a custom rubber plug to keep it dry.

How it fits

One of the best parts of the Rotlicht is how secure it mounts. The aluminum case acts as a great foundation for the lights long rubber pads. Those pads keep the light nearly immovable when mounted with the included rubber strap. I have ridden this light for a few weeks without it slipping down or twisting on the seatpost.

Moving forward

Like any product tested here in Minnesota, I am really excited to see how it handles the cold and wet winter ahead. So far the Rotlicht has shown remarkable promise even after being subjected to a cold, wet, salty ride. Stay tuned for a complete review.

The Lupine SL-A4 Road Light is by far the brightest, clearest, and most capable 900 lumen bike light I have ever used. Read on to learn more.

Lupine SL-A7 Road Light, out of the box and amazing first impression

by John Brown, HaveFunBiking.com

I really didn’t know what to expect when I heard we were going to be reviewing Lupine’s new SL A7 light. You see, Lupine is a brand I always hear excellent things about, but until now have not had the pleasure of trying one myself. This is by far the clearest and brightest 900 lumen light I have ever seen. It turns out the light uses a custom reflector and lens to focus the light exactly where you need it. Hearing amazing things about their quality and durability as I researched the light. My first experience with their product reinforced everything I have heard and more. Read on to learn more.

Lupine road bike light out of the box

What I did know as I opened the box, Lupine is a German based company. They do all the development and production in house and the light comes in a robust box with ample foam padding. The padding is precisely cut to fit the components and hold them firmly in place. based on their excellent packaging, I would say it’s unlikely your light could arrive damaged due to shipping. In the box you will find the lamp, battery, charger, two straps, mounting hardware and a pair of small wrenches. Overall, the light looked great and was rather light weighing just over ½ a pound. After reading about the light I was saddened to see its output was only a 900 lumen. Typically,  I find most lights below 1000 lumens to be rather dark for my commute. Turns out, I was way totally wrong as you will see.

Lupine

The SL A7 mounted to my handlebar.

My first impression

Like I said, 900 lumen lamp isn’t usually a lot of light. What I have learned with the SL A7 is that the amount of light is not as important as how that light is used. Turns out the light’s lens is as important as the light’s final output number. We will touch more on this later.

First, I mounted the light to my bike. The light uses a handlebar mount that appeared to be delicate. That elegant mounting system is easy to use and surprisingly holds the lamp firmly in place. I then secured the battery with the shorter of the two supplied straps and it showed no signs of moving.

Lupine SL A7

Detail of Lupine’s SL-A7 elegant mounting hardware

First Ride

Upon kicking off for my first ride with the SL A7, I could not believe what I saw. This is by far the brightest, clearest, and most capable 900 lumen light I have ever seen. The light uses a custom reflector and lens to focus the light exactly where you need it and not waste any of the beam.  It is difficult to explain, but the beam almost appears to be a solid bar of light, running horizontally, across your field of vision. In addition to Lupine’s mastery of the beam location, they seem to also offer a better color than I am used to seeing. Again, it’s hard to explain without seeing it, but the light has a color that seems to eliminate excess glare and shadow. I was able to see more than I typically can, and see it clearer.

The battery run time is published to be 3 hours. In my initial test, received every minute of that 3 hours before recharging. The battery itself was really keen with a push button charge indicator that worked well.

Lupine SL A7

Detail of the 6.6 Watt Hour battery included with the SL A7

Future tests

Although designed for on road purposes, I plan to take this SL-A7 light off road for a test. Our trails are pretty smooth, so I don’t think vibration will exceed the lamp’s mounting capabilities. Additionally I want to see exactly how much light this thing can throw in the woods. Another big concern of mine is to see how the light handles cold temperatures in the upper Midwest. So expect a lot of sub-freezing rides comments in my next review. All in all, if this light continues to perform like it did initially, I see a very good final review coming. Stay tuned.

Bike Pic March 6, find your next adventure

With spring in the air, it’s time to get your bike ready for another season of mountain biking. To find your next adventure, see all the great places to ride and explore in the new Minnesota Bike/Hike Guide.

Thanks for viewing the Bike Pic of the Day here at HaveFunBiking (HFB). 

Now, rolling into our 10th year as a bicycle tourism media our goal is to continue to encourage more people to bike, while showcasing unforgettable places to ride. As HFB searches and presents more fun cycling related photos, worth a grin, scroll through the information and stories we have posted that may help you find your next adventure. Then, while out there if you see us along a paved or mountain bike trail, next to the route you regularly commute on, or at an event you plan to attend, be prepared to smile. You never know where our camera’s will be and what we will post next!

Do you have a fun bicycle related photo of yourself or someone you know that you would like to see us post? If so, please send it our way and we may use it. Send your picture(s) to: [email protected] with a brief caption (of each), including who is in the photo (if you know?) and where it was taken. Photo(s) should be a minimum of 800 pixels wide or larger for us to consider using them. If we do use your photo, you will receive photo credit and an acknowledgment on Facebook and Instagram.

As HaveFunBiking continues to encourage more people to ride, please reference our blog and the annual print and quarterly digital Minnesota Bike/Hike Guide to find your next adventure. We are proud of the updated – At-a-Glance information and maps we are known for at the HFB Destination section on our website and in the guide. Now, as the Guide goes into its seventh year of production, we are adding a whole new dimension of information, now available for mobile devices. 

So bookmark HaveFunBiking.com and find your next adventure – we may capture you in one of the next photos we post.

Have a great day!