Tag Archives: Blinker

No matter your level of bicycle riding skills, bike lights are essential to make sure you have a safe ride, day or night. Bike lights aren't only needed when the sun goes down.

Bike lights will help to keep you safe day and night!

by John Brown, HaveFunBiking.com

No matter your bicycle riding skills, bike lights are essential to make sure you have a safe ride, day or night. Lights aren’t only needed when the sun goes down. In fact, lights are super helpful when riding in conditions where traffic may be present or limited visibility. That’s where proper lighting comes in. Plus, many states, like Minnesota, require you to have lights on your bike. The two types of bike lights on the market are lights that allow you to see and lights that allow others to see you.

Bike lights that Help You See

Lights that help you see are usually high-output LEDs that cast a focused beam of light in front of you. These lights start at 600 lumens and increase output from there—their size and run time depending on the battery. For example, rechargeable and battery-operated lights are usually larger, while lights run by a generator are smaller.

So, how do you know which one is best for you? It all depends on how often you plan on using it. The battery-operated kind works well as backups in the rare chance you get caught in the dark. The rechargeable kind is best if you plan to use them regularly and want to save on the cost of buying batteries. If you ride long periods in the dark, it’s hard to beat a generator-powered light. Any of these lights will be great for unlit roads, trails, or paths.

When you look to buy a light, they are all compared by the lumens they produce. What’s a lumen, you ask? Well, lumens are the most popular description of brightness. In the past, lights were measured by the amount of energy they consumed (watts), but with LEDs that get more light output with less power consumption, measuring brightness with watts has become impossible. Simple rule, more lumens equal brighter light. As a comparison, the iPhone flashlight is less than 10 lumens.

Bike lights to Help People See You.

The lights designed to be seen use an LED to flash intermittently when turned on. Surprisingly they can be as small as a few coins stacked on top of one another and have run times in the hundreds of hours. Additionally, they are usually easy to move from bike to bike if needed and are great for city streets and well-lit paths. Some riders are now finding added security in running these lights during the daytime.

Reflectivity

Another great way to ride safely in the dark is to use reflective products. Thanks to advancements in reflective technology, you can find completely reflective clothing, looks like normal fabric and glows when hit by light. There are reflective stickers you can adhere to your bike and reflective bags you can mount behind the saddle or on your handlebars.

How to be Seen

Visibility is about safety, so it’s best to use a belt and suspenders approach. A headlight will allow you to see and be seen from the front. Match that with a reflective jersey, and you become visible from the sides as well. Mount a rear blinker, and you become visible from 360 degrees.

Sign up for our free, weekly E-Magazine for more great content!

The Genie Helmet is a revolutionary helmet that boasts a headlight and tail light as well as remote activated turn signals. Read on to see some more detail.

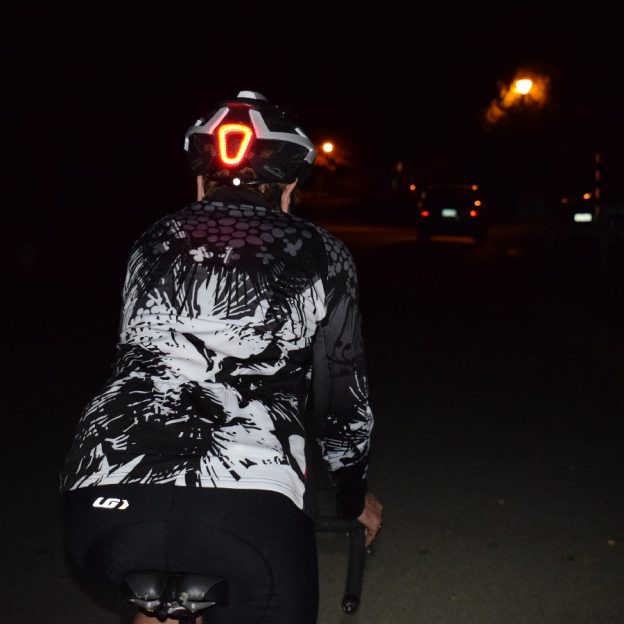
A first look at the revolutionary MagicShine Genie Helmet

by John Brown, HaveFunBiking.com

Recently, we reviewed a light from the wizards over at MagicShine, the MJ-900B. Along with the light they also included an amazing Genie helmet. The Genie is a revolutionary helmet that boasts a headlight and tail light as well as remote activated turn signals. Read on to see some more detail.

Genie Helmet out of the box

The Helmet is packaged in a relatively sturdy cardboard box with a foam liner to keep things stable. Within the box is the helmet, remote, instructions, screwdriver, battery cell, and a wedge shaped device. Once I read through the instructions, I saw that I needed to install the battery cell. In order to install the cell, I had to remove the battery cover on the top of the helmet. Removing the cover is done by loosening a single Philips head bolt and using the wedge device to pry the cover off.  With the battery cell installed, activating the light is as simple as pressing the power button once.

Genie

The MagicShine Genie out of the box

Genie Helmet functions

You can tell the helmets system is activated by looking at the rear blinker. Once the system is on, the rear blinker will be lit. In order to power the headlight or turn signals you simply press the corresponding remote button once. To change mode, you press the button again. Here is the only tricky part, In order to turn off the headlight or blinkers, you need to hold the button down for between 2-3 seconds.

Genie

Front light and turn signals with inset of remote

The Genie Helmet fit

The helmet is a one size fits all variety with a dial type retention device. The overall fit is a bit round for my head, so I felt a bit more pressure on the front of the helmet than I would prefer. That being said, I run into the same problem with Giro brand helmets, so I think it’s more an issue with my head than the helmet. It has ample padding throughout so the feel of the helmet is soft.

Genie

Ample, soft padding in the Genie helmet

How it feels

With so much going on within the Genie helmet, there is some added weight. Wearing the helmet feels just like when I attach a GoPro to my standard helmet. That weight can be a little strange at first, but like the camera, you will get used to it.

More to Come

Because there are many different head shapes, there will be more than one person trying out this helmet. We want to give the fit a thorough review. For the function of the helmet, I am really excited to see if cars respect the turn signals, how warm the headlight gets, and how long the battery lasts. Stay tuned for more info.