Category Archives: News

Tubeless tires are one of the best upgrades you can make to your bike. This is the HaveFunBiking guide to tubeless tire setup and troubleshooting.

Tips and tricks for setting up your tubeless tires on your bike

By John Brown, HaveFunBiking.com

Tubeless tires are one of the best upgrades you can make to your bike. They are more resistant to flats, ride better, and are lighter. With all their benefits, the fear of setting them up keeps many riders from enjoying the tubeless world. If you are still refusing to take the leap for fear of having to care for them, read on. This is the HaveFunBiking guide to tubeless tire setup and troubleshooting.

Are tubeless tires compatible for your bike wheels?

First step in setting up your tubeless wheels is to verify you have all the right parts. First, verify with the manufacturer that your bike rim and tire are tubeless ready. Review the rim and tire for a tubeless ready designation. Common terms for Tubeless are “Tubeless ready”, “TLR”, “TCS”, “Tubeless Easy”, “TNT”, and “TR”.  Once you assure that the rim and tire are tubeless ready, you can move on to getting your wheels and tires ready.

tubless tire

Vittoria’s TNT tubeless logo

Tubeless tire

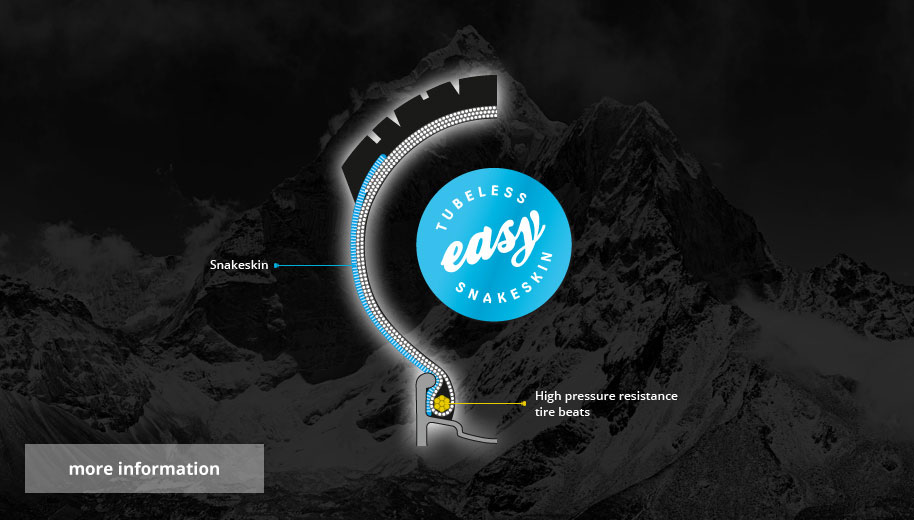
Schwalbe’s Tubeless easy logo

Prep

First, take the wheels off your bike. Once they are off remove the existing tires and tubes off the wheels. For the next step, you need to verify what type of rim tape you have. Rim tape is the barrier in the center of the rim that holds the innertube’s pressure from pressing into the spoke holes. If you have cloth tape or a nylon belt, you need to remove it. If there is an adhesive plastic tape applied to the rim (frequently yellow or blue), leave it in place. Next, clean the rim thoroughly with soap and water. Also clean the beads of you tire with soap and water.

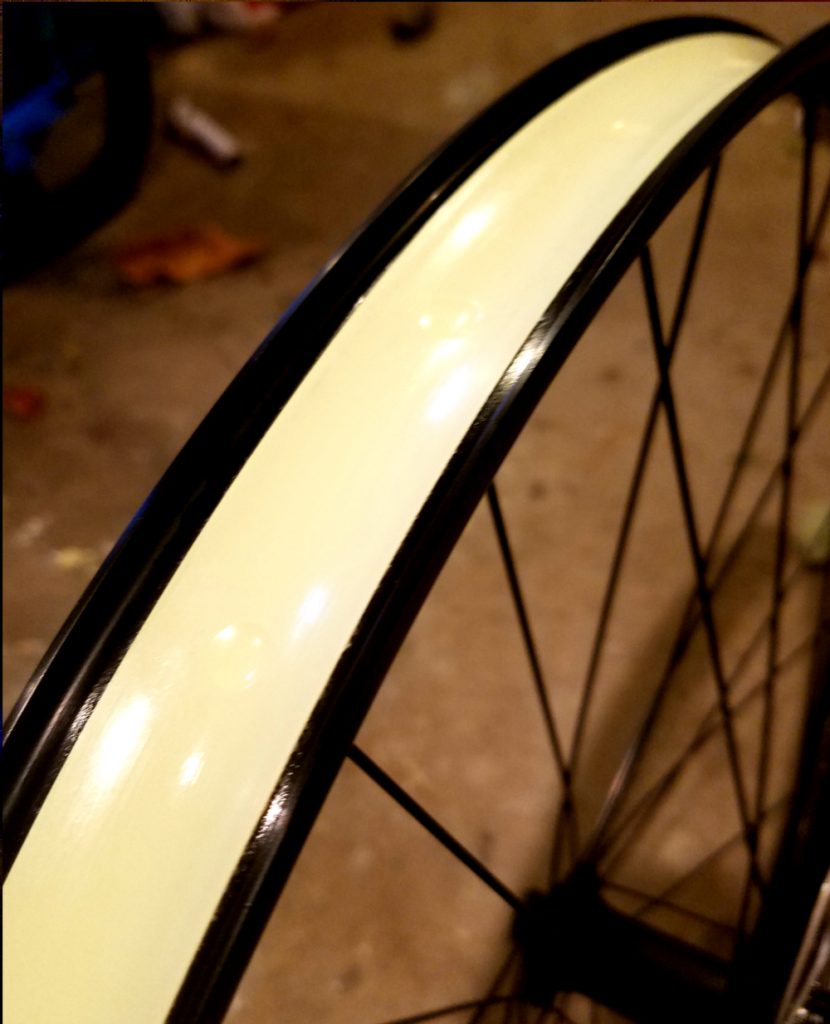
Yelow Tubeless rim tape is well applied here

Tubeless tire bike tape

If you had to remove a nylon belt or cloth tape, you will need to replace it with a tubeless rim tape. There are many different brands and they all work well, the only thing you want to make sure of is that the rim tape matches your rim width. I like to pick a tape that will cover the inside of the rim from edge to edge. That means, if the rim has a 23mm inner width a tape with a 23mm width fits perfectly ensuring an airtight fit between tire and rim. When you install the tape, start opposite to the valve hole, Stretch the tape slightly as you go, and overlap the end by at least four inches. Once the tape is in place, use your fingers to burnish it down into the rim.

tubeless tire

Installing tape on a clean bike rim.

Installing the valve

Now that the bike rim is taped and ready for a tire, you need to install the tubeless valve. A tubeless valve looks just like a standard presta valve except instead of being attached to an innertube, it has a small seal at the end of it. To install the valve, first locate the valve hole in the rim and pierce the rim tape. I like to use an awe that has a diameter just a bit smaller than the tubeless valve. Once you pierce the tape, push the tubeless valve through it and tighten it into place with a valve nut. You can also dip the valve’s seal in a little tire sealant before you install it to maximize the airtight seal.

Tubeless tires

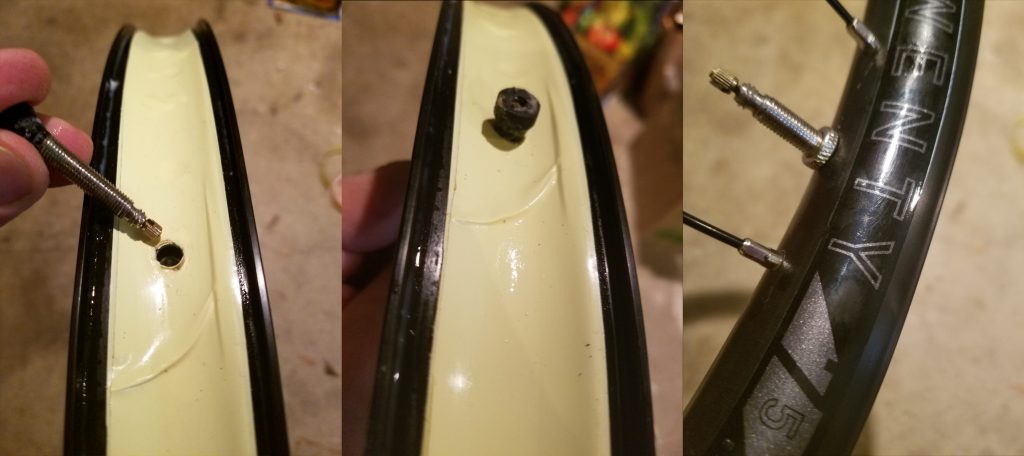
Valve installation process

Seating the tire

Installing a tubeless tire is almost an identical process to installing a standard tire, except there is no tube. Start by installing one side of the tire bead onto the rim, before installing the second bead, you can add sealant (more about this in the next section) or just put the tire all the way onto the rim dry. I urge you not to use a tire lever to install the tire. Quite often, tire levers can damage the tire or tape, limiting their ability to hold an airtight seal.

Sealant

The tire sealant I mentioned in the last section is the fluid that goes into your tire, that helps everything stay airtight. There are heaps of sealants on the market, but for the most part they all get installed one of two ways. You can either pour the desired amount into the tire before it is completely installed, or you can inject the sealant through the valve. Sealant can dry out within the tire over time, so you should plan to add more sealant to the tires on a quarterly basis. To add sealant through the valve, you will need to remove the valve core from the tubeless valve, and use an injector to force fluid into the tire

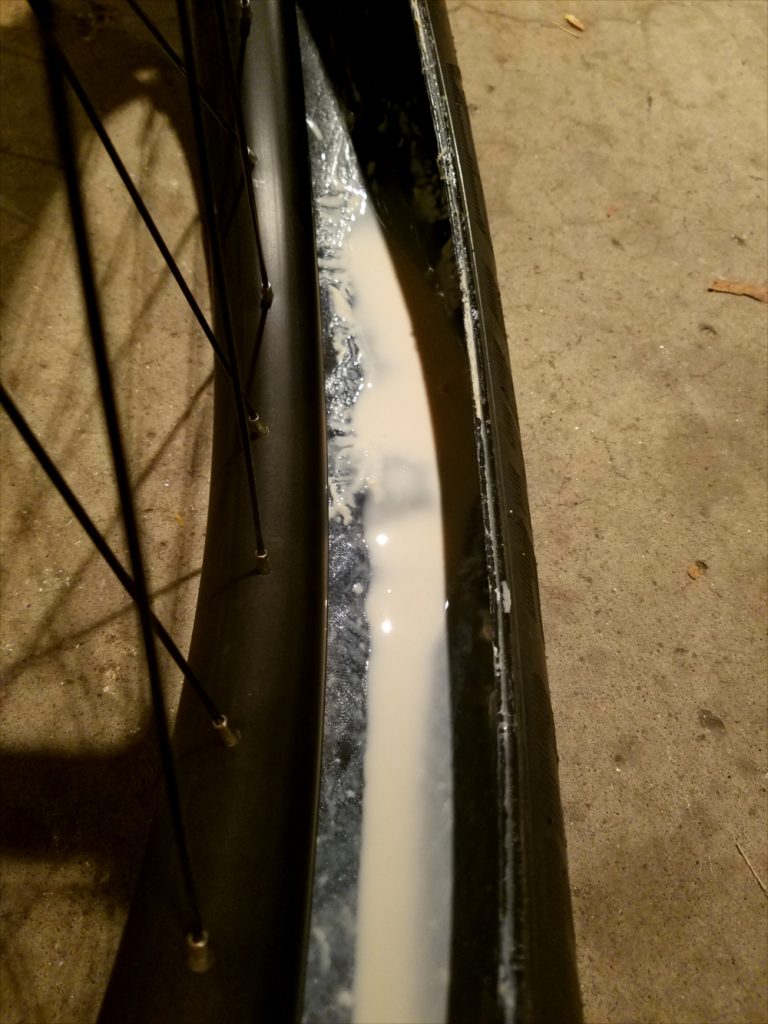
Sealant in the tire. You can see the dried sealant on the tire

Airing it up

One of the most difficult parts to installing a tubeless setup can be getting it to hold air. I know this sounds strange, but with all the different rim and tire manufacturers out there, getting consistent tolerances between the two is difficult. This variation in tolerance is what can lead to some difficulty airing the tires up for the first time. Thankfully, as an industry, tolerances are getting closer every year.

There are two schools of thought on airing up the tire initially: with sealant or without. While there are benefits to both ways it breaks down to this. With sealant in the tire, you stand a better chance of having the system seal initially. Without sealant, if there is any issue with the tire seating, you don’t need to fool with the mess of sealant correcting the issue. Overall, I like to be careful with my prep, tape application, and valve installation so I can air up the tire with sealant.

With Sealant

To air up the tires with sealant in the system, ensure the tire is seated on the rim well. Inspect that the tubeless valve is sitting inside the cavity of the tire (it I possible for the tire to be sitting completely off to one side of the valve on wider rims). Then, with a good floor pump, start adding air as quickly as you can. It is ok if the system leaks a bit of air and fluid at first, but after 30 seconds of pumping you should have a tire that is beginning to hold air well. I like to bring the tire up to max pressure initially to guarantee it’s seated completely, then I lower the pressure down to my desired PSI.

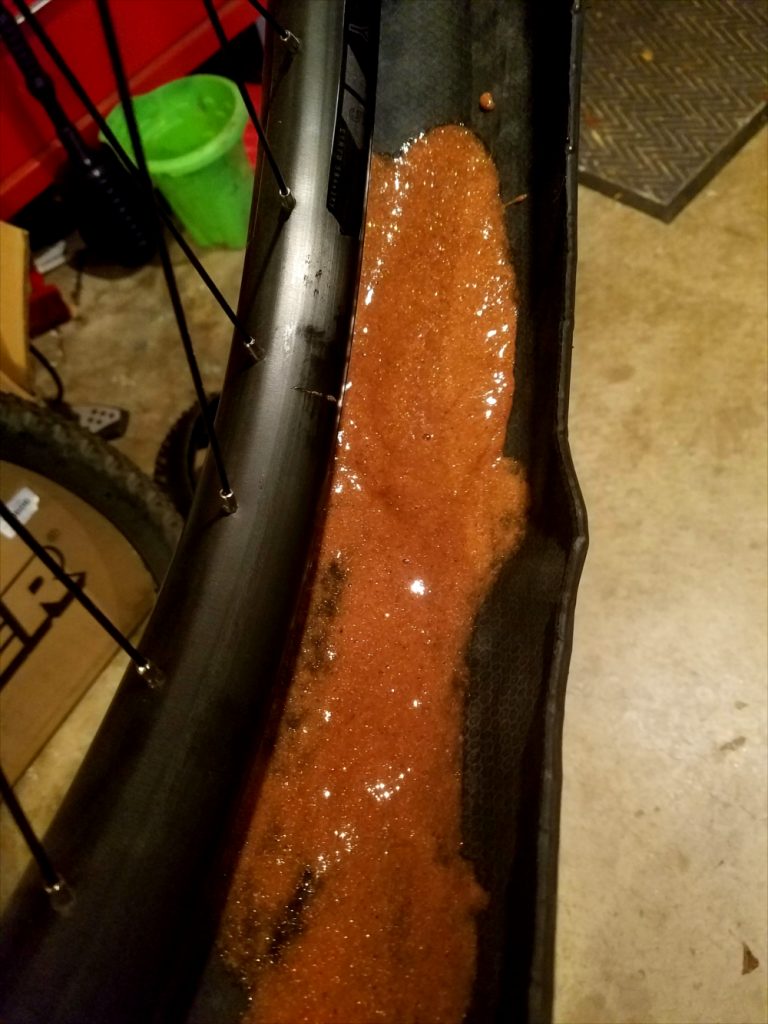
Flatstopper sealant poured directly into a tire

Without Sealant

Airing the tire up dry follows the same procedure, but after the tire is seated, you must release the air pressure, remove the valve core, inject sealant, then re-inflate.

tubless tires

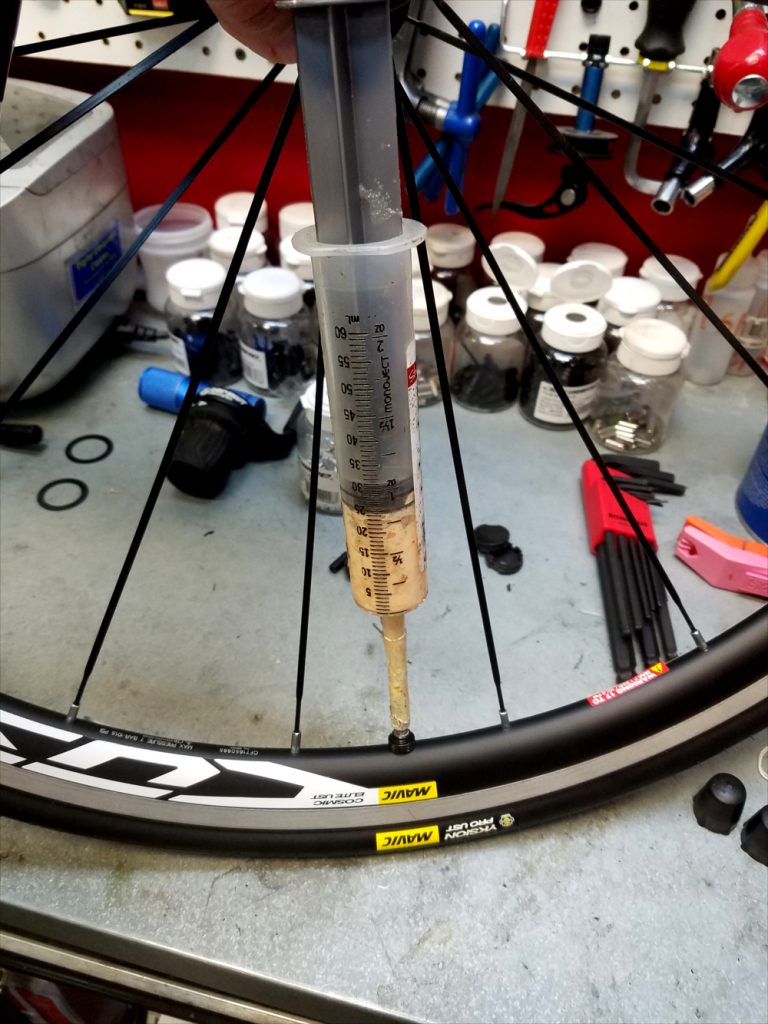
Sealant being added through the valve.

Common issues and fixes

Wont air up – It is totally possible that regardless of how much you pump, the tire won’t take air. There are a few things you can do to help. First thing is to hang the wheel by the rim, rather than having it sit on the ground. Often time, taking pressure off the tire completely will let it seat. Also, you can use more air. I find a compressor or floor pump with a reservoir works exceptionally well. If both these things don’t work, you can remove the valve core from the tubeless valve and try again (it allows slightly more air to get into the tire).

Leaking fluid – Depending on the tire you use it’s common to see some fluid weeping from the area where the tire and rim meet, or from the actual sidewall of the tire. In both cases, I find it helps to lower the air pressure and allow the sealant to dry. Pressures that are too high will often time keep fluid weeping faster than it can dry and seal. If you see fluid leaking through the base of the valve, or through the spoke holes, chances are you have a valve that isn’t airtight or rim tape that isn’t sealing. Like the sidewall, lower the pressure and see if it seals. If it continues to leak, you may need to tighten the valve, or worse yet, replace the rim tape.

I think with these tips and a little practice you will find that installing tubeless tires is a breeze. Also, you will find that the ride quality and flat prevention benefits are well worth the slight learning curve.

If you are in the Twin Cities Gateway, north of Minneapolis this summer and near Blaine, here are a couple events you may want to consider jumping on your bike and riding too. The Blaine Festival is family fun!

The Blaine Festival and bicycle races are two fun events to bike too

If you are in the Twin Cities Gateway Area this summer, the Blaine Festival, north of Minneapolis, is only a week away. From June 27th to the 30th you will find several fun events over the weekend. While there you may want to consider jumping on a bike and riding the velodrome track at the National Sports Center.

The Blaine Festival is family fun!

You will find the parade and a whole lot more to bike too.

You will find the parade and a whole lot more to bike too.

un for the whole family, the 2019 Blaine Festival (June 27 – 30) is a community event now celebrating its 50th year. The fun kicks off on Friday at Noon, with a medallion hunt and festivities that runs through Sunday, at 6 p.m. for a weekend of fun.

Stack the Oreo cookies always gets grins, young and old.

Stacks of Oreo cookies always get grins from both young and old.

Pig races and a “Not So” ugly contest are just a few of the fun events

Events throughout the three-days include carnival rides, crafter/business fair, civic tent, petting zoo, magician, recreational activities, food, and live bands. Along with the traditional parade scheduled at Noon on Saturday event, other highlights include: pig races, a pedal tractor pull, an Oreo stacking contest and the “Not So” Ugly do contest!

Join the fun, the festival is located in Blaine at Aquatore Park (northwest of Highway 65 & 10). With free admission and parking, there is a wide variety of entertainment with something for everyone.

The Blaine Farmers Market

The Blaine Farmers Market is easy to get to by bike.

The Blaine Farmers Market is easy to get to by bike.

One of the many joys of summer is to savor the fresh fruits and vegetables from the garden. However, not all of us have the time and space to raise our favorite produce. That’s where farmers’ markets come into play and the Twin Cities Gateway (TCG)has you covered. Along with the Blaine Market, TCG offers six other farmers’ markets, on different days and locations to choose from.  A great place to pick up a couple of things you want for a healthy snack on that next bike outing.

In Blaine, each Wednesday in the city hall parking lot stop in at the farmers’ market, throughout the summer.

Visit the Blaine Market, from 3 to 7 p.m. on Wednesday’s at 10801 Town Square Drive NE, Blaine, MN 55449

Don’t forget two-wheel racing at the velodrome in Blaine

Every Thursday and some weekend offers you the option to participate or watch the racing at the National Sports Center Velodrome in Blaine  – see more here!

Need lodging for your visit to Blaine?

You can find a complete listing of lodging opportunities in Blaine and neighboring communities Twin Cities Gateway communities here.

Have Fun!

Thanks to AAA The Auto Club Group, printed copies of both the Iowa and Minnesota Bike Guides are still available. With summer just a few days away stop by one of the AAA offices near you by looking at our digital editions for a map of a AAA office near you.

Complimentary Iowa and Minnesota printed bike guides are still available

Thanks to AAA The Auto Club Group, printed copies of both the Iowa and Minnesota Bike Guides are still available. With summer just a few days away stop by a AAA offices near you. Just look at the maps in our digital guide editions for a map of a AAA office location near you.

Where to pick up one of the bike guides

In the lower left corner of each Iowa and Minnesota map you will find the address of a participating AAA office to pick up a copy of the guide. Just stop in and ask for a complimentary of the guide and learn more about AAA’s Bike Benefit Program. A program that includes roadside service for your bike – It’s like having a SAG in your back pocket.

Help us by sharing your comments on this year’s Bike/Hike Guides

As we wrap up our 9th year of printing these handy, pocket size booklets we would like to hear, what you like about the guide and how we can make it better. So we can continue to add more links and helpful information to assist you in finding your next adventure. Please page through the Guide’s events, maps and helpful tips sections and give us your comments at: [email protected] – Thanks!

Check out our ‘Pic of the Day’

Have you seen our daily feature picture at HaveFunBiking.com, on Facebook, or at #nextbikeadventure on Instagram? If not, moving into our 10th year as a bicycle tourism media, check them out, like us and or follow us. If you have a good photo with a caption, send it our way.

Along with a good caption, photo(s) should be a minimum of 800 pixels wide and deep or larger for us to consider using them. If we do use your photo, you will receive photo credit and an acknowledgment on Facebook and Instagram.

So check out the guides, have fun and keep riding!

If you are in the Twin Cities, what a fun way to spend the early part of your 4th of July, then the Tour D'Amico (TDA) bike ride. 

Tour D’Amico bike ride option, if you are in the Twin Cities over the 4th

If you are in the Twin Cities what a fun way to spend the early part of your 4th of July, then at the Tour D’Amico (TDA) bicycle ride. This year the Hiawatha Bicycling Club (HBC) and D’Amico & Son’s Restaurants invites you to start your Independence Day celebration with a scenic bike ride and  a delicious picnic upon your return. Now in its 19th year, select from one of four scenic routes options for a fun day.

HFB_a-1b

The 19th Annual TDA begins in Golden Valley, MN to start the days festivities.

Tour D’Amico bike ride registration

Registration is in the court area outside D’Amico Restaurant in the Golden Valley Commons Shopping Center, just off Highway 55 and Winnetka Avenue. You can pick up your ride packet or sign up with day-of registration and start riding between 8 to 10:30 a.m. on the Fourth.

HFB_a-1c

Hiawatha bike club members greeting riders as they check in at the registration table.


All four routes, through the western suburbs of the Twin Cities, are signed and supported. Maps and Ride with GPS will be available to further assist you on this fun bike tour. Along the way enjoy stopping at several rest stops for refreshments and treats. Then at the end of your ride savor a D’Amico & Sons American/Italian al fresco picnic lunch.

HFB_a-1a


What a fun way to spend the early part of your  4th of July holiday. Leisurely riding the scenic parkways and trails with family and friends.

The Tour D’Amico bike ride starts and ends in Golden Valley

The 44 mile Tour D'Amico map

The 44 mile Tour D’Amico map

Choose from the 20, 29, 44 or 62.2 mile scenic route all mapped to give everyone riding a chance to explore some of the Twin Cities newest bike boulevards and trails. Riding through parts of Edina, Hopkins, Plymouth and Wayzata before returning back to Golden Valley.

Along the way, enjoy the Tour D’Amico’s selfie contest

IMG_20140704_091959_307

Riders always enjoy the Selfie Contest on TDA.


IMG_20140704_115112_700IMG_20140704_102427_033IMG_20140704_114825_242


Riders who enter the selfie contest will have fun and may win a prize.

HFB_a-2


With helmets on and a cell phone ready to take pictures, riders prepare for TDA, having fun with old and new friends.

HFB_a-3HFB_a-4


Some of the Tour D’ Amico rider’s warming up for the selfie contest.


Riders on the Tour D’Amico route

HFB_a-8


They have come to ride the Tour D’ Amico from as far away as Burlington, Iowa.

HFB_a-6


Happy TDA riders ready to get out on the route.HFB_a-10


An adventure awaits these two as they leave Golden Valley.

HFB_a-11


The last two to leave the Golden Valley parking lot, are the Hiawatha Bicycling Club Ride Marshall’s, making sure everyone returns safely.

HFB_b-1a


The tours first rest stops on TDA is a Cub Grocery Store, in Plymouth MN.

HFB_b-1b


Our happy Hiawatha Bicycling Club hosts at the Plymouth Station Rest Stop.

HFB_b-2


Riders enjoying bananas and other treats before heading back out on the course.

With beautiful weather scheduled, riders will enjoy the low traffic roads, fun trails and scenic landscapes along the way.

HFB_c-1


This guy knows how to travel and celebrate the 4th of July, will you join him?

HFB_c-2


Riding the route to the next rest stop, D’ Amico’d in Wayzata.

HFB_d-1


TDA riders will enjoy some of D’ Amico and Sons tasty salads, fruits and other treats at the second rest stop.

HFB_d2-1


With this photo, you know it’s good… do we need to say more!

HFB_d-4


Here TDA riders, from all four routes meander together around Lake Minnetonka’s shoreline to Hopkins for another tasty rest stop.

HFB_d-6


More happy riders ready to check out the rest stop at the Hopkins Depot.

HFB_d-5


It looks like this rest stop was as good as the last two!

Time to head back for a Tour D’Amico picnic

HFB_d-7


Here, this TDA rider makes her way back to D’ Amico’s in Golden Valley for the delicious picnic.


HFB_e-4


Still smiling, on the last section of the 2017 Tour D’ Amico, riders here make their way back to Golden Valley for a picnic lunch in the court area, next to the fountain.

HFB_f-1


With so many choices, the dessert bars are sinfully delicious.

Join in on the fun sharing your TDA experience with old and new friends over a D'Amicos picnic lunch.

Join in on the fun sharing your TDA experience with old and new friends over a D’Amico’s picnic lunch.

HFB_f-3HFB_f-2


Everyone always enjoys the fine food and refreshments D’ Amico’s served after the ride – Sign up today! 

About Hiawatha Bicycling Club

Join the club at Hiawathbike.org to learn more about all the fun rides they lead, like the Tour D’ Amico.

Proceeds from the Tour D’Amico over the last few year’s have benefited the Children’s Lighthouse, trail maintenance projects in the Twin Cities and the bike education program of the Bicycle Alliance of Minnesota.

Pedaling along the Mississippi River Trail, north of Minneapolis, takes cyclists through the remarkable art community of Fridley. With the annual '49er Days, live theatre and a stunning gallery everyone will be inspired biking or hiking in Fridley.

The art of biking and festivals in friendly Fridley Minnesota

Pedaling along the Mississippi River Trail (MRT), north of Minneapolis takes cyclists through the remarkable art community of Fridley, with the annual ’49er Days,  June 14 -16. One of the nine communities in the Twin Cities Gateway the city offers a one of a kind experience for art and bike lovers alike. From live theatre, a stunning gallery and a festival with many craft artist, everyone visiting will feel inspired after taking a look at the creative scene in bike-friendly Fridley.

Craft art is one of the highlights at the ’49er Days Festival

Come for the 49er Parade, stay for all the fun activities and food scheduled throughout the day.

Come for the 49er Parade, stay for all the fun activities and food scheduled throughout the day.


The Fridley Lions Club, ’49er Festival starts with a parade on Thursday, June 14.
Then throughout the weekend, the festival hosts many fun activities. In a family-friendly community tradition celebrating the year, Fridley was incorporated as a city!

Banfill-Locke Center for Art

ENJOY THE BEAUTIFUL GARDEN AS YOU ENTER THE BANFILL-LOCKE CENTER FOR THE ART IN FRIDLEY.

ENJOY THE BEAUTIFUL GARDEN AS YOU ENTER THE BANFILL-LOCKE CENTER FOR THE ART IN FRIDLEY.

Just off of the MRT the Banfill-Locke Center for the Arts makes a great rest stop on your bike ride. Stop in to cool off and admire the works in the gallery. Maybe pick up a gift for another art lover in their gift shop. If seeing all the collections that will inspire you, consider making the trip to Banfill-Locke regularly and sign up for a class. You can find a class that would best fit your schedule, from a single lesson to an eight-week workshop. The Banfill-Locke Center offers classes in literary, visual, and self-discovery arts. The center also allows brings in local poets for poetry enthusiasts to appreciate.

On Thursday, June 21 from 5 – 8 p.m. the Banfill-Locke Center celebrates the impact the arts have on the Fridley community during our Summer Solstice Soiree.

Fridley Community Theatre

Along with wonderful art, Fridley also has a renowned community theatre. With three productions a year, the community theatre works hard to bring wonderful live theatrical performances to its audiences. For this year’s summer production “Sister Act” is the feel-good musical comedy smash based on the hit 1992 film that had audiences jumping to their feet!

There is still time to get your ticket, the show opens in July with performances on July 20, 21, 26 at 7 p.m. and a matinee performance, July 28 at 2 p.m.

Also playing is the Fridley Community Youth Theatre Production the Lion King, June 29 through July 1, check it out!

Natural art can be found at the Springbrook Nature Center

After walking through Springbrooke's Interpretative Center take a stroll down one of the many trails there.

After walking through Springbrook’s Interpretative Center take a stroll down one of the many trails there.

There are two parts to Springbrook. The inside contains information about the center and interactive section in the back. You can learn about the different kinds of trees, see live snakes, frogs, turtles, wild turkey, and more. It’s a great place to prepare for a hike on the Nature Trail.

Once you get outside there are a couple of access points to the trail – and this is where the real adventure begins. Everywhere you go you will be surrounded by nature. You’ve got trees of different kinds everywhere, small and large bridges that will take you across all kinds of creeks and wetlands. There’s even a large walkway that takes you across a semi-large pond where you’ll have the best chance to catch some bird sighting.

So bike on over to Fridley to get your fill of all things art.

The second most common mechanical problem to a flat tire, is a broken chain. Read on to learn the causes of and quick remedies to fix your chain.

Causes of a broken chain and the quick and easy ways to fix it

by John Brown, HaveFunBiking.com

The second most common trail side mechanical problem to a flat tire is a broken chain. While it could be the end of an otherwise great ride, with a little preparation you can easily fix the chain and get your bike back on the road. Read on to learn the causes of and remedies to a broken chain.

Why is a broken chain common?

Wear

Chains break for a host of reasons, but most common is wear. For example, if a chain has been ridden for 2500 miles, it will actually stretch out. Correspondingly, a ridden chain will be longer from link to link than a new chain. Because the chain is stretched, the metal fatigues is more susceptible to failure. Additionally, as the chain wears the chainrings and cassette (gears in the rear) will wear out as well. Combine all those factors, mix in one bad shift and you have a recipe for a broken chain. Therefore, it’s a good idea to have your chain checked by your local bike shop at least once a year.

Impact

Chains, like anything else on your bike, can be damaged if it gets hit hard enough. While not as common, chains can break if they are involved in a rock strike or other impact. Impact damage to chains can be more difficult to repair than if the chain breaks due to wear. The reason being, wear will typically only break one chain link, while impact can damage many.

The parts of your bike chain

Your chain is made of only four pieces; the outer plate (A), inner plate (B), roller (C), and rivet (D) and every link contains two of each.

How to fix a broken chain

To start, you need find and remove the broken link. How much of the broken chain you remove depends on how you are fixing it. Usually, you need to remove a complete link (one set of outer plates, inner plates, rollers and rivets like in the picture above).

To repair, replace or adjust the length of you chain you need to purchase a chain tool. A chain tool is a device that pushes the rivets into and out of a chain. Generally speaking, most bicycle multi-tools will have chain tools, but you can also buy them individually.

broken chain

Pedros multi tool on the left and Park Tools CT5 on the right.

To use the chain tool, position the chain into the lower tines (see image below). Once the chain is positioned, begin threading in the rivet tool (see image) until it forces the chain rivet almost all the way out. As you can see, the chain will easily come apart. Repeat this process until all portions of the broken chain are removed.

Removing a broken chain link and shortening chain

For older chains you can remove the broken link and mend the chain back together one link short. Keep in mind, the chain length is very specific for the function of the drivetrain. If you shorten the chain, you will lose the ability to shift into the largest cogs safely. Therefore, have the chain properly sized and repaired at your local shop once you get home. With the broken link removed you will need to put the chain back together. Start by pushing the two links ends together and placing them in the chain tool. Force the rivet back into place with the chain tool. Done!

Install a quick link

Quick links come in many different sizes depending on the amount of speeds your bike has. From 8-12 speed, chains will all use a different quick links that are not cross compatible. If only the outer plates are broken, you can cut them out, install the quick link, and ride off as if nothing happened. If an inner plates break, you must cut 1-1/2 links out of the chain before installing the quick link.

Install a chain pin

Installing a chain pin is necessary for all Shimano brand chains. Like quick links they are speed specific (ie. 8,9,10 speed etc.), and not cross compatible. To install a chain pin, remove the offending link and the rivet completely (see image below). Then, put the two chain ends together (held in place by the chain pin) and use the chain tool to press the pin into place. Once the chain is installed break off the portion of the pin protruding from the back of the chain.

Ongoing maintenance

Breaking a chain is rarely an isolated incident and more frequently, it is the sign of a larger issue. If you do break a chain on the trail, be sure to get your bike to a professional for inspection. Additionally, if you need to replace the chain be prepared to replace the cassette, and possibly chainrings as well. Considering all the parts of your drivetrain wear together, attempting to to introduce a new part into that group might not function well.

We hope this information is helpful, both for situations when out riding and when you need to bring your bike in for servicing. Have Fun!


Full of bicycle routes and trails for your next adventure. AAA -The Auto Club Group invites you to stop by one of their branch offices to pick up a copy of the new Minnesota Bike/Hike Guide, learn about their bikes benefits program and register to win.

Pick up a copy of the new MN Bike Guide and win a bike tour pass from AAA

They are still available for your next adventure, the new Minnesota Bike/Hike Guide full of bicycle routes and trails to explore in the state. Right now AAA -The Auto Club Group invites you to stop by one of their branch offices to pick up a copy of the new bike guide. When stopping in to pick up a complimentary copy you can also register to win a ride tour pass to one of the three popular Minnesota rides.

The 2018 MN Bike Guide is available at all AAA Auto Offices in Minnesota

A print copy of the 2018 MN Bike Guide is available free at all AAA Auto Offices in Minnesota


Imagine a free wheel pass to the: Tour of Saints; the St. Paul Classic Bike Tour; or the Mankato River Ramble that will be drawn on June 15th. Plus, when you stop in to pick up a guide, learn about the exciting new bicycle benefits program at one of the following AAA branch office locations:

 Burnsville, 600 West Travelers Trail, Burnsville, MN 55337

Coon Rapids, 2170 Northdale Boulevard, Coon Rapids, MN 55433

Duluth, 2520 Maple Grove Road, Duluth, MN 55811

Mankato, 1930 Adams Street, Mankato, MN 56001

Maplewood, 1727 Beam Avenue, Maplewood, MN 55109

Rochester, 1535 Greenview Drive, SW, Rochester, MN 55902

Roseville, 2483 Fairview Avenue N, Roseville MN 55113

St Cloud, 3959 2nd Street S, St Cloud, MN 56301

Tour of Saints riders having fun on this annual June ride.

Tour of Saints riders having fun on this annual June ride.

I

Your next adventure may be the new bike guide

The Minnesota Bike/Hike Guide is a handy pocket sized booklet available in print and online. This year’s edition offers a 100 pages of bike friendly maps, ride events and helpful tips to create fond memories for you and your family or friends.

The new bike program at AAA my add security and a peace of mind

When you have a mechanical problem with your bike AAA is just a call away.

If  you have a mechanical problem with your bike, AAA is only a call away.

When picking up a copy of the new bike guide, ask about the AAA Bicycle Benefits Program.  This new benefit is like having a support vehicle in your back pocket when riding. Rest assured, if your bike has a mechanical failure, help is only a phone call away. AAA Auto Club now includes roadside tows for bicycles as well as vehicles.

Remember to register to win a ride tour wheel pass

The St. Paul Bike Classic is another family friendly ride that happens the first Saturday in September each year.

The St. Paul Bike Classic is another family friendly ride that happens the first Saturday in September, each year.

The Tour of Saints is scheduled for July 8th, starting in St. Joseph, MN. The St. Paul Classic Bike Tour is scheduled for September 9th, on Grand Avenue in St. Paul, MN. And the Mankato River Ramble is scheduled for October 7th starting in North Mankato, MN. Further information is available on these bike tours and more at a AAA branch office locations in your area.

Now, have fun biking with AAA information and support this summer!

Family or group bike outings to nearby events adds to the fun

With so many summer festivals and attractions for a family to take in, commuting by bike can add to the fun. Especially if the event is within three to seven miles of your home or the lodge you are staying at. By leaving the car behind and traveling by bike everyone in your group can spend more time having fun with less of the hassle factor of driving and finding parking at the event.

This bike photo shows a family riding a trail that parallels a road that will take them to a local community celebration five miles away.

This bike photo shows a family riding a trail next to a busy road that will take them to a local community celebration.

In most cases by using trails, quiet roads and bike friendly streets to reach a community event is much faster. Plus, it will allow everyone in your group a more unique and unforgettable adventures. To make your next family or group outing safe and fun please consider these suggestions when planning on driving your the bike to the event and leave the car behind:

Plan your bike route before heading out with family and friends

If you are not familiar with the area you plan to ride, look at city and county maps. Most are available online and Google Maps is a good backup option. Most cities offer maps available at the tourism center, library or city office which show both the streets and trails in an area.

When planning a route is a lot easier when you know where the quiet secondary streets are. Especially when trails are not always connected to the destination you want to ride. When trails or bike designated routes are not available look for parallel streets and avenues that are a block or two off the main auto route to the event. Usually these streets offer low traffic shaded lanes to get you to the destination desired.

For the first few outings, a six to fourteen mile round trip by bike is plenty. If the festival is further away and your family is new to biking to events consider multi-modal commuting. Using a car or public transportation to travel part of the distance and then bicycling the rest of the way).

Before leaving, instruct all family members that they have to abide by the rules of the road when biking on roadways and trail. Remind them they need to, “Drive their bike”, obeying all rules as if they are driving a car.” That means riding on the right side of the road or trail  signaling their turns, stopping at stop lights and giving pedestrians the right of way.

When the temperature is hot while riding a bike it good to find shade periodically and hydrate.

When the temperature is hot while riding a bike it good to find shade and drink some water periodically.

If younger children are riding, allow plenty of time. When it is hot make frequent stops every couple miles to take a drink of water, rest, stretch, etc.

Check your bike gear so everything is ready for a fun journey

Before heading out, check that all the tires are properly inflated, brakes are working and chain is lubed (the ABC’s). You don’t want to worry about any mechanical issues when the family is riding. Especially on the bike trip home, when everyone is a little tired.

To freshen the air in your tires you can find the recommended tire pressure on the sidewall of the tire. Here you will find the recommended PSI (Pounds per Square Inch) behind it as your ideal pressure.

Is everyone carrying plenty of water or are there frequent hydration stops planned where water is available? On a hot day taking a sip or two of water every couple miles a good idea.

Bike safety and visibility

How visible is your clothing? Check to see that everyone is wearing highly noticeable – bright clothing so your group is seen by traffic from a distance. If your return trip is later in the day have rear flashers and reflectors on each bike will help to be seen by others on the road. If you plan to return after dark a front headlight should be a part of your bike equipment.

For more information on bicycle safety when riding alone or with the family check out the Walk! Bike! Fun! Pedestrian and Bicycle Safety curriculum. Brought to you by the Bicycle Alliance of Minnesota, it is free for you to download and use.

In this bike photo the family has gathered together at a busy intersection to cross on their way to the local fair.

In this bike photo the family has gathered together at a busy intersection to cross on their way to the local fair.

With these helpful bike commuting tips, we hope you and your family will find the next festival or event you participate in, twice as fun. Especially when incorporating your bike into the adventure. Remember, with less parking and traffic hassles a family or group of friends has more time to bond and have fun.

We now have: 24”, 26”, 27.5”, 29”, 27+ and 29+ wheel sizes for mountain bikes. Take a look below to see the pros and cons of each size.

Mountain bike wheel sizes: past, present and future explained

by John Brown, 

Here is a brief history and a look into the future of mountain bike wheel sizes. Once the 29er revolution took over, many companies started looking at even more sizes. Therefore, we now have: 24”, 26”, 27.5”, 29”, 27+ and 29+ wheel options, with another new dimension on the horizon.

The Mountain Bike began it’s commercial success in 1978 in the mountains around the San Francisco bay area. A group of friends started racing down mountain roads on trash-picked Schwinn Excelsior cruiser bikes. Quickly, riders demanded a more durable bicycle that could not only bomb down the hills, but turn around and ride back up. To that end, Joe Breeze of Breezer bikes was happy to oblige by building the first ever Mountain Bike. Considering there were only 26” balloon tires (like the ones on the Excelsior) That is what he used for the first Mountain Bike, setting the tone for all Mountain Bikes built over the next 25 years.

Tire Size

Breezer #1 (the first Mountain Bike) and the Schwinn Excelsior “klunker” both with 26″ wheels

Early changes to wheel sizes

By the early 90’s, mountain bikes had exploded. There were professional mountain biking events all over the world, a prime-time TV show (Pacific Blue anyone?) and mountain bikes in every garage in the country. On the wave of MTB excitement bicycle brands started investing serious money into new technology development, and one of the areas of interest was wheel size. Starting things off was Cannondale with their long heralded “Beast of the East” that used a 24” rear wheel. The benefit of a smaller wheel is better acceleration and the ability to make shorter chainstays.

tire size

Cannondale “Beast of The East” with 24″ rear wheel

On the other side of the country, in Petaluma California, a different idea was being hatched. Based on the development of the 700x48c “Rock and Road” tire by Bruce Gordon, A custom builder caller Willits, started making mountain bikes with 700c wheels. The owner of Willits, Wes Williams, was well connected within the cycling industry and became the advocate for what would be called a 29er. From Wes’ influence, Trek, the largest bike brand in the world, launched production 29ers through their Gary Fisher brand. At that point 29ers were in the main stream and now with so many wheel sizes take a look below to see the pros and cons of each size.


tire size

Rock and Road tire that was the start of the 29er movement

It all started with a 26” wheel size

The 26 inch wheels have existed for over 100 years. Furthermore, the critical dimensions of these wheels haven’t changed. Therefore, you could theoretically fit a tire from 1930 onto a rim of today. In an industry that releases new products every year, that consistency is amazing. Currently, 26” wheels are used primarily on department store Mountain Bikes or cruiser bicycles. Therefore, 26″ replacement parts can be found easily and inexpensively.

27.5” and 29” wheels

While 29ers led the way for new wheel sizes, 27.5” wheels were also popular in the initial wheel size change. The reason 29ers took hold so quickly was, in comparison to 26” wheels, they roll over objects easier and have better traction. Conversely, the downside to larger wheels is more mass to push around. In fact, The issue with mass is why 27.5” wheels became popular. A 27.5” wheel has similar traction and roll over to a 29er with much less weight. Therefore they accelerate and change direction more easily. You will now find 29” and 27.5” wheels on almost any mountain bike sold in bike shops. Typically, you see 27.5” wheels on smaller size bikes and 29” on the larger sizes. Also, full suspension bikes use 29ers on the lower travel options and 27.5” on longer travel bikes.

wheel size

A fun chart Giant Bicycles released to compare wheel size and angle of attack

Plus wheel sizes

Plus sized tires are a new development in the cycling industry. In detail, they use the same rim diameter as 29″ and 27.5” bikes, but the rims and tires are wider. For example, a standard tire width is around 2”, while plus tires are 3” wide. As a result,  plus sized tires puts a lot more rubber on the ground, and gives you amazing traction. With a plus sized tire, you can expect to climb up almost anything with ease. Therefore, once difficult trails become easier, and it feels as if every turn has a berm. The penalty for all that traction is additional weight. Additionally, having large tires increases the tire’s overall air volume and makes finding the right pressure a bit more complicated. If you are interested in plus tires, your bicycle has to be built to accept their additional size. Usually, it’s just best to buy a complete bike.

wheel size

Plus tire angle of attack

The future wheel sizes

The development of wheel sizes has slowed down a bit for the cycling industry. With that being said, the movement has shifted to tires. The most recent buzz is coming from the 29” x 2.5” size tire. This “Big 29” tire is looking to be the new size of the year. The reason that size is getting attention is because it blends the speed and agility of a standard 29” tire with the gravity defying traction of plus tires.

What wheel size is best for You

I would love to say it’s easy to measure the pros and cons of each wheel/tire size, cross reference that information with your personal preferences and decide what is the right thing for you. Sadly, that doesn’t work. In reality, the best way to see what is going to work for you is to test ride them. Test rides are the best way to match your riding style with one of the many options available today.

Allowing motorists the option to pass a bike in a no passing zone makes the Share the Road campaign, 'Allow 3 Feet When Passing,' safer.

Take the worry out of your next bike ride with Cycling Savvy

Here is a course that will help you feel more comfortable and confident riding your bike. Cycling Savvy is returning to the Twin Cities area again this summer with a three-part bicycle safety class. By enrolling in this class you will feel secure going anywhere on your bike safely and confidently.

Bike with Hokan and John Hardy doing a “chalk talk.” Sign up for Cycling Savvy to learn more.

Bike with Hokan and John Hardy doing a “chalk talk.” Sign up for Cycling Savvy to learn more.

Course structure and content for a safe bike ride

While Cycling Savvy inevitably teaches some of the same essential traffic cycling principles and skills as other cycling courses, it is an entirely new curriculum.  From the ground up, it is built upon an understanding of the needs of adult learners. The course addresses the challenges of today’s changing behavior that is strongly rooted in our traffic culture. Much of the content in the Cycling Savvy curriculum is completely original. Traditional content is framed and delivered in unique ways to maximize the learning process. It is a modular course, consisting of three, 3-hour classes, with seasoned certified instructors to help you along the way.

Class I (Train Your Bike!)

This three-hour session is conducted in a parking lot. It consists of a set of progressive drills designed to increase students’ control and comfort handling their bikes in various situations and includes:

  • Start/Stop, Power Pedal & Balance Stop
  • Snail Race, Slow-speed Balance
  • Drag-race, Gears & Acceleration
  • Ride Straight, One-handed
  • Shoulder Check
  • Object-avoidance Handling, Weave, Snap
  • Turning: Slow-speed Tight Turns, High-speed cornering, Emergency Snap-turn
  • Emergency Braking

Reserve your spot today for session-one: Friday, June 8th; Friday July, 20th; or Friday, September 21. Class hours are from 6 p.m. to 9 p.m. each session. Location will be at the Ski-U-Mah Parking Lot near TCF Stadium, 6th Street Southeast Minneapolis, MN 55455

Class II (The Truth & Techniques of Traffic Cycling)

Through guided discussion with video and animation, this three-hour session will familiarizes students with bicycle-specific laws, traffic dynamics and problem-solving strategies. Students discover that bicycle drivers are equal road users, with the right and ability to control their space.

Options for Class II are: Saturday, June 9th; Saturday, July 21st, or Saturday, September 22. Class hours are from 9 a.m. to Noon. Location for this class will be at 110 Union Street S.E., room 107 Minneapolis, MN 55455

Class III (Tour of Minneapolis*)  (3.5 hours):

This session is an experiential tour of Minneapolis roads. This 3.5 hour final course includes some of the most intimidating road features (intersections, interchanges, merges, etc.) a cyclist might find in his/her travels. The students travel as a group, stopping to survey and discuss each exercise location. After observing the feature, discussing the traffic dynamics and the best strategy for safe and easy passage, the students ride through individually and regroup at a nearby location.

Please note, the Tour of Minneapolis session* above is only available for those who take the full course. The first two sessions may be taken á la carte, in any order.

Options for Class III are: Saturday, June 9th; Saturday July 21 or Saturday September 22. Class hours are from 1 p.m. to 4:30 p.m. Location for this final class will also be at 110 Union Street S.E., room 107 Minneapolis, MN 55455.

For more information on driving your bike like you do with a car see Cycle Savvy.org