Tag Archives: bike fix

Giving back to your cycling community you can enjoy some great ways to stockpile some good karma and it’s fun!

How to fix a flat tire on a bike is a skill every rider should have

by John Brown, HaveFunBiking.com

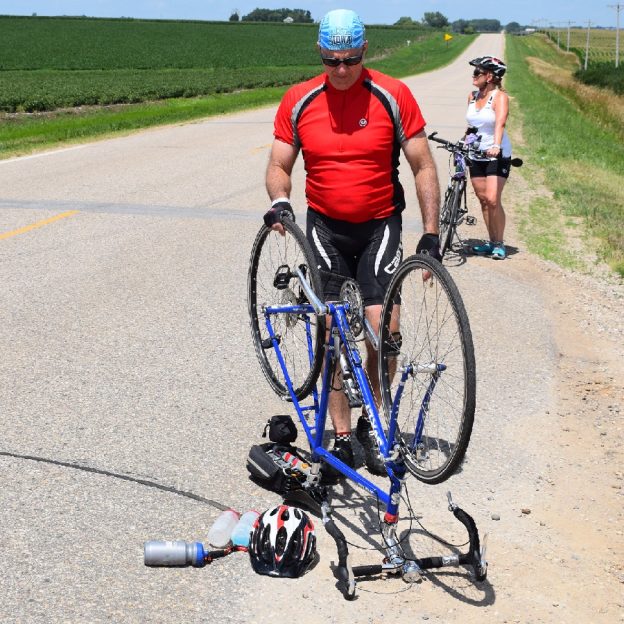
One inevitability of riding a bicycle is that you will get a flat tire. With a little practice and planning, you will be able to fix a flat tire and finish your ride, without a problem. To be prepared, you will need a few tools and to practice how to fix a flat on your bicycle a few times to get it down. Read below for a step by step on how to change your first flat.

Learning how to fix a flat tire is a part of bicycling.  With a little practice and planning, you too can fix a tire and finish your ride.

Needed items to fix a flat tire

To easily fix a flat tire be sure to carry the following items:

Pump

fix a flat pump

Pumps come in many shapes and sizes. Most are portable in a jersey pocket or on the bike. Be sure to look for a pump that is capable of meeting your tires pressure.

Tube

Fix a Flat tire tire size

Tubes are sized specifically to tires. Find the right size tube for your bike by looking on the sidewall of your tire. Common sizes are 700×23 and 26×2.1″. Tire sizes above are underlined in red. Tires size may also be molded into the sidewall of the tire.

Patch kit

Fixing a flat patch kit

Patches seal small holes in innertubes. There are glueless versions and versions that require glue.

Tire lever

fix a flat tire levers

Tire levers come in many shapes and colors, but almost all of them include the same features – A shovel shaped end to scoop the tire bead off the rim, and a hooked end to secure the lever onto the wheel.

FIX A FLAT: Getting Started

The first step to fix a flat is to remove the wheel from your bike. Consult your bicycles owner’s manual for the proper way to remove the wheels.

Begin by removing all the remaining air from the tire. Depress the valve while squeezing the tire until all remaining air is out. Also try to push the bead of the tire into the rim well, doing this will make it easier to remove the tire from the rim.

Taking the Punctured Tube Out

Fixing a flat terminology

Tire, Rim, and Tire Lever Terminology

With the wheel in one hand and the tire lever in the other, try to position the shovel end of the tire lever under the bead of the tire. (see picture below)

fix a flat tire lever in action

Once the lever is positioned beneath the tires bead, push the hook side of the lever down (using the rim as the fulcrum) and lift the tires bead. Once you have lifted the bead with the tire lever, you should be able to push the lever around the perimeter of the rim, freeing one bead from within the rim. (See Video)


Some tire and rim combinations are too tight to allow this method. If you can’t make headway pushing the tire lever around the rim, use the hook side of the tire lever to capture a spoke. Use a second tire lever a few inches away from the first to remove the bead, the bead should be loose enough to remove easily at this time (see pictures below).

Remove the innertube and either patch it or take out a new one. Before installing a new innertube, run your fingers along the inside of the tire while inspecting an area a few inches in front of your fingers.(See Video)

You are looking for the object that caused the flat. You won’t always find something in the tire, either it fell out, or stayed in the road.

Installing a New Tube

When putting the innertube back in the tire, inflating it a little helps. Add enough air to give the tube shape, but not so much that it doesn’t fit into the tire


Start by putting the valve through the valve hole in the rim, then feed the rest of the tube into the tire.

Once the tube is in the tire, begin moving the tube into the rim well.

Begin at the valve, and feed the tire bead back into the rim well. It will be easy to get the bead moved over the edge of the rim initially, but will get progressively more difficult as you get farther away from the valve. It is normal for the last few inches of bead to be the most difficult to seat, don’t get discouraged and don’t attempt to use a tire lever to put the bead back. Tire levers can pinch and puncture innertubes. Instead of a tire lever, use your thumbs and the heel of your palm to force the bead back onto the rim. (See Video)


Once the tire and new innertub are reinstalled begin airing the tire up. Once there is a small amount of pressure in the tire, check to see if it is seated properly. A quick spin usually tells you visually if everything is even. (See Video)

If you are sure the tire is seated evenly, bring the tire up to pressure completely. Tire pressures are usually marked on the sidewall of the tire if you aren’t sure of how much to put in. Put the wheel back into the bike, reengage the brake, and you are off.

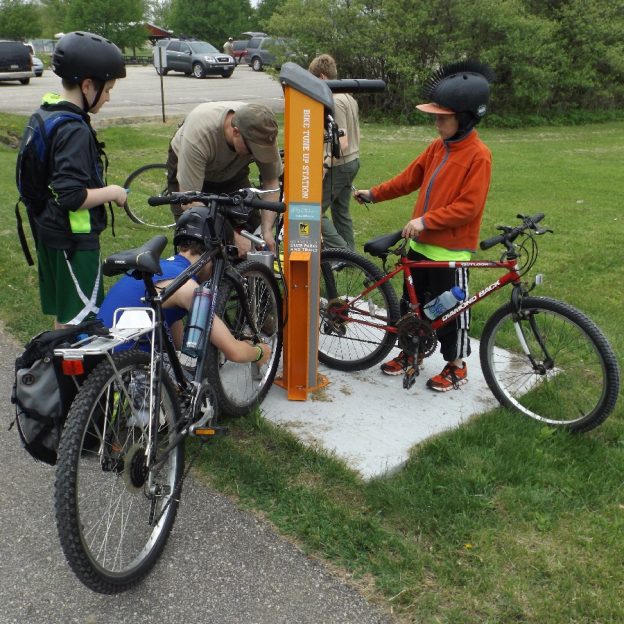
Quick and easy tips for adjusting your bicycle’s v-brakes

by John Brown, HaveFunBiking.com

For those who don’t have disc brakes, the V-brakes on your bike are your greatest single source of control. Take a look below for some tips and tricks on how to adjust your V-brakes.

What Condition is Your V-Brakes In?

Before diving into adjusting your V-brakes, be sure to inspect the brake itself. First thing to check for is excessive corrosion. Highly rusted bolts or springs can break resulting in a crash. Also look for any bent or broken parts. The cradle on the left brake arm is there to hold the brake noodle. If either the v-brakes noodle or cradle are bent (see picture), your brake might not function properly. Also review the brake pads. The easiest way to do this is to remove the wheel. Most pads have lines on them to indicate when they need to be replaced (see picture). Also inspect the pad surface for bits of metal that can damage the bicycles rim.

Cable condition

There are two parts you need to inspect. The Brake cables, and the brake housing. The cable is the wound steel cable that moves when you squeeze the lever. The brake housing can come in many different colors, but is almost always rubber coated and has the cable run through it. Check the cable for rust, frays or kinks and replace if needed. Check the housing for cracks or splitting. Finally, check that the cable moves through the housing freely without resistance.

Rim condition

Spin the wheel and check to see that your rim is straight and round. A wheel should not touch either brake pad as it rotates. It also needs to remain as round as possible. If the rim moves up or down too much, the brake pads can hit the tire, or run off the rim entirely. If the wheel isn’t straight and round, be sure to take it to your local bike shop to have it trued. The other concern when checking the rim is wear. Most rims now have a wear indicator built into the rim in the form of a recessed dot, or a recessed channel around the rim. Once the rim wears past the dot or channel it is time to replace the rim.

Wear line

Rim Dent

Pad placement

V-Brake pads get adjusted by way of a 5mm fitting on the back side of the brake pad. The pad sits on a pair of conical washers that allow the pad to be pivoted up to 20 degrees. I find the easiest way to adjust the brake pad is to hold the left brake with your right hand (or the right brake with your left hand) and place your pointer finger along the bottom of the pad (see image). Loosen the 5mm fitting with your hex wrench and use the wrench and your pointer finger to align the pad. To properly align the pad, you want to center the pad between the top and bottom edge of the rim. The pad should be positioned so that no part hits the tire or misses the face of the rim.

Centering

Once the pads are placed properly, the next thing to do is center the brakes. Centering the brakes entails adjusting the brake springs to ensure the pads are both an equal distance from the rim. Adjusting the brake springs is as simple as tightening or loosening the set screws at the bottom of each brake arm. I like to start on the brake arm that has the most adjustment. I determine the amount of adjustment by how far in or out the adjustment screws are in the brake (see image). The only real tricky part of centering the brake is remembering that screwing the adjustment in will move the pad away from the rim (the opposite of what you might expect).

Cable tension on v-brakes

Once the pads are adjusted and the brakes are centered, you need to make sure that the brake engages with the right amount of lever pull. I have found the easiest way to do this is to position the end of the cable noodle on the end of the brake cradle (1), loosen the cable pinch bolt, pull the cable tight, tighten the cable pinch bolt, then position the noodle correctly (2) and you are set (see image).

Troubleshooting

Once you get done, and test the brakes you may encounter some common problems like Squealing and grinding noises, or just no power.  A few simple tricks will resolve most of these issues.

  • 1- The brake pads may appear to be in great shape, but due to age, be to hard to operate properly. Switching out the old pads for new ones can help quiet noisy brakes and add power
  • 2- Pads that are exposed to long descents can generate a hard glaze over the pad surface. A few quick brushes with a flat file can knock off the glaze and quiet the brakes.
  • 3- The rim surface can get contaminated over time. Rubbing it down with sandpaper or steel wool can go a long way to increase braking power and reduce noise.
  • 4- Depending on the brake condition, there can be excessive flex in the brake arms. In order to combat noise you can “toe” the brake pads by having the leading edge make contact with the rim first.
  • 5- Finally, you can apply a little grease or oil to the brake cables where they enter the housing.
AAA announced that it was extending its popular AAA Roadside Service to include bicycles, offering cyclists and added peace of mind.

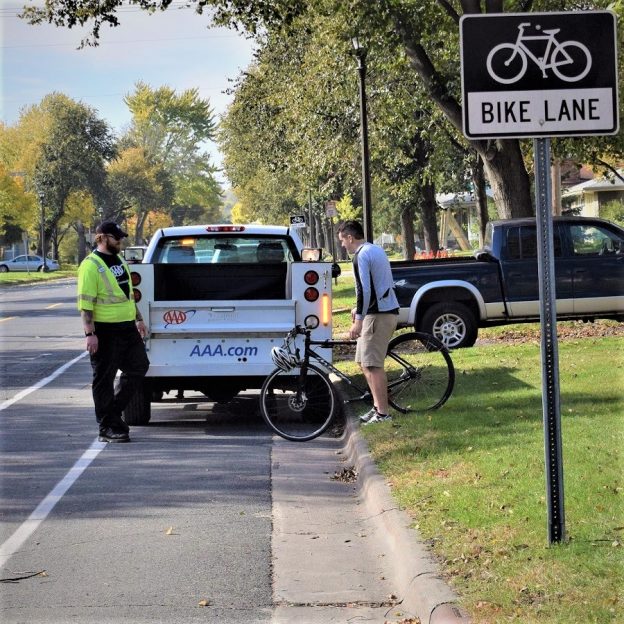
New AAA Roadside Service adds peace of mind for your next bike ride

by, Russ Lowthian, HaveFunBiking.com

As more people take to bicycling for recreation and transportation it is nice to know there is someone to come to rescue if a bike breaks down. In a move to support bicyclists, AAA is now offering support. Recently, the company announced that it was extending its popular automotive AAA Roadside Service to include bikes. Here at HaveFunBiking.com, hearing the news is exciting. This is a perfect service that will assure cyclist, someone will be there if they breakdown.

Any bike you are riding is covered by AAA Roadside Service

With wheel bearing going out this cyclist wouldn't be carrying his bike hope if he had a AAA Roadside Service membership?

If this rider had AAA Roadside Service, he wouldn’t be carrying his bike home because of a mechanical issue.

How the program works? For as little as $49 a year you can purchase a AAA membership that offers Roadside Service for both your car and bike. If you are already a member you are now covered when bicycling. Just call your roadside assistance number on the back of your membership card.

Like the automotive Roadside Assistance Program any bike you are riding (road, mountain, recumbent, e-bike, tandem bikes, bike rentals and bicycle trailers) is eligible. Coverage applies to any qualified bike a member is riding at the time the bicycle becomes disabled. A member should be with the bicycle and have their AAA Membership Card in hand at the time of service. Keep in mind, the Roadside Service is provided only for the rider whose bicycle has become disabled or inoperable. However, any accompanying minors of a member is covered.

When a quick fix isn’t an option, AAA Roadside Service is there

The second most common mechanical problem to a flat tire, is a broken chain. Read on to learn the causes of and quick remedies to fix your chain.

The second most common mechanical problem to a flat tire is a broken chain.


If a quick fix isn’t an option, (examples: you blew a tire; some spokes broke; or the chain busted) first call a family member or friend. Then, if no one is available to assist, AAA Roadside Service may be your best option.

It’s like “Having a SAG Wagon in your back pocket,” especially when you are touring away from home, on vacation, etc. This roadside service is something that will give a cyclist peace of mind.

Three levels of SAG (service and gear) support for you and your bike

Under the new terms of the roadside pickup service. AAA will transport you and your disabled bike to any point of safety within the limits of your coverage. This is based on three available levels of membership below:

  • The Classic: Gives you up to four transports of your bike or car, within a 5-mile radius of the breakdown per year
  • The Plus: Gives you up to four transports of your bike or car, within a 100-mile radius of the bicycle breakdown
  • The Premier: Gives you one transport of your bike or car, up to a 200-mile radius of the breakdown; remaining transports are 100 miles.

This is exciting news if you are a casual, touring cyclist or a bike commuter! Mary Miller, from South St. Paul was ecstatic to hear the news. She stated, ” now I feel comfortable riding my bike more often knowing that I can call AAA to come and get me if I breakdown.”

What You Don’t Get

The service is strictly a pickup and delivery service and does not offer any repair amenities or supplies. If you are capable of fixing a flat, repairing a broken chain or spoke and continuing your ride, please do so. The service is designed when you have run out of quick repair options. In fact, there is a laundry list of “services not included:

  • Airing or changing a flat tire
  • Pickup from anywhere not reachable from a paved, “regularly traveled” road
  • Parts, including tires
  • Pickup of bicyclists who are physical unable to continue with the ride
  • Locksmith services, in case you accidentally lock up your bike and lose the key or combination.

AAA Roadside Service is available in many states across the U.S.

“We are tremendously excited about this great new bike benefit program available to AAA members across most of the upper Midwest, Southeast and much of our country,” stated Gail Weinholzer, Director of Public Affairs, AAA – The Auto Club Group.

The new bicycle service is available throughout the entire territory served by AAA. The Auto Club Group which includes all of: Florida, Georgia, Iowa, Michigan, Nebraska, North Dakota, Tennessee and Wisconsin; most of Illinois and Minnesota; and a portion of Indiana.

For bicycle coverage outside the above states and for full details on AAA Roadside Membership visit AAA.com/Bicycle.


You don’t need to be a mountain biker to have a bike crash, after all, accidents happen. Be sure to take a few moments post-crash to inspect your bike.

Bike Crash: What to Look for and Inspect After the Unexpected

by John Brown, HaveFunBiking

I love the feeling of riding bikes. I don’t know if it’s the freedom, the movement, or the ability it gives me to clear my head, but I can’t imagine enjoying any other sport more. As a mountain biker, that tranquil feeling is sometimes interrupted by an unexpected bike crash. While crashing my bike isn’t something I enjoy, I realize that as I try to push my boundaries, a bike crash is a real possibility. You don’t need to be a mountain biker to have a bike crash, after all, accidents happen. However, if you find yourself spontaneously dismounted from your bike, be sure to take a few moments post crash to inspect your bike.

Body, Mind, and Helmet Inspection After a Bike Crash

Nothing on your bike is more important than you. It’s tempting to jump right up after a bike crash, but take a few moments to assess yourself. Make sure your joints (particularly knees and wrists) feel and function okay. Follow that up by looking for any cuts that might need attention. Finally, remove your helmet and check to see if there are signs of impact. If there are, seek medical attention.

Wheels

After you have deemed yourself okay, pick up your bike and spin each wheel independently. Look for any wobbles or dents in the rim. Also, look to see if the tire has come unseated from the rim. Sometimes you may not be able to see a slight wobble in the rim, but you can hear the rim hit the brake pad as it rotates if you listen closely. Slight wobbles can be fixed later (as long as the brake pads aren’t hitting the tire) but larger ones will leave you calling for a ride home. If you have AAA for your car, they now offer a bike pickup service as well.

Bars and Seat

Once you have checked the wheels, make sure that the bars and seat on your bike are still straight. Look down over your handlebars and make sure they are in line with the front wheel and level. Next, look down the length of your saddle and make sure it is in line with your bike and not bent down to one side or another. If you see any bending in the seat or handlebars, it’s best to take the bike into your shop and have those parts replaced. You may see some scuffing on the side of your saddle or the end of your handlebar grips. That scuffing is a good indication that your seat or bars made a hard contact with the ground and could need replacement.

Derailleurs

Before you ride away, look at your rear derailleur from the back of the bike. The top and bottom pulley should be in line with the cog above it. If it is bent inward, do not ride the bike. A bent derailleur will still hold the chain on the gears, but as you shift into a lower gear, it will get caught in your wheel. This scenario usually leads to a destroyed derailleur and can even result in a destroyed bike.


Frame

Look at the frame and inspect each tube carefully. You are looking for any dents (on metal bikes) or cracks (on metal and carbon frames). If you see damage to the frame, have it checked at your local shop before you continue to ride it.


Brakes

The last thing to check is the brakes. Make sure they operate properly by spinning the wheels and inspecting where the pad hits the rim. If the pads hit the tire, adjust the brake before riding away. A brake pad can make quick work of a tire, leaving you in a far worse situation.

Follow up

For the next few rides, be sure to pay close attention to how you feel and how the bike feels. I have had injuries appear days after a crash. Similarly, my bike has sustained damage that I missed upon my initial inspection. Listen for strange noises coming from the bike, or any change to the way the bike handles.