Tag Archives: mountain bikes

Most mountain bikes today are coming equipped with a suspension. Learn how the right suspension setup can have you riding longer and in greater control.

Suspension Setup For Your Smoothest, Fastest, and Best Ride Ever

by John Brown, HaveFunBiking.com

Most mountain bikes today are coming equipped with a suspension fork, many others are offering suspension for both the front and rear wheel. Additionally, the technology being employed in these suspension systems has become truly amazing. As good as suspension is, it does nothing unless setup correctly. Read on to learn how the right suspension setup can have you riding longer and in greater control.

Suspension Setup Terminology

To properly set up your suspension, it is first important to know what all the parts are called, and what they do. While shaped very different, suspension forks and rear shocks use the same terms and functions
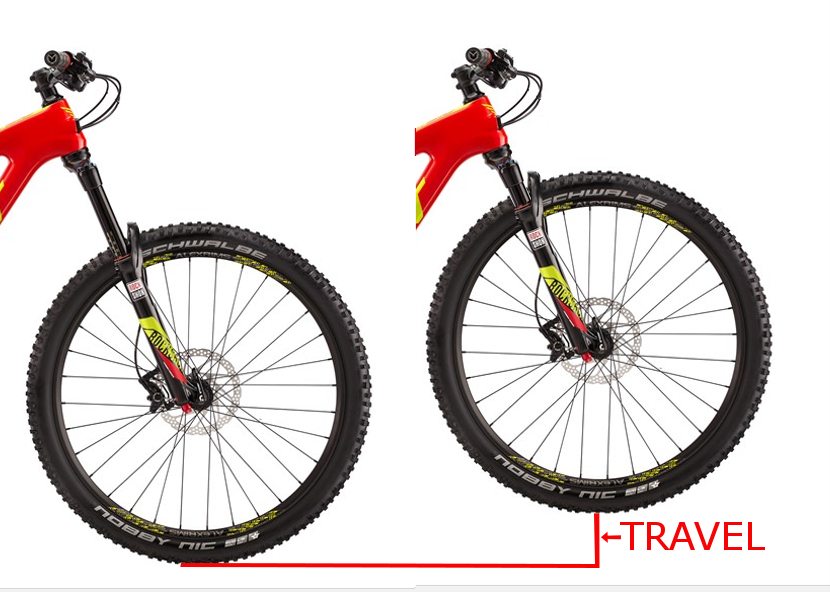
Travel

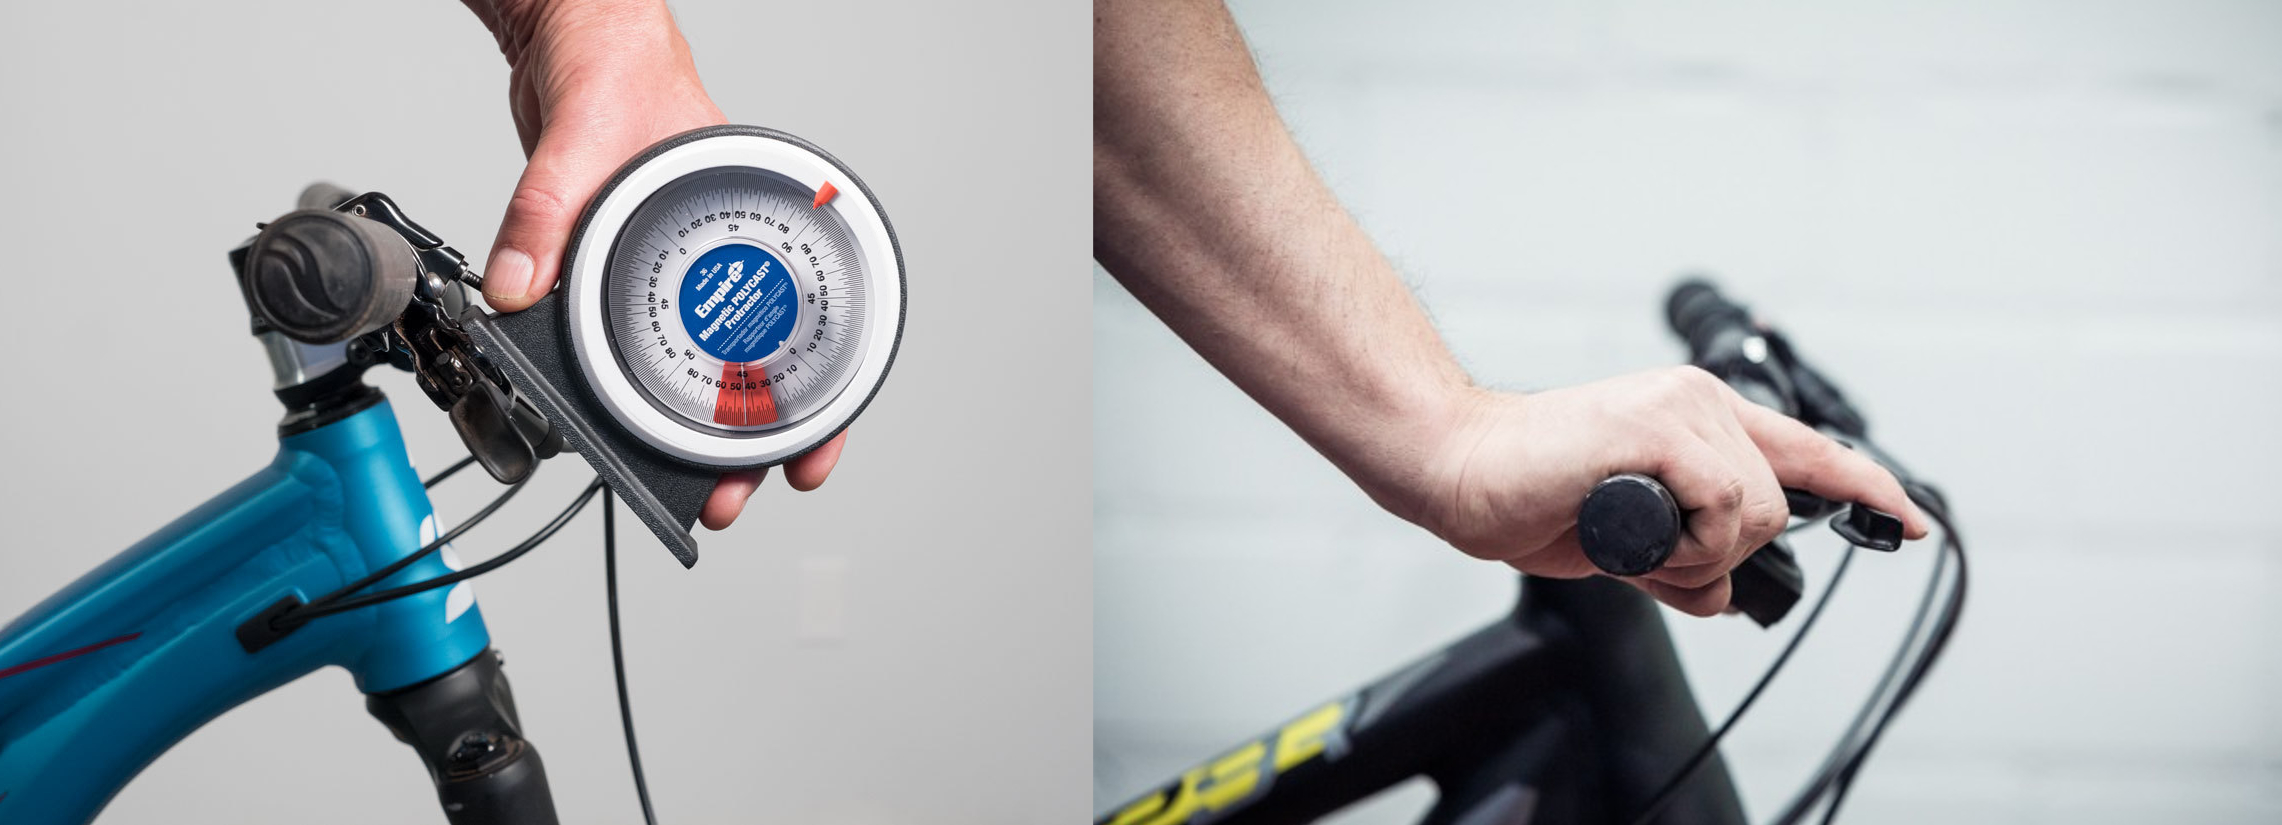
Suspension travel is simply the distance your wheel can move. On suspension forks, this is easily measured on the fork itself, while measuring rear wheel travel is far more difficult. ON the bright side, most manufacturers publish the amount of rear wheel travel a bike has.

Spring

Suspension springs can be made of metal (coil spring) or air. Coil sprung suspension is great because it offers smooth motion from the initial movement to the end of its travel. Air springs are great because they are lighter than a coil, and have a wider range of adjustment (just add air to make the suspension stiffer, or remove it to make the suspension softer). The downsides of an air spring is that they suffer from a greater static friction (stiction) in the initial part of its movement than a coil spring. Additionally, to change pressure in an air spring, you need a specific shock pump.

Suspension Setup

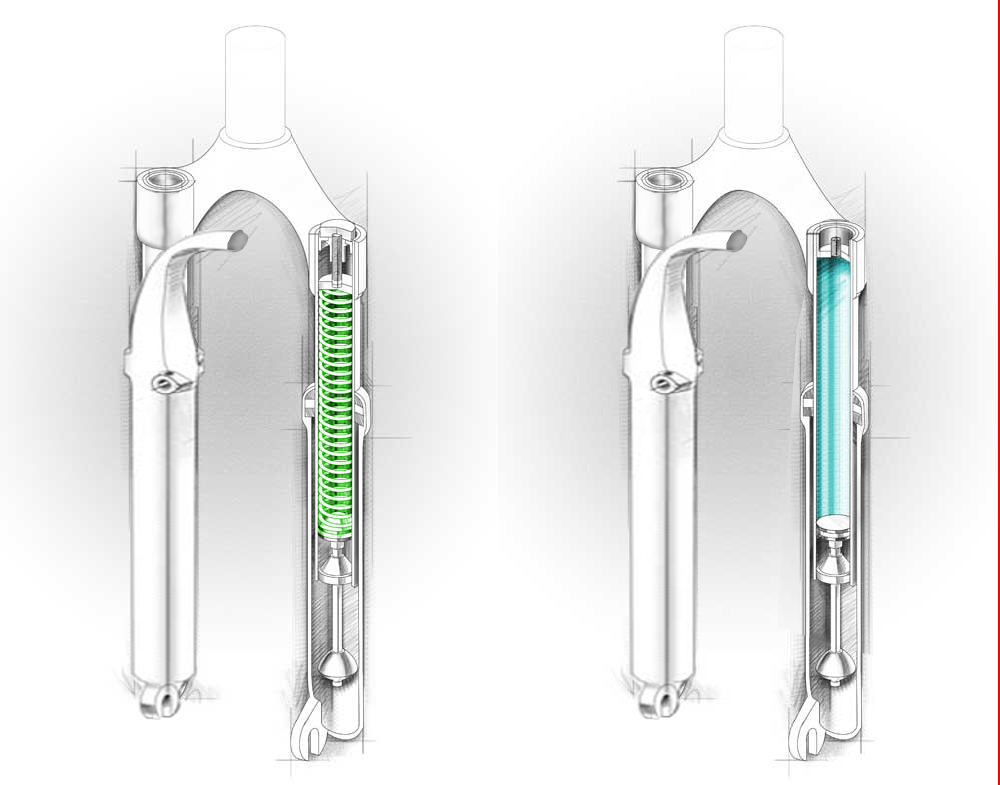
These cutaway pictures show how a suspension fork works. Coil spring on the left (green) and air spring on the right (blue)

Damping

Damping is a way of controlling how fast the suspension can move. As an example, if a fork is un-damped, it would rebound as quickly as it was compressed, making your bike bounce around the trail like a pogo stick. A damper is the mechanical device inside the suspension that allows it to compress quickly when you hit an object, but return at a controllable rate. Damping comes in two common forms, Compression and Rebound. Compression damping controls how fast a suspension can be compressed and rebound damping controls how fast the suspension can return to full extension.
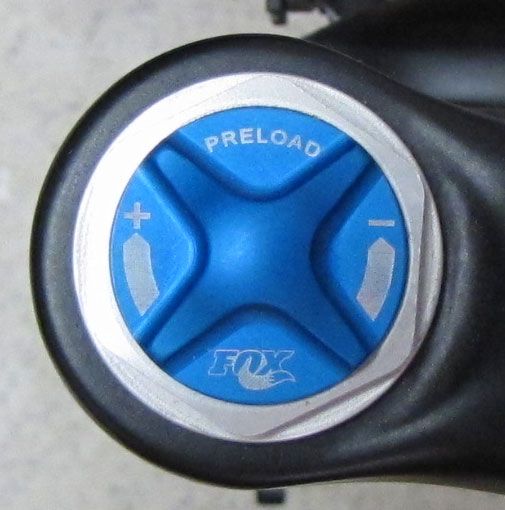
Preload

Preload is a set amount of compression force applied to the spring at its full extension. For instance, a coil spring might have some preload applied if a rider feels their suspension is too active. By applying some preload, you raise the force needed to begin the suspensions movement. In most cases, preload is handled by adjustment knobs on the top of a suspension fork.

Sag

Sag is the amount your suspension will compress when you are seated on your bike. Having some sag allows your wheels to track down into holes in the trail as well as compress if you hit an object. Overall, an optimal amount of sag is between 25-35% of the total travel.

Bottom out

Bottom out is when you compress suspension to its limit. Most suspension is designed with bumpers to protect metal parts from doing damage to one another during a bottom out.

Setting Sag

First, you will need something to mark your sag point. Most suspensions come with a rubber o-ring installed around the fork leg or rear shock. If they don’t have an o-ring, you can use a zip-tie that is loosely installed around the leg or rear shock.

Next, lean the bike up against a nearby wall and get on. Stand on the pedals with your hands on the bar and bounce up and down on the bike a few times. Now sit gently on your saddle with your weight forward (normal riding position).

Now push the o-ring down on the suspension against the seal and get off your bike carefully. You should see is some space between the o-ring and suspension seal (see image). That space is your sag measurement. Like stated earlier between 25-35% of total travel is optimal, so suspension with 100mm of travel should have 25-35mm of sag. If you have too little sag, stiffen the spring, too much then soften it.

Suspension Setup

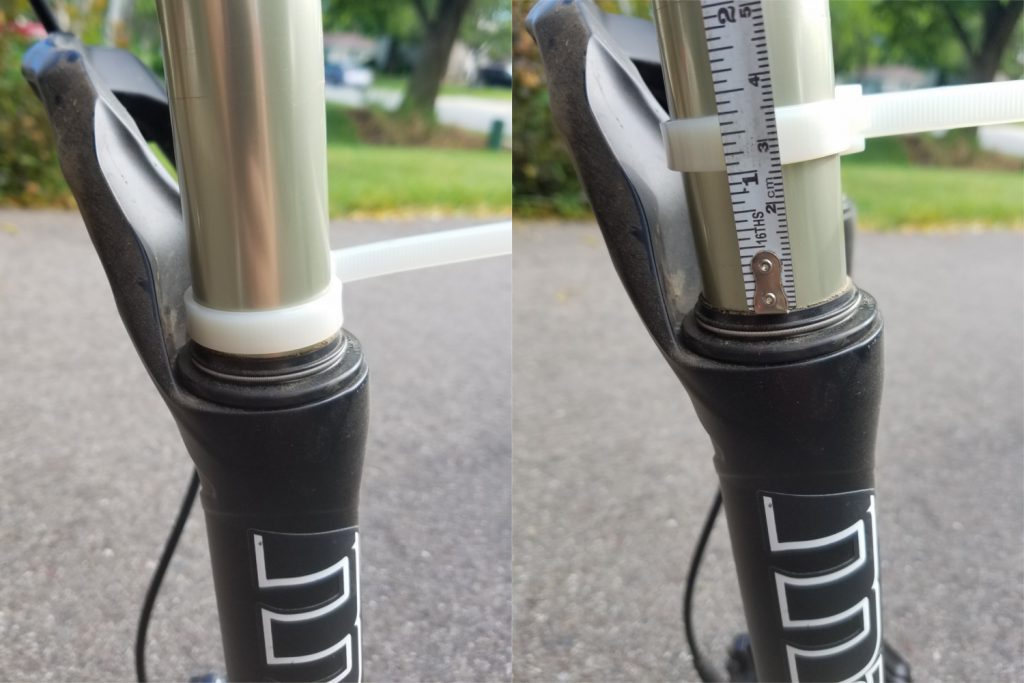
The zip tie is flush against the fork seal under the weight of the rider, but when the rider steps off, 25mm of sag can be measured (left)

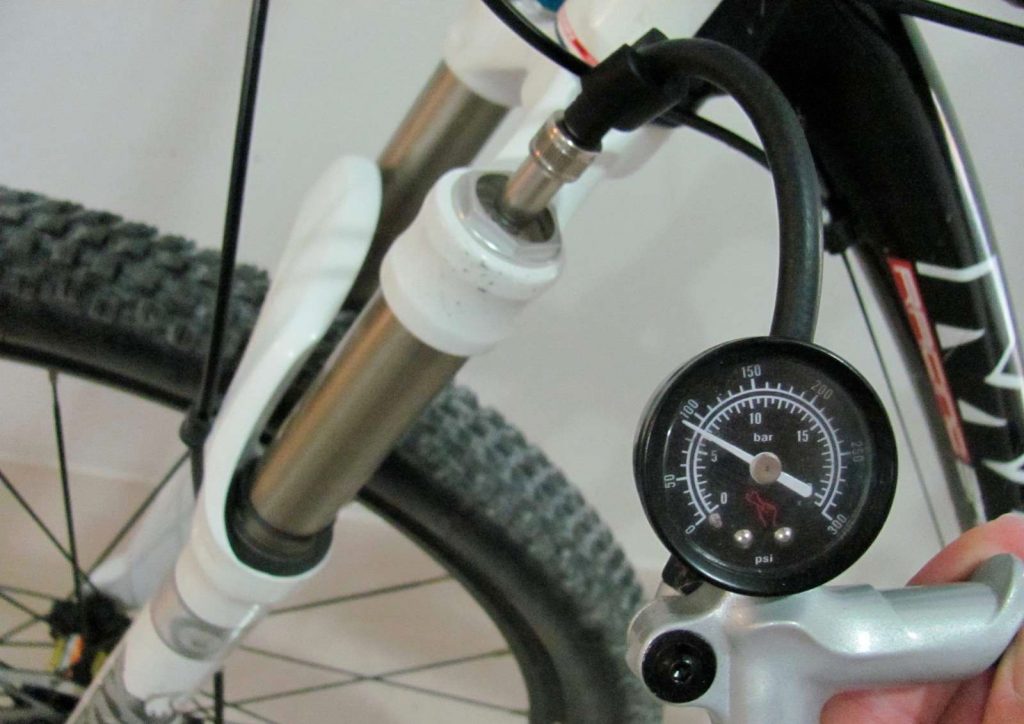
Suspension Setup and Air Spring Adjustment

Most manufacturers have a recommended air pressure based on your riding weight (remember to account for the weight of your gear and pack!). Before checking your sag, start by pressurizing your suspension to those recommended settings. Once you have checked sag, either increase or decrease the air pressure to make your suspension stiffer or softer.

Coil spring.

To adjust the sag amount on a coil spring you have two options. First option is to replace the spring for stiffer or softer versions. Replacing the spring will be necessary if you can’t achieve the proper sag by adjusting the preload setting. To adjust preload, simply turn the knob on the top of the suspension fork to the right to stiffen the fork, or the left to make it softer.
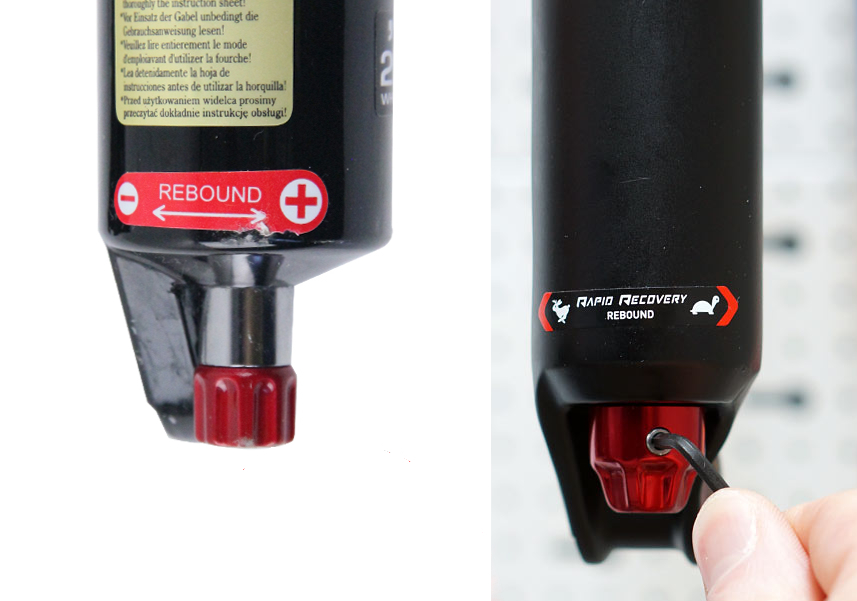
Setting Damping

Most suspensions only offer the ability to adjust rebound damping easily. Compression damping can always be adjusted, but it typically requires some disassembly. To initially setup your rebound damping, first find the adjustment knob usually located on the bottom of the right fork leg. Turn the damping knob to full open (typically represented by a “–“ symbol or a picture of a rabbit). Now, stand over the bars; press down then pull up quickly. You should feel the suspension spring back up as quickly as you compressed it. Turn the damping knob closed a small bit and repeat your compression test. Continue to compress and add damping until you feel the suspension is not quite able to keep up with your hands as they pull up.

Suspension Setup On the Trail

With your suspension setup now at a good starting point, take the bike out on the trail to fine tune it. First thing you want to ensure is that you bottom out your suspension under normal riding conditions a few times per ride. Bottoming out the suspension is a clear indicator that you are using all of your travel. However, be sure you aren’t bottoming out all the time. I know I just told you it’s OK to bottom out the suspension, but if you are doing it more than 2-3 times a ride, chances are you need to stiffen your spring.

If by chance you haven’t slowed the fork’s damping down enough, you will feel as if the bike wants to bounce away through rough sections. An under-damped fork will almost feel like the front end of the bike is trying to get away from you. The solution to this problem is to increase the amount of rebound damping you have.

As you add damping, be concerned with not allowing the fork to “pack up”. When you set your damping, you determined the rate at which the suspension can return to full extension. If your terrain is particularly rough, it is possible to set the damping to rebound slower than you need. As an example, if you go through a rock garden, hitting an object every second that compresses you fork 10mm, you want the damping to allow the suspension to rebound at least 10mm per second. If your suspension can only rebound 7mm per second, you will quickly be riding at less than full travel. The key indicator of this is the fork will feel stiffer through the rough stuff, but soft again when the trail smooths out. If you experience this, speed up the damping slightly until the feeling goes away.

Continuing adjustments

Over the first 6 months of owning your new suspension, never stop focusing on how it performs. As the forks wears in and begins to move more freely, the amount of damping you need may differ. Also, as you adjust your spring, it will slightly change the way your damping works. The best way I can describe suspension setup is as a dartboard. Rather than shooting for the bulls-eye in one shot, you are traveling down a spiral road getting closer to the bulls-eye with every new adjustment. With a little luck and focus, you will realize all the performance your suspension has to offer you.

Cycling shoes can help you ride longer, faster and in greater comfort.

Cycling Shoes: What Are The Differences and How To Make Sure They Fit

by John Brown, HaveFunBiking.com

Cycling shoes can help you ride longer, faster and in greater comfort but only if you get ones that fit well. Read on to see what makes cycling shoes unique and how to find the right ones for you.

Benefits of Cycling Shoes, Clipless or Not

Cycling shoes have a very stiff sole to disperse pedaling pressures along the entire length of your foot. In contrast, normal sneakers have flexible soles that centralize most of your pedaling efforts onto the sesamoid bones, causing a lot of discomfort. Therefore, a cycling shoe is also a great option for riders who don’t plan to use a clipless pedal. Once you add the benefits of a clipless pedal, cycling shoes will make riding easier and more comfortable.

Types of Soles for Cycling Shoes

What makes a cycling shoe stiff is the materials used in the sole. The most common materials are nylon and carbon fiber. Nylon is a great choice for cycling shoes because it is strong, relatively light, very durable and highly resistant to cracking. Additionally, nylon is inexpensive, so it can be used to make low cost cycling shoes. The downside of nylon is in its stiffness over time. In my experience, Nylon will generate a flex point over time, making the shoes more flexible through the years. Carbon is very similar to Nylon in that it is strong, and light. Where carbon differs is that it is far stiffer than nylon, never generates flex, and is very expensive to produce. Carbon soles are only found on high cost shoes, but offer a much longer lifespan.

Types of Cycling Shoes

Cycling shoes can help you ride longer, faster and in greater comfort and there is a large selection to choose from.

Cycling shoes can help you ride longer, faster and in greater comfort and there is a large selection to choose from.

Cycling shoes can most easily be categorized into three categories – Road, Mountain, Recreation.

Road Cycling Shoes

Road shoes are easy to spot because the sole is almost entirely smooth with only a small bit of tread on the heel. They are the only shoes capable of accepting a large road cleat, and are typically highly ventilated.  Thanks to the lack of tread, it is easy to see what the sole material is.

Mountain Cycling Shoes

A Mountain shoe will look like a road shoe above the sole. Often time the closures, ventilation and appearance are the same as it’s road sibling. Where these shoes differ is the sole design. Mountain shoes have deep treads built into the sole to offer traction in loose and steep conditions. Because the sole is covered in rubber treads it is more difficult to conclude if it is made of carbon or nylon.

Recreation Cycling Shoes

Not everyone needs a road specific shoe or the aggressive treads that come with a mountain shoe. For that reason, most companies make a recreational cycling shoe. These shoes use a soft rubber for the tread that offers tons of grip when used on a flat pedal, they also use a nylon sole for stiffness and clipless compatibility. Mostly, these shoes look like a casual sneaker even though they hide cycling specific benefits inside. Some even use a hinged sole that can flex upward when you walk, but will not flex under pedaling forces.

Insoles in Cycling Shoes

Your foot is designed to work like a leaf spring when walking or running. Your arch collapses to absorb impact and rebounds to help you propel forward. Although, when cycling, having your arches collapse can cause alignment issues in your knees, ankles, and hips. To combat arch collapse, most cycling shoes use insoles designed to support your arch. If your shoes don’t offer insoles with enough support, there are plenty of options available for custom insoles.

Trying them on

Now that you understand what you’re looking at, let’s talk about how to try the shoes on. First thing to remember about cycling shoes is that they are nothing like sneakers. Cycling shoes are often sized in European sizing and while most brands offer a conversion chart, only use it as a starting point.

When you try a Cycling shoe on for the first time, it should fit tighter than a sneaker. You want a tight fit because your foot is attempting to pull out of the shoe during a pedal stroke. In contrast, while running your foot is being slammed into the shoe so sneakers need to be more roomy. Additionally, most cycling shoes are made of synthetic materials that stretch and conform to your foot over time. Therefore, a shoe will be far more snug when you try it on than a year later. If the shoe is snug all the way around, that is good fit even if you can feather your toe off the front of the shoe. If you feel any specific point of contact, that usually is an indicator that the shoe is the wrong fit.

Installing Cleats in Cycling Shoes

If you go to your local bike shop to get your shoes, they will typically install the cleat for you. If you are doing it on your own, try to position the cleat just behind the ball of your foot and straight on the shoe. I find it helpful to grease the threads of the cleat bolts before installation.

Hopefully, you feel comfortable going to try cycling shoes on after reading this. If you do have any more questions, either leave them in the comments, or visit your local bike shop.

For many, the fun of mountain biking is going down hill. So how do you descend with speed and confidence? Find out here!

Mountain Bike Hacks: How to Descend with Speed and Confidence

For many, the fun of mountain biking is going down hill. So how do you descend with speed and confidence? You will find it is as easy as controlling your weight, position and growing skills.

Weight Distribution

Weight distribution is the most important thing to focus on when descending. The inaccurate explanation of this is to “lean back” when heading downhill. In reality, by “leaning back”, you extend your arms completely and “hanging” on the handlebar. As you descend, if your arms are extended completely and the front end needs to drop, you will get pulled forward and potentially pitched over the bar.

For many, the fun of mountain biking is going down hill. So how do you descend with speed and confidence?

For many, the fun of mountain biking is going down hill. So how do you descend with speed and confidence?

An easy trick to controlling your weight is to consider how much pressure is on your pedals. Rather than keeping even weigh distribution between your bars and pedals, concentrate most of your weight on the pedals. As you initially get used to this concept, I find it useful to imagine what would happen if a genie magically came by and made your bike disappear mid ride and you were left to land on the ground. Would you land on your feet or your hands?

Once you get your weight distributed onto your pedals, you can easily move your body forward and back over the bike as the situation requires. While moving your weight around, you will find it is easier to do if you first get your weight into as low a position as possible.


Position

While most bikes have suspension, your arms and legs offer better suspension than any shock. By bending your knees and elbows It is easy to get into a low position and absorb trail shock. Additionally, beyond well bent joints, concentrate on looking ahead rather than down. If you look down, you lose vision of what is coming down the trail and you bend your back into a poor riding position (see image). By contrast, looking forward will naturally put your chest out and hips down, and grant you more time to see obstacles and correct. Finally, having a comfortable bend in your arms and legs, will allow you to be loose on the bike. Loose means you can let the bike move freely beneath you without affecting your position. Other than being low, balanced, and loose, you need to practice a few things to build your skills.


Skills

By bending your knees and elbows It is easy to get into a low position and absorb trail shock, while descending.

By bending your knees and elbows It is easy to get into a low position and absorb trail shock, while descending.

The number one skill is to ride in straight lines. While descending, you have more speed and less traction,therefore, trying to make hard or quick turns becomes increasingly difficult. When entering a descent, look ahead and setup as straight a path as possible, going over obstacles rather than around them. When you do plan to turn, try to control your speed before the turn and lay off the brake while making the turn. To do this, find areas that are smooth to apply the brakes and try to avoid skidding. Remember that if your wheels are skidding, you have lost traction and the ability to stop under control. Moreover, if your wheels are skidding, they will continue to skid even if the ground becomes smooth. An easy trick to help you brake comfortably, is to place your brake levers in an easily accessible place.

Bike setup

One trick that helps with position, braking and weight disbursement is a higher lever position. A common incorrect brake lever position is based on a normal seated riding position rather than the descending position. The levers should be set so that you can reach out and access them easily with your weight low and elbows bent. This will look higher than what you are used to (see image). The reason this is helpful is best explained by what happens if the levers are positioned incorrectly (low). If the levers are low, you will naturally roll your wrists over the bar when reaching for the brake. This lifts your weigh, locks your arms, and positions you too far forward.

Another way to get your weight low, is by installing a dropper post. Dropper posts allow the rider to remotely lower their saddle height. A lower saddle height lets you get your weight lower, easier. Once you need your saddle up again, just hit a button and its back in place.

Ride within your skills

I don’t encourage you to find the steepest, rockiest pitch to practice these skills on. When practicing these new skills, use descents of trail that you are comfortable with. The descents that you are already doing with relative ease are the places to practice new skills. Once you become comfortable with weight and position, try some new places and slowly work your way up to difficult terrain.

Free Bikes 4 Kidz (FB4K) is in the count down phase to their 's Bike Giveaway Weekend, but they still need your help to clean and wrench the remaining bicycles that were donated in October.

Bike Pic Nov 18, Free Bikes 4 Kidz Givaway Needs Your Help

Help a child receive a bike. Free Bikes 4 Kidz (FB4K) is in the count down phase to their Bike Giveaway Weekend, but they still need your help to clean and wrench the remaining bicycles that were donated in October.

The Free Bikes 4 Kidz Bike Giveaway Weekend culminates on December 3 – 4, 2016. This program was started in 2008, with 300 bikes donated, giving kids of low-income families a chance to have a bike. This year over 5,000 bikes have been collected and stored in the Mall of America’s warehouse. Help them clean and fix the bikes that still need tender-loving care. Can you help? Please volunteer today!

See all the bike-friendly places to explore in the new Minnesota Bike/Hike Guide

Thanks for viewing the Free Bikes 4 Kidz Pic of the Day 

Now rolling into our 10th year as a bike tourism media, our goal is to continue to encourage more people to bike and have fun. While highlighting all the unforgettable places for you to ride. As we continue to showcase more place to have fun we hope the photos we shoot are worth a grin. As you scroll through the information and stories we have posted, enjoy.

Do you have a fun bicycle related photo of yourself or someone you may know that we should post? If so, please send your picture(s) to: [email protected]. Include a brief caption (for each), of who is in the photo (if you know?) and where the picture was taken. Photo(s) should be a minimum of 1,000 pixels wide or larger to be considered. If we do use your photo, you will receive photo credit and acknowledgment on Facebook and Instagram.

As we continues to encourage more people to bike, please view our Destination section at HaveFunBiking.com for your next bike adventure – Also, check out the MN Bike Guide, now mobile friendly, as we enter into our 8th year of producing the guide.

So bookmark HaveFunBiking.com and find your next adventure. And don’t forget to smile, while you are riding and having fun. We may capture you in one of our next photos that we post daily.

Have a great day!