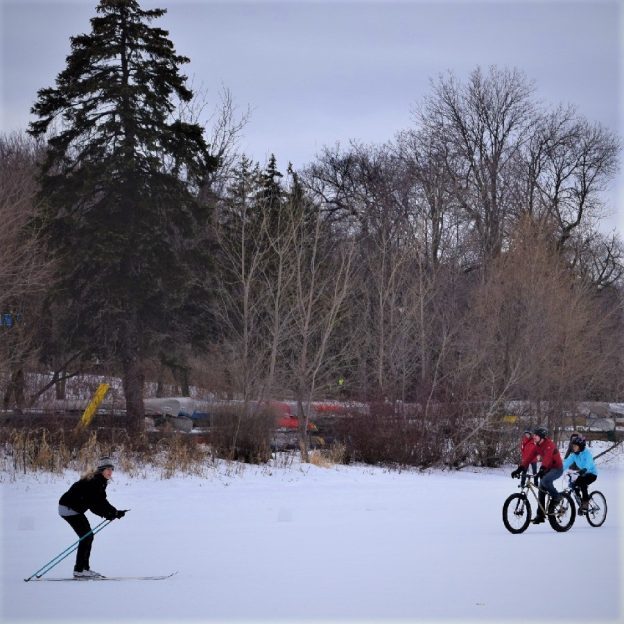
Tag Archives: downhill

Fun winter activities to stay healthy during this ongoing pandemic

by Russ Lowthian, HaveFunBiking

For many of us, being active outdoors enjoying fun winter activities (biking, hiking, etc.) with the Coronavirus’s uncertainty has been challenging. The last two years (2020-2021) have been like no other in recent memory. Despite the lifestyle changes caused by this virus, there’s still plenty of fun to be had. In fact, seeking out healthy activities may be even more important now as winter approaches. Doing something you enjoy can distract you from problems and help you cope with all the new life challenges.

Page through our latest Bike/Hike Guide with many maps of Minnesota destinations offering fun winter activities. Then, layer up your dress attire for the temperature swings ahead and head out. You will soon discover that outdoor pursuits pose a lower risk of getting sick than indoor activities do if you haven’t already.

Its a perfect time of the year to jump on a fatty and hit the trail. This pic was taken last year at the Get Phat with Pat event in the Minnesota River Bottoms, in Bloomington, MN.

It’s a perfect time of the year to jump on a fatty and hit a Minnesota trail.


Why choose outdoor activities?

According to a recent article from the Mayo Clinic. The COVID-19 virus is primarily spread from person to person through respiratory droplets. Released into the air when a person is talking, coughing, or sneezing. In contact with others indoors, you’re more likely to inhale these droplets from an infected person.

This Bike Pic  Tuesday as the temps continue to drop, we caught this biker dude, with plenty of layers and a mask having fun in the Bold North, near Bloomington, MN.

With plenty of layers and a mask, this biker dude is having fun in the Bold North.

When outside, the fresh air is constantly moving, dispersing these droplets. You’re less likely to breathe in enough of the virus’s respiratory droplets to become infected. Being outside enjoying Minnesota’s fun outdoor activities offers other benefits, too. As you may have discovered this summer, being outside also offers an emotional boost that will help you feel less tense, stressed, angry, or depressed.

This Bike Pic Thursday, we caught this biker chick out having fun along the Minnesota River bottoms near Bloomington, MN.

This biker chick’s winter activities include having fun along the Minnesota River bottoms near Bloomington, MN.

Move more with low-risk Minnesota winter activities.

In general, any activity that allows you to keep a social distance of at least 6 feet (2 meters) from others is lower-risk. Here in Minnesota, a winter wonderland pursuits, consider moving with these low-risk outdoor activities to stay healthy and safe. Again, use the current Minnesota Bike/Hike Guide, with all the maps, to find a place to enjoy the following hobbies.

  • Fat Biking
  • Nature walks
  • Snowshoeing
  • Downhill and/or cross country skiing
  • Ice skating
  • Ice fishing and hunting
  • Fitness classes, held outside to allow extra distancing
  • And exploring the snow-covered trails on an ATV.

Similar to your summer experiences, try to avoid crowded walkways and narrow paths. Choose routes that make it easy to keep your distance. Wear a mask when you can’t maintain at least 6 feet (2 meters) from people you don’t live with.

It’s Friday and HaveFunBiking George will soon melt away as the spring thaw approached,

Winter activities can also include stopping to make a snowman when fat biking?

As fall turns to winter, your well-being also includes doing things that make life worth living. With the right information, you can make thoughtful choices about ways to bring a sense of normalcy and joy to your life during this pandemic. Maybe with some fun Minnesota winter activities!

Remember that just getting together for a chat at a safe distance can offer a valuable opportunity to be with people you care about — and boost your mood at the same time.

Road Bike Hacks: Descending with Confidence and Skill on Your Road Bike

What goes up must come down. Descending on your road bike can be fun and safe if you learn some basic skills.

Weight down

If you have ever watched a motorcycle race, you will have seen those riders get off the side of the bike and touch the ground during turns. The purpose of that position is to get their center of gravity as low as possible. I don’t recommend matching that position on your road bike, but we can take some lessons from them. First thing, the lower your weight, the more stable you will be. Try lowering one foot to the bottom of the pedal stroke while descending in a straight line. When turning, drop your outside foot to the bottom of the pedal stroke and lean your hips toward the inside of the turn.

Hands in drops

Most riders use their drops about 10% of the time. It should be a position you can be in comfortably, if not, be sure to have your fit checked. Being in the drops while descending does two very important things. First, it lowers your upper body weight. Second, it gives you a greater mechanical advantage on your brake levers. Be careful with this new found braking power. Get comfortable with the different brake feel on gradual grades before tackling steep roads with speed.

Brake power

As you descend you are putting more weight on your front tire than rear tire. Additionally, as you apply the brakes, even more weight gets distributed onto the front wheel. With your weight shifting forward, you will notice that a rear wheel is far more likely to skid and break free while going downhill than on flat ground. The best thing to do while braking downhill, is to use the front brake to stop and slow the bike and the rear brake to control speed. New riders get taught that the best way to stop is to use both brakes evenly and that if we use too much front brake we are prone to crash “over the bars”. While going “over the bars” is a real concern it can be combated with a little practice. Simply put, as you begin to stop, brace yourself with your arms and get your weight low.

Look ahead

The world comes at you fast when heading downhill. For this reason, focus farther down the road than you would on flat ground. Keep eyes peeled for cars, pedestrians, painted road surfaces, gravel, or anything else that you will want to avoid. Also, look for the best approach for upcoming turns. When preparing for a turn, be cognizant of the exit to the turn as well as the entry. By planning how to enter, navigate, and exit a turn safely and efficiently, you will stay in control.

Trust your tires

Tires are literally where the rubber hits the road. Even though your tires only make about 3 square inches of contact with the road, they can do a lot to keep you planted. You can do a simple test to build confidence in the traction your tires give you. Try to find a place where the road surface is banked and ride along it. Under highway overpasses often have banked concrete surfaces with a sidewalk separating them and the road. Ride along that bank slowly and see how well the tires hold. You will find that the tires continue to hold fast even when the pitch becomes very steep.

Warning signs and speed wobbles

There are some normal things you want to avoid while going downhill. The most concerning things like sand, gravel, leaves, or debris could rob you of traction. Beyond outside influences, speed wobbles are an uncommon but frightening situation that some cyclist encounter. Speed wobbles are exactly what they sound like. As you get up to a certain speed, your bike will begin to wobble. There are many causes for speed wobbles, but only two things you can do when you encounter them. You can go faster (not recommended) or slow down carefully. Slowing out of a speed wobble is a matter of riding straight, and slowing under control.

Ride within your abilities

More important than the skills to ride downhill is the mentality. Riding at speeds you are comfortable with will keep you mentally, and by extension, physically calm. Calm riders make better and safer decisions. Be sure to take unknown descents with caution and build up to speed after you try it a few times. Overall, remember that it becomes harder to control your bike at higher speeds, so take it slow to start.

For many, the fun of mountain biking is going down hill. So how do you descend with speed and confidence? Find out here!

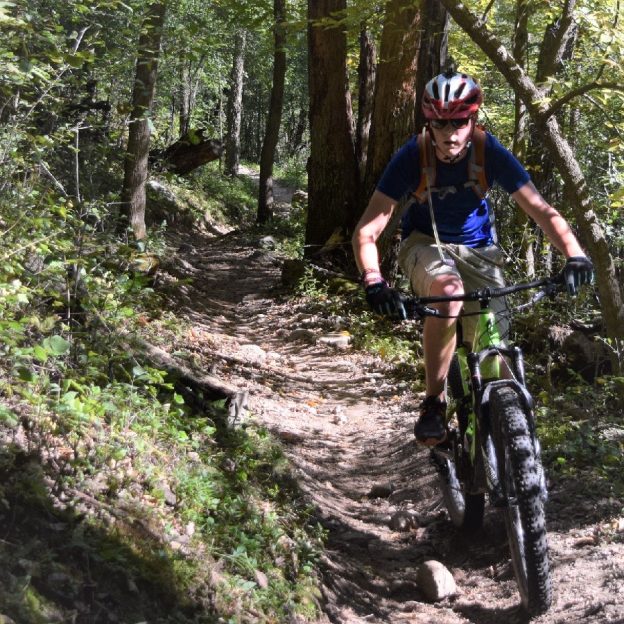
Mountain Bike Hacks: How to Descend with Speed and Confidence

For many, the fun of mountain biking is going down hill. So how do you descend with speed and confidence? You will find it is as easy as controlling your weight, position and growing skills.

Weight Distribution

Weight distribution is the most important thing to focus on when descending. The inaccurate explanation of this is to “lean back” when heading downhill. In reality, by “leaning back”, you extend your arms completely and “hanging” on the handlebar. As you descend, if your arms are extended completely and the front end needs to drop, you will get pulled forward and potentially pitched over the bar.

For many, the fun of mountain biking is going down hill. So how do you descend with speed and confidence?

For many, the fun of mountain biking is going down hill. So how do you descend with speed and confidence?

An easy trick to controlling your weight is to consider how much pressure is on your pedals. Rather than keeping even weigh distribution between your bars and pedals, concentrate most of your weight on the pedals. As you initially get used to this concept, I find it useful to imagine what would happen if a genie magically came by and made your bike disappear mid ride and you were left to land on the ground. Would you land on your feet or your hands?

Once you get your weight distributed onto your pedals, you can easily move your body forward and back over the bike as the situation requires. While moving your weight around, you will find it is easier to do if you first get your weight into as low a position as possible.


Position

While most bikes have suspension, your arms and legs offer better suspension than any shock. By bending your knees and elbows It is easy to get into a low position and absorb trail shock. Additionally, beyond well bent joints, concentrate on looking ahead rather than down. If you look down, you lose vision of what is coming down the trail and you bend your back into a poor riding position (see image). By contrast, looking forward will naturally put your chest out and hips down, and grant you more time to see obstacles and correct. Finally, having a comfortable bend in your arms and legs, will allow you to be loose on the bike. Loose means you can let the bike move freely beneath you without affecting your position. Other than being low, balanced, and loose, you need to practice a few things to build your skills.


Skills

By bending your knees and elbows It is easy to get into a low position and absorb trail shock, while descending.

By bending your knees and elbows It is easy to get into a low position and absorb trail shock, while descending.

The number one skill is to ride in straight lines. While descending, you have more speed and less traction,therefore, trying to make hard or quick turns becomes increasingly difficult. When entering a descent, look ahead and setup as straight a path as possible, going over obstacles rather than around them. When you do plan to turn, try to control your speed before the turn and lay off the brake while making the turn. To do this, find areas that are smooth to apply the brakes and try to avoid skidding. Remember that if your wheels are skidding, you have lost traction and the ability to stop under control. Moreover, if your wheels are skidding, they will continue to skid even if the ground becomes smooth. An easy trick to help you brake comfortably, is to place your brake levers in an easily accessible place.

Bike setup

One trick that helps with position, braking and weight disbursement is a higher lever position. A common incorrect brake lever position is based on a normal seated riding position rather than the descending position. The levers should be set so that you can reach out and access them easily with your weight low and elbows bent. This will look higher than what you are used to (see image). The reason this is helpful is best explained by what happens if the levers are positioned incorrectly (low). If the levers are low, you will naturally roll your wrists over the bar when reaching for the brake. This lifts your weigh, locks your arms, and positions you too far forward.

Another way to get your weight low, is by installing a dropper post. Dropper posts allow the rider to remotely lower their saddle height. A lower saddle height lets you get your weight lower, easier. Once you need your saddle up again, just hit a button and its back in place.

Ride within your skills

I don’t encourage you to find the steepest, rockiest pitch to practice these skills on. When practicing these new skills, use descents of trail that you are comfortable with. The descents that you are already doing with relative ease are the places to practice new skills. Once you become comfortable with weight and position, try some new places and slowly work your way up to difficult terrain.