Tag Archives: Bike tire repair

We have compiled the best list of simple bike tips to make your next ride more fun, more efficient, and more comfortable.

Simple Bike Tips to Get You Going Faster, Farther, and More Comfortably

by John Brown, HaveFunBiking.com

Do you want to make your bike ride more fun? How about getting all you can out of your bike? What about making your bike more comfortable? Well, we have is some great news! We have compiled a list of simple bike tips to make your ride more fun, more efficient, and more comfortable.

Lube your chain

If your chain isn’t running smoothly, neither are you. While a in-depth bike clean is great, simply keeping your chain lubricated is an easy way to ensure you bike runs well. Start by propping the bike up so you can rotate the cranks backward freely. Next, Backpedal the bike, while dripping lubricant onto each chain link. Once the chain is well saturated, give a few moments for the lubricant to penetrate the chain. Finally, wrap a rag around the chain, backpedal, and remove all the excess lubricant. Done!

Bike Tips to Find the Perfect Tire Pressure

First, fill the tires to the recommended maximum pressure as listed on the sidewall. Next, take the bike for a quick spin around the block for feel. From there, let about 5psi out of each tire (a digital pressure gauge works great) and ride it again. Continue lowering the pressure in 5psi increments until you can no longer feel the small imperfections in the road vibrate through the bike. Use these pressures as you starting point. Finally, over the next few rides, adjust pressure by 2-3 psi in search of the absolute perfect pressure. The goal is for a pressure that allows the tire to easily deforms over objects, offer ample traction, and resist compressing too far under hard braking and turning. As an example, I recently determined my mountain bike’s perfect pressure to be 28psi for my front and 32psi in the rear.

Saddle fit

Checking your saddle height is also a quick way to get more comfort and efficiency. While a complete bike fit does the most benefit, checking saddle height goes a long way to help with back pain and other discomforts. To set saddle height, sit on your bike and place your heel on your pedal. Then rotate the pedals backward. At the bottom of the pedal stroke your goal is to have your leg completely extended while keeping your hips level. If at the bottom of the pedal stroke you aren’t getting complete extension, raise your saddle. However, if you’re tilting your hips at the bottom of the pedal stroke, lower the saddle. Once you begin pedaling naturally (with the ball of your foot on your pedal, rather than your heel), you will have the proper amount of bend to your knee.

Mountain bike tips

To get your Mountain bike working it’s best try a few of these bike tips.

Cut your bars

Bicycle companies usually install all the same width bars on their mass-produced bicycles. That means that all but the largest size riders usually ride with bars that are too wide. For many riders, uncomfortable bar width is something they just get used to. But before you get used to it, realize that there are serious ramifications on using a bar that’s too wide. First, riding a bar that’s too wide spreads your arms out forcing you to use your support muscles inefficiently. Second, as you spread your arms, your back will naturally pitch forward (potentially leading to discomfort). Finally, wider bars are more prone to accidentally clipping trees or signs, causing a crash.

To cut your bars, first remove the grips (Spray a little hairspray under the grip and they will slide right off), Then measure and mark the amount of bar you intend to remove. Considering you can’t uncut your bars, only take 1-2 cm off at a time, then ride for a few weeks to verify before cutting again. You can cut the bars with a pipe cutter or hacksaw, but remember to smooth the sharp edge with sandpaper once finished.

Brake reach

Stopping the bike confidently leads to control and comfort, so make sure you adjust your brakes levers to match the size of your hands. Most brake levers have a reach adjustment built into them. By loosening or tightening the reach adjustment bolt you can bring the brake lever closer to the bar, or move it further away. I like to setup a brake so that the rider can easily reach the lever without changing their hand position on the grip. Additionally, I try to make sure the levers can’t hit the bar, or other fingers when they are squeezed.

Check your sag

A mountain bike with a suspension fork will work better once that fork is adjusted for the weight of the rider. The first step in adjusting the suspension is to set the “sag”. “Sag” is the amount your suspension compresses when you put your weight on the bike. Most suspension calls for about 25% sag, meaning, when you sit on the bike, the suspension compresses ¼ of its travel.

To set sag, first snug a zip tie around the upper leg of your suspension fork. Make sure it is snug enough to stay in place by itself, but not actually tight. Slide the zip tie all the way down until it is resting on the rubber seal of your fork. Next, find somewhere that allows you to put both feet on the pedals and balance without needing to pedal (I find a wall works well). Get on the bike, rock back and forth a few times to cycle the suspension, then sit still on the saddle in your standard riding position with both hands on the bar. Have a friend, move the zip tire so it sits on the seal once again and carefully get off the bike. You can now measure the distance from the seal, to the bottom of the zip tie and determine your sag. As an example, if a fork has 100 millimeters of travel, you want the distance between the zip tie and seal to be 25 millimeters. If you would want to adjust your suspension, see your forks owner’s manual for details.

Road Bike tips

Not to forget the road bike out there. Here are a few bike tips for the drop bars.

Re-tape your bars

On your road bike, bar tape does a big job. If installed correctly and replaced frequently, it can quiet loads of road buzz that would otherwise be transferred into your hands. Many times, riders ignore their tape because it appears OK. While your tape may look OK, the real test is to see how compliant it is. Use the tip of your finger and press firmly into the tape where your hands typically rest (usually, this is just behind the hoods). Follow up by then pressing an area of the bar that never sees wear. Compare the two to see just how compressed your tape has become, replace if needed.

Adjust your hoods

While you are replacing your tape, it’s a good Idea to review the location of your brake hoods. Verify, that when seated on your bike with your hands on the hood, your wrist is straight. If your hands bend upward or down, you are putting excess strain on your shoulders, arms and hands. That strain can lead to fatigue or pain.

Overall, a great fitting and functioning bicycle will allow you to ride longer, faster, and in more comfort. If you have additional questions about customizing your bicycle the professionals at your local bike shop can be a great resource.


When you're out touring the countryside or riding your bike in town here are six bike maintenance items to carry with you to help fix the most common problems you may encounter.

Bike Maintenance – Six Items to Have Along on a Ride


When you’re out touring the countryside or riding your bike in town here are six bike maintenance items to carry with you to help fix the most common problems you may encounter. The good news is that these will all fit in the small pack underneath your seat or in your rear jersey pockets. And, if you don’t already have the bike maintenance tools or items, you can mostly likely pick them up for a reasonable price at your favorite bike shop.

1. A Spare Tube is Essential for on the Road Bike Maintenance

If you’re going to be out and about, the most likely problem you’ll have with your bike is a flat tire. So bring along a spare tube. They are fairly compact, easy to change out, and you’ll be back riding in no time. Never changed a flat tire? Here is an easy instruction video on how to change a flat.

Have a tube that fits your tire is the most important bike maintenance items you can carry with you.

Have a tube that fits your tire is the most important bike maintenance items you can carry with you.

In addition to a spare tube, you will want to carry a patch kit. If you get a second flat, or a friend you are riding with has multiple flats, you’re going to gain some extra points for having that kit. Plus, using a patch in a tire adds a tough skin protector to a surface area when you aren’t able to find the sharp object that created the problem in the first place.

2. A Set of Tire Levers

If you’re going to fix a flat tire, you’ll need tire levers. These small tools slide under your tire and help pull it off your rim so that you can remove the tube to patch it or replace it with a spare.

A pair of tire levers makes getting it easier to pry the tire from the rim, without pinching the tube.

A pair of tire levers makes getting it easier to pry the tire from the rim, without pinching the tube.

They fit easily in your pouch or jersey pocket, and you really don’t want to be without them

3. A Pump or CO2 Inflator

Whether you repair your tire with a patch kit or spare tube, you will need to inflate the tire again after the repair. That’s where a small bicycle frame pump comes in handy for bike maintenance on the road. Usually clamped to your frame, these little pumps will put enough air in your tire to get you back on your way.

A small air pump is a must have bike maintenance item to have along unless you prefer a CO2 cartridge.

A small air pump is a must have bike maintenance item to have along unless you prefer a CO2 cartridge.

Some riders prefer to carry CO2 cartridges – these small cylinders deliver a burst of pressurized air to refill a tube in a matter of a few seconds. They are lighter, but require a bit of practice to use or else you can blow out the tube you’ve just replaced. Plus, they cost about a dollar a piece for what is typically a onetime use. For information on how to use these inflators, check out the Youtube Video talking about it.

4. Multitool Gadget

For any number of potential fixes or adjustments you might face on the road, a multi-tool is a handy gadget that you’ll want to take along no matter how short or long your ride.

A multitool is a great bike maintenance item to have along for making adjustments, to opening a bottle of root beer.

A multitool is a great bike maintenance item to have along for making adjustments, to opening a bottle of root beer.

A multi-tool typically comes equipped with a dozen or more individual tools in various sizes including Allen wrenches, hex bolt wrenches, screw drivers, a chain tool, and more. Tucked neatly into one small package, it’s like a portable tool box for fixing your bike – in more ways than you can ever imagine. Plus, many come outfitted with a bottle opener too for when you are back and ready to celebrate another fun ride.

5. Mobile Phone

Every wonder how we got by, in the days before cell phones? It’s nice for calling home to get picked up in case of breakdown or for calling your buddies who may be ahead of you, or behind you, on those longer rides.

When bike maintenance requires calling for help a cell phone is a great tool to have along.

When bike maintenance requires calling for help a cell phone is a great tool to have along.

There is no reason not to carry a cell phone, especially with all the apps for mapping, cadence, and speed.

6. Cash/Identification and Insurance Card

This is one of those just-in-case items that you bring and hopefully will never use. Take along a few dollars for drinks and snacks along the way. And, in case of a split in your tire, a dollar bill can be laid along the split inside your tire to keep your tube from bulging out too badly until you can get it repaired. Also, be sure to bring along copies of your identification and insurance cards. God forbid you get into an accident, but in case you do, you’ll definitely want and need these items.

When bike maintenance requires some buying power cash and/or a credit card is good to have along, with an ID.

When bike maintenance requires some buying power cash and/or a credit card is good to have along, with an ID.

Tip: On the backside of these documents, write down your list of emergency contacts as well as any special medical instructions or allergies to medicine you might have. Also, if you have any pets home alone, this can be noted along with your emergency contacts so one of the contacts can take care of the pet if the need arises.

Now, with these items stowed away on your bike, it’s time to leave your troubles at home and enjoy the trails and roads. Most of all, it’s time to have fun!


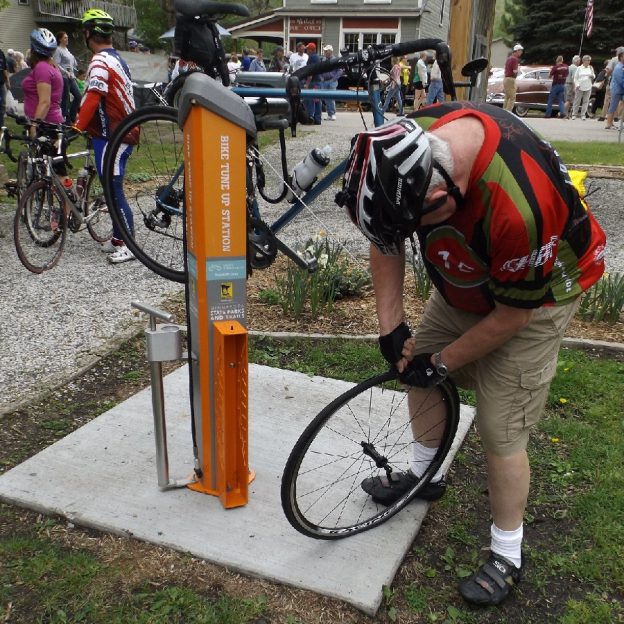
An emergency bike tire boot repair option

Brad Kopp, One ten Cycles Service Manager/Assistant Store Manager

The inevitable truth is that every avid cyclist has, or will eventually have, a flat while riding and need a bike tire boot repair. When considering a repair the key is to identify the cause of the flat and resolving the issue before continuing with an inner tube replacement. Having the right tools and knowledge will help get you rolling down the trail safely again.

A bike tire boot repair option

Identifying the need for a bike tire boot repair from a blow out.

Identifying the need for a bike tire boot repair from a blow out.

The type of hole in the inner tube can give you an idea of whether a tire boot is necessary. A small pinhole would indicate a puncture via thorn, wire, glass etc.  Two small cuts on either side of the tube indicate a pinch flat caused by too low of pressure and an impact with a rock or pothole. In most cases, these scenarios do not necessitate a tire repair.

Identifying a blowout

Installing a bike tire boot when you need to repair from a blow out.

Installing a bike tire boot when you need to repair from a blow out.

A blowout can be identified by a large shredded hole or a long horizontal slit, commonly caused by a ripped tire or improperly seated tire bead. Failure to repair the tire casing in the event of a blowout could allow your new inner tube to protrude from the tire and flat immediately. It’s possible to temporarily repair a tire with a boot such as Park Tool’s TB-2. It should be noted that booted tires should be replaced as soon as possible.

Take the following steps to repair a damaged tire:

  1. Temporarily repair a tire with a boot such as Park Tool’s TB-2.

    Temporarily repair a tire with a boot such as Park Tool’s TB-2.

    Locate cut or tear in tire.

  2. Clean inside of tire around tear (alcohol wipes work excellent).
  3. Locate and remove emergency tire boot backing.
  4. Place patch over damaged tire casing, making sure not to overlap the tire bead.
  5. Firmly press down patch.
  6. Re-install tire and tube.

Pro Tip: Also inspect for rim strip failure in the event of a blowout. A damaged rim strip can sometimes be emergency repaired with a section of a TB-2 patch.=-09876543.

For more questions related to keeping your bike in top shape, stop in an see Brad at One ten Cycles, On Highway 100, west of the 35E Freeway in Mendota Heights, MN.