Tag Archives: Bike chain

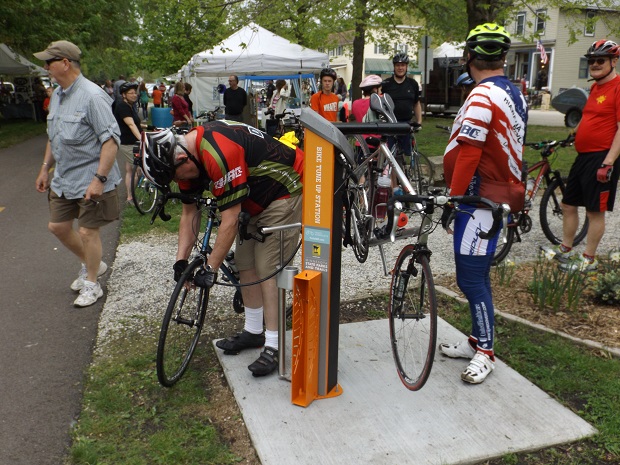
Bike tune-up tricks for better cycling performance

Do you want your bike to go faster, ride more effortlessly, and shift smoother after your annual bike shop check-up? Here are some bike tune-up tricks that you may want to keep handy.

Bike tune-up tricks to remember.

Improvements in these areas are often relatively easy to accomplish with just a few simple steps. Try out these four simple tune-up tasks below, which don’t require any special knowledge or tools, and you should see a long-lasting improvement in your bikes performance and ease of riding:

1. Clean your chain and lubricate often

Light lubrication is the key, wiping off excess to prevent dirt build up.

Light lubrication on your bike chain is the key; wipe off excess to prevent dirt build-up.

The chain and sprockets on your bike play a key part in the transfer of power from your legs to your wheels, making them go round and round. When the crank and gears collect dirt and grit and get gummy, not only does it slow you down, but they also wear out faster. Keeping your chain clean and lubricated is one of the best ways to keep your bike working well.
• How to clean your chain – quick and easy check out this video.

Tip: Use lightweight oil specially designed for bikes. Please avoid motor oil as it is too heavy and will quickly attract dirt and crud. Want a big greasy chainring mark on your leg? Using too much oil or the wrong kind is a guaranteed way to get one. Light lubrication is the key, and wipe off excess at the end.  

2. Lubricate the moving parts of your derailleurs.

Keep your derailleurs clean for smooth shifting.

Keep the derailleur on your bike clean for smooth shifting.

Your bike has quite a few moving metal parts that are vulnerable to dirt and moisture and should be lubricated regularly to keep your bike happy and is in good working condition.

Pivot points on the brakes and derailleurs are good examples of places you should target because they are vulnerable to attracting dirt and grit due to their placement on your bike. You can spot many of these places by watching your bike in action and seeing where metal parts move against and around each other.

For instance, think about your brakes. Most road bikes are mounted on a bolt on the frame above your wheel. Then, when you squeeze the lever, the brake pivots around this bolt as it contracts. These places where you want to apply a couple of drops of oil.

3. Inspect your brake pads.

check your brakes to see that the pads are clean and aligned correctly.

Check your brakes on your bike to see that the pads are clean and aligned correctly.

A quick check of your brake pads will often reveal potential problems that are easy to fix. You want to check:
• Are your brake pads adequately aligned? Brake pads are the little rubber things that clamp down on your rims to slow you when you squeeze the brake levers. Make sure they are hitting the rims evenly and aren’t either rubbing the tire or missing your rim partially or entirely.

• Are the brake pads toed in? The bike brake pads should also be “toed-in,” which means the leading edge of the pads should touch the bike rim first when you lightly apply the brakes. The pads squish a little, and you should get complete contact to the rim when you squeeze down hard – This helps prevent squeaking.

• Check for junk embedded in the brake pads. Inspect the surface of the brake pads where they meet the rims, and using a sharp pointy instrument like a knife, pick out any bits of sand or metal that may have become embedded in the pad. Removing this grit prevents the pads from wearing and scratching your rims and helps them provide more even and consistent stopping power. Need more info, check out this video.

4. Check the pressure on your tires.

Always check your tires air pressure.

Always check your bike tires’ air pressure.

Checking the tire pressure is one of the simplest things you can do to have the best results. And surprisingly, most people overlook this both on their bikes and car. Paying attention to keeping the proper level of air pressure in your tires accomplishes many things, including:
 Makes pedaling easier
• Protects your rims from damage
• Prolongs the life of your tires
• And it makes it much less likely that you will get a flat
.

And, checking for proper air pressure in your tires before every ride is quick and easy to do.

Simply look for the recommended air pressure for your bike’s tires. It will be printed on the sidewall of the tire in both English and/or metric units. When you know what that number is, inflate the tire, and check the air pressure as you pump go to ensure that you’re on target. You’ll need a tire gauge, either built into your pump or a separate gauge, to measure the tires’ air pressure. Be sure to check the pressure frequently as you pump up the tire so that you do not overinflate your tire. See this video for more information.

Also, take a quick moment to check your tires for proper inflation before each ride and add more air if needed. It is not uncommon for tires to gradually lose air over several days, even without having a flat that needs to be replaced. Taking just this simple and easy step will prove to be a valuable one to you in the long run.

If you are still having problems, need to adjust the derailleurs, or get some new tires if the ones on your bike are several years old, visit your local bike shop, they will fix you up and share some more easy maintenance tips.

Now go out and have fun riding!

A chainring tattoo is common on the right leg when the bike chain is dirty.

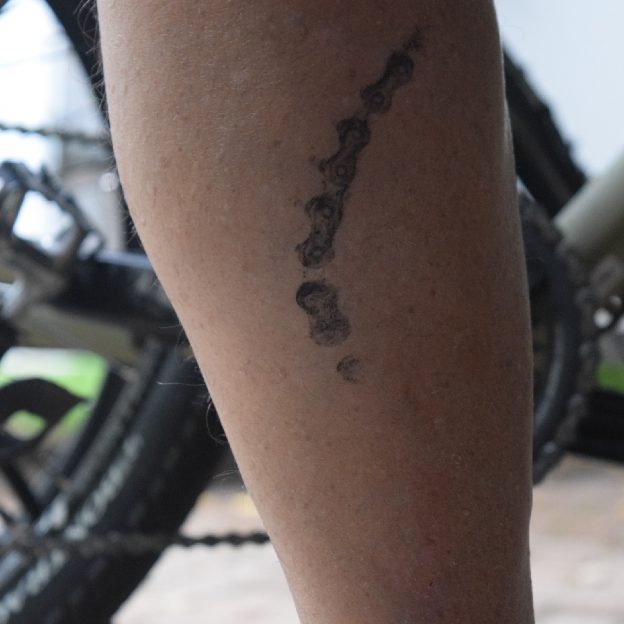
Bike Grease Mark: Avoiding a Chainring Tattoo

Cutting Through Bike Grease: Avoiding a Chainring Tattoo

by Jess Leong, HaveFunBiking.com

The accursed chainring tattoo is something that many bikers – whether a beginner or not – has experienced. While known as a ‘noob’s problem’ (a newbie or beginner’s problem), even experienced riders have had their fair share of chainring tattoos.


What is a Chainring Tattoo?

Characterized by the ebony spikes reminiscent of the triangular rays drawn on a sun picture, the design is made from oil and grease. Oil, grease, and debris can gather in the various components of a bike’s chain, cassette, and chainring. When this builds up, it can spill over and a calf can touch it.

The chainring tattoo is coined as such because the grease can be annoying to remove. How does this happen? It occurs when the rider accidentally presses their leg against the side of the bike where those components are. This generally happens at stoplights or stop signs when a rider puts down their leg to brace themselves, but the leg isn’t far enough from the bike. The leg may bump or touch the bike’s side and its very own tattoo.


Why is it Called a “Newbie’s Problem” Tattoo?

Plenty of seasoned riders and pros can be seen supporting a chainring tattoo if one pays close enough attention. However, generally it is considered a “Beginner’s Problem” because many riders learn tricks or find a method that works for them to avoid having their leg touch the bike’s chain, cassette, or chainring. It takes practice and experience, but sometimes that doesn’t even save their calves.

Rest assured that while beginners may seem to get it more often, there are seasoned riders and pros that can still be affected – you just might not notice it!

Having a chainring tattoo just marks you as a rider – and some people go so far as to actually get an ink tattoo. For those riders, the tattoo will stay with them forever as a tribute to how much they love riding their bikes. As some riders say: It’s a mark of a true cyclist.


What’s the Easiest Way to Remove it?

Since it is grease, regular hand soap and water isn’t likely to remove the tattoo from your calf. Instead, opt for some dishwashing soap, water, and a rag or paper towel. Dishwashing soap generally is made with surfactants to remove grease. While different dish soaps can vary in effectiveness to cut through grease, they still work well for us cyclists. Plus, they’re safe to use!

A bicyclist with a dirty bike chain can easily experience a chainring tattoo.

A bicyclist with a dirty bike chain can easily experience a chainring tattoo.

Additionally, you can also use olive oil or baby oil to remove the chainring tattoo with ease. Some riders will either leave the grease on their calves until they return home. Others will carry around some wipes and oil to help remove it on the go.

How Can I Avoid Getting the Tattoo?

Besides trying to avoid touching your leg to your bike when stopping or getting off/on your bike, there’s a few options that other cyclists have been throwing around and some have found useful.

  • Use dry lube rather than wet lube: There is a much lower chance of getting grease stains because dry lube is a lighter lube and therefore isn’t as sticky. Wet lube – what most use for bike maintenance – is known to be a lot stickier. It, therefore, picks up more debris while one is riding their bike. The downside with dry lube is that it tends to need to be put on more frequently and since it is a light lube, it is easily washed away if it gets wet, whereas wet lube would not wash away and has more ‘staying’ power. Dry lube should be used in drier times/climates whereas wet lube should be used in wet locations. Either way, make sure not to layer the two lubricants on one another. Also, always remove excess lubricant to reduce buildup of grease.
  • Clean your chain, cassette, and chainring fairly often. The reality is that grease, debris, and oil builds up: Cleaning your bike chain can be a hassle, but it is something worth doing. It keeps the bike lifespan long and gives less grease marks! Check out our article for information and tips on how to clean your bike chain in 5 simple steps.
  • Chain guard: This puts a physical barrier between you and the culprit. It ensure that your leg doesn’t touch any of the components that can give you a grease tattoo.

Can’t Avoid it? Cover it Up!

  • Roll up your pants legs: This won’t necessarily stop you from getting the grease on your calves, but at least it won’t be on your clothing. Plus, after you get to where you’re going, you can roll down those pants legs and cover up any tattoos. It’s like they were never there!
Cleaning your bike chain and crank ring will help in avoiding a chainring tattoo.

Cleaning your bike chain and crank ring will help in avoiding a chainring tattoo.

Whether or not you decide to support the chainring tattoo with pride or want to cover it up, don’t let it get in the way of your next bike adventure. HaveFun and just Ride On!


Jess Leong is a writer for HaveFunBiking.com.

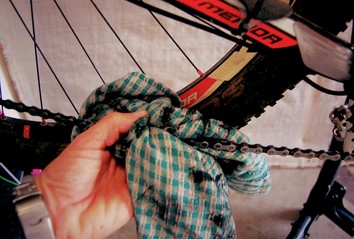
How to Lube and Clean Your Bike Chain

From Christian Woodcock -Bike Roar
Most of us can’t often be bothered cleaning and lubing our bike chain, yet by following these five simple steps the job can be done quickly and easily. Learn how to lube and clean your bike chain. Remember – Don’t apply lube to a dirty chain!

 clean-2_jockey_wheel_with_small_tool1. Clear away the gunk
I have found it best to scrape away the larger deposits of gunk before degreasing. A good place to start is your rear derailleur. Ever noticed a buildup of black tar on the derailleur jockey wheels? In a perfect world we perfect people wouldn’t allow it to get this bad but things happen…

New on the market, this last year,  is Globalbike Gear Cleaning Cord. This is a convenient polyester cord lightly presaturated with an anti-corrosive, soy based cleaner/lubricant making it safe to use without a strong solvent smell. The cord slides easily between the tight spaces on your bike and picks up dirt, grime and buildup. Once you’re done, simply throw it away! They also make a chain cleaner cloth.

clean-1_bike_drivetrain_with_brush_and_detergent2. Wash
Use hot water, a stiff brush and some bike cleaning detergent (or the stuff you use for your dishes will do). Give the drivetrain a good scrub, particularly the chain. This will remove any dirt or grit hanging around the chain and cogs and prepares the area for degreasing.

Clean-4_apply_degreaser_to_bicycle_chain3. Degrease
What to use? I recommend always using a cycling specific product from your local bike shop. Industrial degreasers are very powerful no doubt, but they can harm some of the more delicate smaller components in your chain. Products designed for bikes often use a non-corrosive citrus or similar biodegradable formula. The other benefit is that it won’t be as toxic for you.

Apply the degreaser to your chain, rotate the cranks backwards and let it soak into the links. Grab your partner’s toothbrush so you can scrub around the tricky areas like the rear derailleur (make sure you buy a new toothbrush once used – it will come in handy again).

Clean-3_wipe_off_bicycle_chain_with_rag4. Wipe off
Wash any remaining degreaser away with water. Grab the chain with rag in hand and rotate the cranks. Even after all this cleaning you will get black tar coming off the chain – That’s ok.
Your chain should be looking pretty sparkly now and will sound crisp as it runs through the cogs on the drivetrain. Oh, sweet music can be heard as you spin!

TIP:  Keep a rag handy where you store your bike. After every ride, give the chain a quick wipe off. This removes any excess lube or gunk collected from the ride and keeps your chain nice and clean. The lube remains where you want it- in the links, and doing its job.

Clean-5_apply_lubrication_to_bicycle_chain5. Re-lube
One of the reasons for the tar build-up we removed in the first step is over lubricating. We have all been guilty of this at some time or another and thankfully it hasn’t been criminalized (although in some riding groups you may get verbally flogged or sneered at.)

Lube should only be applied to a clean chain and as little as possible is best. Ideally you want the lube to penetrate into the chain links since this is where the chain contacts the cogs, not the outside links. Rotate the cranks to get maximum coverage.

Don’t worry if you over do it, the last step is to again grab the chain with a rag and wipe away any excess lube.
For the latest products: See your local bike shop

Bonus Tip 1:  Use the lightest lube you can get away with for the conditions. If using a dry waxy lube, the trick is on the first use. Apply thoroughly and leave overnight if possible, then wipe off excess and apply again.

It is a simple job, but an important one in order to have a smooth running bike. After lubing that crisp chain sound will now be the purr of a happy drivetrain.

 Bonus Tip 2: Road and Mountain Bikers, an old 1 or 2 gallon garden pump sprayer works wonderful to rinse off the mud from the trail or grim on the road before wiping down your chain and loading your bike for transport. Never use a power washer, the high pressure can damage seals on your drivetrain and possibly the paint on your bike frame.

Author: Christian Woodcock -Christian loves riding bikes. He has many years of experience working in bike shops and has successfully raced mountain bikes at a high level. These days, expect to see him climbing and suffering on a road bike, or talking it up on the trails with friends.