Tag Archives: Bike repair

Revolutionary products in this review include the Carlito bike lock and the Flat Stopper's amazing new tubeless bike tire sealant.

Revolutionary products the Carlito bike lock and Flat Stoppers tire sealant

By John Brown, HaveFunBiking.com

It’s been about two months since the Interbike show and there are a couple of new products I am excited to share. Each year I go to the show to find the most technologically impressive products there. This year was no exception and there were two new products that I have spoken with friends about that were created by inventors who looked at a certain problem in a new way. The first is the Rocky Mounts Carlito bicycle lock and the second is the Flat Stopper Tire Sealant kit. Read on for more details.

Rocky Mounts Carlito Bike Lock is one of two revolutionary products

Rocky Mounts is best known for their car racks, but recently they have moved into bike locks as well. Their line of bike locks covers all the basic options and introduces an all new concept. That Concept, is the Carlito lock. The bike lock looks like a standard mini U-lock but incorporates some really cool features. First, Rocky Mounts chose silicon for the cover material. Therefore, the Carlito lock is softer on paint while being more durable than a vinyl covered lock. More importantly, what makes the Carlito so cool is the material they use for the lock itself. Rather than using hardened steel for the construction, they employ aluminum alloy. While aluminum is not as durable as steel, it’s half the weight. So for anyone looking for the visual security of a U-lock at half the weight, the Carlito is an amazing option.

Carlito Lock

(left) Carlito lock and Key (top right) and U (bottom right) detail.

Flat Stopper tire sealant is also impressive

Tubeless tires are now a standard feature on every category of bike. Almost all tubeless systems use the same type of Latex based sealant to seal punctures and keep the tires airtight. Where The Flat Stopper differs is that it is not Latex based. In fact, rather than latex they use completely inert ingredients that contain no ozone depleting chemicals and aren’t carcinogenic or flammable. Moreover, it’s actually a water based system. While their exact recipe is a secret, I did get some inside info on how their sealant works. Apparently, rather than relying on latex to dry out and seal like most systems, Flat Stopper works through pressure. Therefore, once the sealant gets forced into a puncture (by the tire’s internal air pressure) it immediately seals the hole permanently.

Flat Stopper Sealant

Flat Stopper’s clean packaging (left) is perfect for quickly filling your tires with sealant. On the right is a close up of what Flat Stopper looks like up close.

Connecting Thread

The thing I like most about both these two products, they are a totally new approach to existing solutions and the problems they are suppose to solve. The Carlito bicycle lock offers moderate physical security as well as a high level of visual security all while weighing practically nothing, making this new approach to security exciting to see.

Similarly, some of the biggest issues with sealants today are related to their caustic ingredients, slow response and generally messy setup. Flat stopper has eliminated all those issues with almost no downside. Stay tuned for more in depth reviews of the Carlito and Flat Stopper in the near future.

See how to get the most out of 100 years of technological advancements. You will find adjusting your front derailleur is easy if you follow these steps.

How to adjust your front derailleur for perfect and silent shifting

by John Brown, HaveFunBiking.com

In the late 1920’s, in France, there was a bike race under way and it wasn’t the Tour De France. Instead, this race was a technological race that brought the derailleur into the light. Before 1928, bicycles had a maximum of two speeds, and you needed to remove the rear wheel to change those gears. As there was need for quicker shifting, the bicycle derailleur was born. Initial derailleurs consisted of nothing more than paddles that were actuated by steel rods located between the rider’s legs. Needless to say, there was a lot of finesse that went into shifting those bikes. Then after the second world war parallelogram derailleurs, what we use today, were developed so riders could shift their gears with ease. Read on to see how to get the most out of 100 years of technological advancements. You will find adjusting your front derailleur is easy if you follow these steps.

Front Derailleur

Early “Rod Style” Benelux front derailleur – Yikes

Front Derailleur parts

Limit screws (A) – The front derailleur needs to work within the largest and smallest ring. Limit screws work to stop the front derailleur from shifting outside of its intended range. They are adjustable as to match different types of cranks.

Derailleur Cage – The cage is what holds the chain on gear and what presses on the chain to move it from one gear to the next. The outer portion of the cage (C) is what helps the chain move from larger gears to smaller ones. In contrast, the inner portion of the cage (B) forces the chain from smaller gears to larger ones.

front derailleur

Common parallelogram front derailleur found on Hybrid and Mountainbikes

Derailleur Fixing Bolt (D) – The bolt that holds the derailleur in place on the frame. By loosening this bolt, you can re-position the derailleur for angle and height.

Cable Pinch Bolt (E) – The Cable that controls shifting needs to be held firmly in place. The pinch bolt does that job.

front derailleur

Different Pinch bolt and fixing bolt position for MTB/Hybrid (above) and Road (below) derailleurs

Location, location, location

You guessed it, the most important part of adjusting the front derailleur is its location. If the derailleur is not positioned properly, you will never achieve proper, noise free, shifting in all gears. The reason location is so important is that the front derailleur cage is formed to position the chain in very specific locations.

First step in adjusting the front derailleurs location is to set its height. You need enough room to fit a Nickel between the teeth on the largest chainring and the bottom of the outer cage when they are lined up. Any more clearance than that and the derailleur tends to have issues pulling the chain down from larger gears.

front derailleur

you should be able to fit a Nickle between the derailleur cage and chainring

Once you have the height set, adjust the angle of the front derailleur so that the outer cage and chainrings are parallel. Any misalignment will result in poor shifting and excess noise.

front derailleur

Proper alignment on the left, and misalignment on the right

Lower Limit

Set the lower limit by adjusting the screw marked “L”. To do this, shift the rear derailleur all the way up into the largest cog. Next check to see if there is clearance between the chain and the front derailleurs inner cage with the chain on the smallest chainring. If the chain is running on the inner cage, thread the limit screw out until you have 2-3mm (that nickel distance again!) between the chain and inner cage. When the opposite is true and you have too much clearance between the inner cage and chain, thread the limit screw in until there is 2-3mm of clearance.

Cable tension

Your Front derailleur should be properly aligned and the lower limit should be set at this point. The next step is to attach the cable to the Pinch bolt. Attach that cable by first making sure your shifter is in its lowest gear, Then pull the cable tight, and finally tighten the pinch bolt onto your cable. Usually, you can shift smoothly up from the smallest ring into the next gear right away, but if there is hesitation going up add cable tension either through a barrel adjuster or by loosening the pinch bolt, pulling the cable tighter, and tightening the pinch bolt down again. If the chain wants to shift up from the small ring over the next ring, release some tension. You know you have it right when the chain can pass from one gear to another smoothly and confidently without any banging or skipping noises.

Upper Limit

Setting the upper limit is as easy as getting the chain onto the largest chainring and threading the limit screw to offer 2-3mm of clearance between the chain and the outer cage. While shifting, ensure the chain cannot be shifted over the large ring and off the crank.

Trouble shooting

This guide is great if all the parts are new, but won’t overcome many issues related to worn or dirty parts. The most common shifting issue with older gears is poor upshifting. Chainrings are built with ramps on the inner surface to easily guide the chain from smaller to larger rings. As chainrings wear, these ramps wear as well. If you are having serious issues going from smaller to larger gears, but the gears are silent and problem free otherwise, you may want to consider replacing the chain, chainrings, and gears in the rear.

front derailleur

These Praxis Works chain rings have some of the best shifting thanks to carefully placed ramps.

Another key wear item is the front derailleur itself. Derailleurs are designed to pivot off a parallelogram design that requires each pivot run smooth and precisely. As the Front Derailleur wears, these pivots can begin to bind, while they generate play, leading to poor shifting.

Finally, dirty or corroded cables are a key cause in poor shifting. Replace cables once a year and lube them intermittently to keep them running smooth and freely.

When is enough, enough

Working on your bike is fun, but can be frustrating if things aren’t going according to plan. When things get out of hand, don’t be afraid to start from scratch and go back to step one. Any missed initial steps will make further steps impossible to complete. Also, remember that if it gets too tough, your local bike shop is happy to walk you through the process. You will pay a fee, but the one on one instruction is well worth it.


AAA announced that it was extending its popular AAA Roadside Service to include bicycles, offering cyclists and added peace of mind.

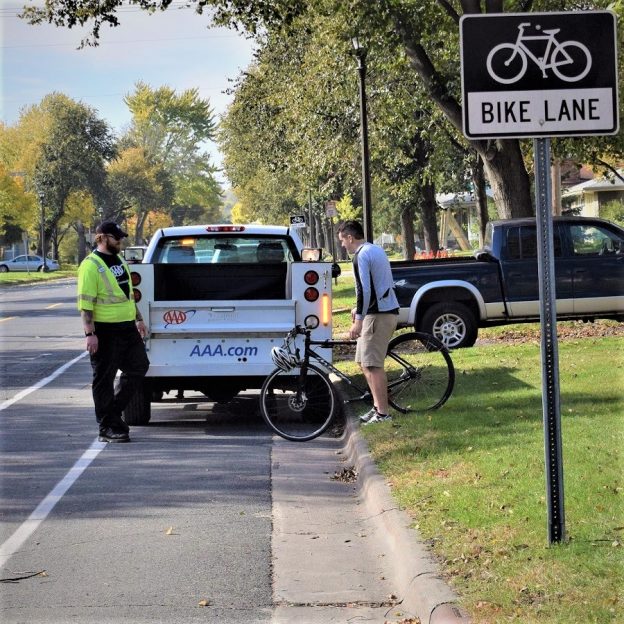
New AAA Roadside Service adds peace of mind for your next bike ride

by, Russ Lowthian, HaveFunBiking.com

As more people take to bicycling for recreation and transportation it is nice to know there is someone to come to rescue if a bike breaks down. In a move to support bicyclists, AAA is now offering support. Recently, the company announced that it was extending its popular automotive AAA Roadside Service to include bikes. Here at HaveFunBiking.com, hearing the news is exciting. This is a perfect service that will assure cyclist, someone will be there if they breakdown.

Any bike you are riding is covered by AAA Roadside Service

With wheel bearing going out this cyclist wouldn't be carrying his bike hope if he had a AAA Roadside Service membership?

If this rider had AAA Roadside Service, he wouldn’t be carrying his bike home because of a mechanical issue.

How the program works? For as little as $49 a year you can purchase a AAA membership that offers Roadside Service for both your car and bike. If you are already a member you are now covered when bicycling. Just call your roadside assistance number on the back of your membership card.

Like the automotive Roadside Assistance Program any bike you are riding (road, mountain, recumbent, e-bike, tandem bikes, bike rentals and bicycle trailers) is eligible. Coverage applies to any qualified bike a member is riding at the time the bicycle becomes disabled. A member should be with the bicycle and have their AAA Membership Card in hand at the time of service. Keep in mind, the Roadside Service is provided only for the rider whose bicycle has become disabled or inoperable. However, any accompanying minors of a member is covered.

When a quick fix isn’t an option, AAA Roadside Service is there

The second most common mechanical problem to a flat tire, is a broken chain. Read on to learn the causes of and quick remedies to fix your chain.

The second most common mechanical problem to a flat tire is a broken chain.


If a quick fix isn’t an option, (examples: you blew a tire; some spokes broke; or the chain busted) first call a family member or friend. Then, if no one is available to assist, AAA Roadside Service may be your best option.

It’s like “Having a SAG Wagon in your back pocket,” especially when you are touring away from home, on vacation, etc. This roadside service is something that will give a cyclist peace of mind.

Three levels of SAG (service and gear) support for you and your bike

Under the new terms of the roadside pickup service. AAA will transport you and your disabled bike to any point of safety within the limits of your coverage. This is based on three available levels of membership below:

  • The Classic: Gives you up to four transports of your bike or car, within a 5-mile radius of the breakdown per year
  • The Plus: Gives you up to four transports of your bike or car, within a 100-mile radius of the bicycle breakdown
  • The Premier: Gives you one transport of your bike or car, up to a 200-mile radius of the breakdown; remaining transports are 100 miles.

This is exciting news if you are a casual, touring cyclist or a bike commuter! Mary Miller, from South St. Paul was ecstatic to hear the news. She stated, ” now I feel comfortable riding my bike more often knowing that I can call AAA to come and get me if I breakdown.”

What You Don’t Get

The service is strictly a pickup and delivery service and does not offer any repair amenities or supplies. If you are capable of fixing a flat, repairing a broken chain or spoke and continuing your ride, please do so. The service is designed when you have run out of quick repair options. In fact, there is a laundry list of “services not included:

  • Airing or changing a flat tire
  • Pickup from anywhere not reachable from a paved, “regularly traveled” road
  • Parts, including tires
  • Pickup of bicyclists who are physical unable to continue with the ride
  • Locksmith services, in case you accidentally lock up your bike and lose the key or combination.

AAA Roadside Service is available in many states across the U.S.

“We are tremendously excited about this great new bike benefit program available to AAA members across most of the upper Midwest, Southeast and much of our country,” stated Gail Weinholzer, Director of Public Affairs, AAA – The Auto Club Group.

The new bicycle service is available throughout the entire territory served by AAA. The Auto Club Group which includes all of: Florida, Georgia, Iowa, Michigan, Nebraska, North Dakota, Tennessee and Wisconsin; most of Illinois and Minnesota; and a portion of Indiana.

For bicycle coverage outside the above states and for full details on AAA Roadside Membership visit AAA.com/Bicycle.


We have compiled the best list of simple bike tips to make your next ride more fun, more efficient, and more comfortable.

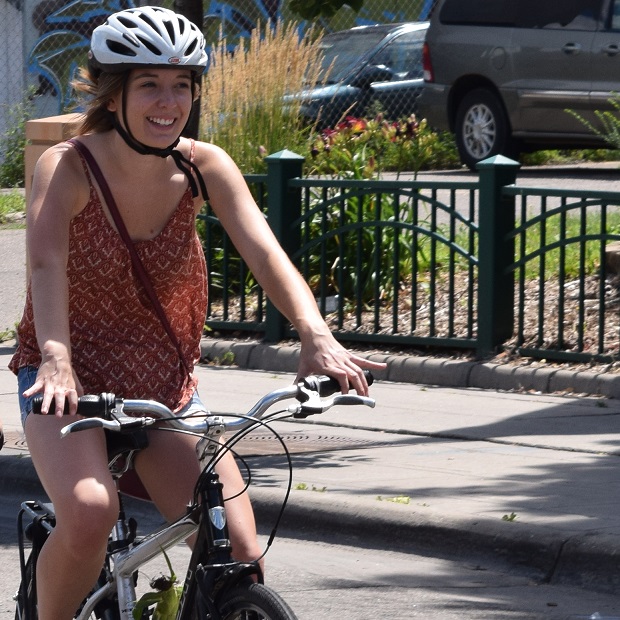
Simple Bike Tips to Get You Going Faster, Farther, and More Comfortably

by John Brown, HaveFunBiking.com

Do you want to make your bike ride more fun? How about getting all you can out of your bike? What about making your bike more comfortable? Well, we have is some great news! We have compiled a list of simple bike tips to make your ride more fun, more efficient, and more comfortable.

Lube your chain

If your chain isn’t running smoothly, neither are you. While a in-depth bike clean is great, simply keeping your chain lubricated is an easy way to ensure you bike runs well. Start by propping the bike up so you can rotate the cranks backward freely. Next, Backpedal the bike, while dripping lubricant onto each chain link. Once the chain is well saturated, give a few moments for the lubricant to penetrate the chain. Finally, wrap a rag around the chain, backpedal, and remove all the excess lubricant. Done!

Bike Tips to Find the Perfect Tire Pressure

First, fill the tires to the recommended maximum pressure as listed on the sidewall. Next, take the bike for a quick spin around the block for feel. From there, let about 5psi out of each tire (a digital pressure gauge works great) and ride it again. Continue lowering the pressure in 5psi increments until you can no longer feel the small imperfections in the road vibrate through the bike. Use these pressures as you starting point. Finally, over the next few rides, adjust pressure by 2-3 psi in search of the absolute perfect pressure. The goal is for a pressure that allows the tire to easily deforms over objects, offer ample traction, and resist compressing too far under hard braking and turning. As an example, I recently determined my mountain bike’s perfect pressure to be 28psi for my front and 32psi in the rear.

Saddle fit

Checking your saddle height is also a quick way to get more comfort and efficiency. While a complete bike fit does the most benefit, checking saddle height goes a long way to help with back pain and other discomforts. To set saddle height, sit on your bike and place your heel on your pedal. Then rotate the pedals backward. At the bottom of the pedal stroke your goal is to have your leg completely extended while keeping your hips level. If at the bottom of the pedal stroke you aren’t getting complete extension, raise your saddle. However, if you’re tilting your hips at the bottom of the pedal stroke, lower the saddle. Once you begin pedaling naturally (with the ball of your foot on your pedal, rather than your heel), you will have the proper amount of bend to your knee.

Mountain bike tips

To get your Mountain bike working it’s best try a few of these bike tips.

Cut your bars

Bicycle companies usually install all the same width bars on their mass-produced bicycles. That means that all but the largest size riders usually ride with bars that are too wide. For many riders, uncomfortable bar width is something they just get used to. But before you get used to it, realize that there are serious ramifications on using a bar that’s too wide. First, riding a bar that’s too wide spreads your arms out forcing you to use your support muscles inefficiently. Second, as you spread your arms, your back will naturally pitch forward (potentially leading to discomfort). Finally, wider bars are more prone to accidentally clipping trees or signs, causing a crash.

To cut your bars, first remove the grips (Spray a little hairspray under the grip and they will slide right off), Then measure and mark the amount of bar you intend to remove. Considering you can’t uncut your bars, only take 1-2 cm off at a time, then ride for a few weeks to verify before cutting again. You can cut the bars with a pipe cutter or hacksaw, but remember to smooth the sharp edge with sandpaper once finished.

Brake reach

Stopping the bike confidently leads to control and comfort, so make sure you adjust your brakes levers to match the size of your hands. Most brake levers have a reach adjustment built into them. By loosening or tightening the reach adjustment bolt you can bring the brake lever closer to the bar, or move it further away. I like to setup a brake so that the rider can easily reach the lever without changing their hand position on the grip. Additionally, I try to make sure the levers can’t hit the bar, or other fingers when they are squeezed.

Check your sag

A mountain bike with a suspension fork will work better once that fork is adjusted for the weight of the rider. The first step in adjusting the suspension is to set the “sag”. “Sag” is the amount your suspension compresses when you put your weight on the bike. Most suspension calls for about 25% sag, meaning, when you sit on the bike, the suspension compresses ¼ of its travel.

To set sag, first snug a zip tie around the upper leg of your suspension fork. Make sure it is snug enough to stay in place by itself, but not actually tight. Slide the zip tie all the way down until it is resting on the rubber seal of your fork. Next, find somewhere that allows you to put both feet on the pedals and balance without needing to pedal (I find a wall works well). Get on the bike, rock back and forth a few times to cycle the suspension, then sit still on the saddle in your standard riding position with both hands on the bar. Have a friend, move the zip tire so it sits on the seal once again and carefully get off the bike. You can now measure the distance from the seal, to the bottom of the zip tie and determine your sag. As an example, if a fork has 100 millimeters of travel, you want the distance between the zip tie and seal to be 25 millimeters. If you would want to adjust your suspension, see your forks owner’s manual for details.

Road Bike tips

Not to forget the road bike out there. Here are a few bike tips for the drop bars.

Re-tape your bars

On your road bike, bar tape does a big job. If installed correctly and replaced frequently, it can quiet loads of road buzz that would otherwise be transferred into your hands. Many times, riders ignore their tape because it appears OK. While your tape may look OK, the real test is to see how compliant it is. Use the tip of your finger and press firmly into the tape where your hands typically rest (usually, this is just behind the hoods). Follow up by then pressing an area of the bar that never sees wear. Compare the two to see just how compressed your tape has become, replace if needed.

Adjust your hoods

While you are replacing your tape, it’s a good Idea to review the location of your brake hoods. Verify, that when seated on your bike with your hands on the hood, your wrist is straight. If your hands bend upward or down, you are putting excess strain on your shoulders, arms and hands. That strain can lead to fatigue or pain.

Overall, a great fitting and functioning bicycle will allow you to ride longer, faster, and in more comfort. If you have additional questions about customizing your bicycle the professionals at your local bike shop can be a great resource.


You don’t need to be a mountain biker to have a bike crash, after all, accidents happen. Be sure to take a few moments post-crash to inspect your bike.

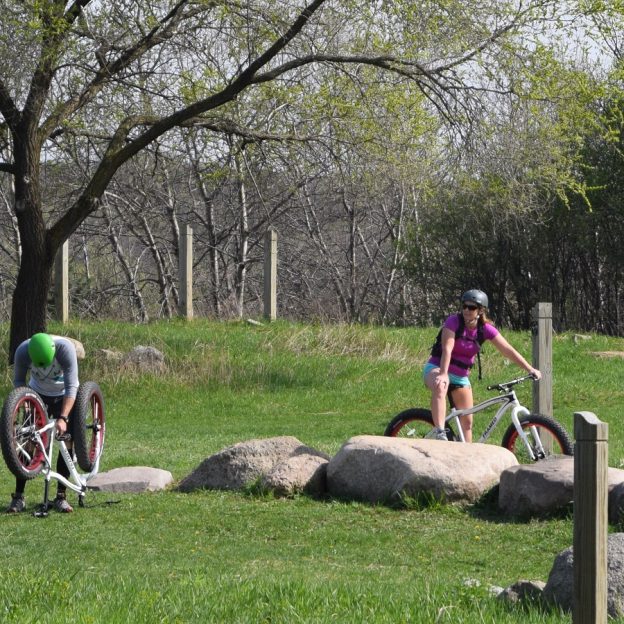
Bike Crash: What to Look for and Inspect After the Unexpected

by John Brown, HaveFunBiking

I love the feeling of riding bikes. I don’t know if it’s the freedom, the movement, or the ability it gives me to clear my head, but I can’t imagine enjoying any other sport more. As a mountain biker, that tranquil feeling is sometimes interrupted by an unexpected bike crash. While crashing my bike isn’t something I enjoy, I realize that as I try to push my boundaries, a bike crash is a real possibility. You don’t need to be a mountain biker to have a bike crash, after all, accidents happen. However, if you find yourself spontaneously dismounted from your bike, be sure to take a few moments post crash to inspect your bike.

Body, Mind, and Helmet Inspection After a Bike Crash

Nothing on your bike is more important than you. It’s tempting to jump right up after a bike crash, but take a few moments to assess yourself. Make sure your joints (particularly knees and wrists) feel and function okay. Follow that up by looking for any cuts that might need attention. Finally, remove your helmet and check to see if there are signs of impact. If there are, seek medical attention.

Wheels

After you have deemed yourself okay, pick up your bike and spin each wheel independently. Look for any wobbles or dents in the rim. Also, look to see if the tire has come unseated from the rim. Sometimes you may not be able to see a slight wobble in the rim, but you can hear the rim hit the brake pad as it rotates if you listen closely. Slight wobbles can be fixed later (as long as the brake pads aren’t hitting the tire) but larger ones will leave you calling for a ride home. If you have AAA for your car, they now offer a bike pickup service as well.

Bars and Seat

Once you have checked the wheels, make sure that the bars and seat on your bike are still straight. Look down over your handlebars and make sure they are in line with the front wheel and level. Next, look down the length of your saddle and make sure it is in line with your bike and not bent down to one side or another. If you see any bending in the seat or handlebars, it’s best to take the bike into your shop and have those parts replaced. You may see some scuffing on the side of your saddle or the end of your handlebar grips. That scuffing is a good indication that your seat or bars made a hard contact with the ground and could need replacement.

Derailleurs

Before you ride away, look at your rear derailleur from the back of the bike. The top and bottom pulley should be in line with the cog above it. If it is bent inward, do not ride the bike. A bent derailleur will still hold the chain on the gears, but as you shift into a lower gear, it will get caught in your wheel. This scenario usually leads to a destroyed derailleur and can even result in a destroyed bike.


Frame

Look at the frame and inspect each tube carefully. You are looking for any dents (on metal bikes) or cracks (on metal and carbon frames). If you see damage to the frame, have it checked at your local shop before you continue to ride it.


Brakes

The last thing to check is the brakes. Make sure they operate properly by spinning the wheels and inspecting where the pad hits the rim. If the pads hit the tire, adjust the brake before riding away. A brake pad can make quick work of a tire, leaving you in a far worse situation.

Follow up

For the next few rides, be sure to pay close attention to how you feel and how the bike feels. I have had injuries appear days after a crash. Similarly, my bike has sustained damage that I missed upon my initial inspection. Listen for strange noises coming from the bike, or any change to the way the bike handles.

More than a 100 residents earn a bike in Hennepin Co.

More than a 100 people living in the Minnesota cities of Hopkins, Brooklyn Center, Brooklyn Park, and St. Louis Park took part in a series of free “earn-a-bike” and “learn-to-ride” classes in 2015.

According to the Hennepin County “Get out – Get Active” newsletter participants in the earn-a-bike program learned: basic bike repair skills; gained exposure to bike safety; worked together as a team to repair bikes; and got a bike to keep at the end of the program. Learn-to-ride classes engaged adults who never learned to ride a bike, or who had learned but lost the basic techniques of riding a bicycle.

Earn-a-bike class in St Louis Park

Earn-a-bike class in St Louis Park

The classes in the four cities were funded by Active Living Hennepin County (through the SHIP program). Directing the efforts of the program was done by the nonprofit Cycles for Change, who’s goal was to increase bike access and education in communities of color and low to moderate income communities. One exciting outcome is that earn-a-bike graduates in Hopkins have formed a bike club and have continued to ride together and to discuss important issues about biking and bike safety in their city.

Source: MNHENNE/bulletins/128d9ad

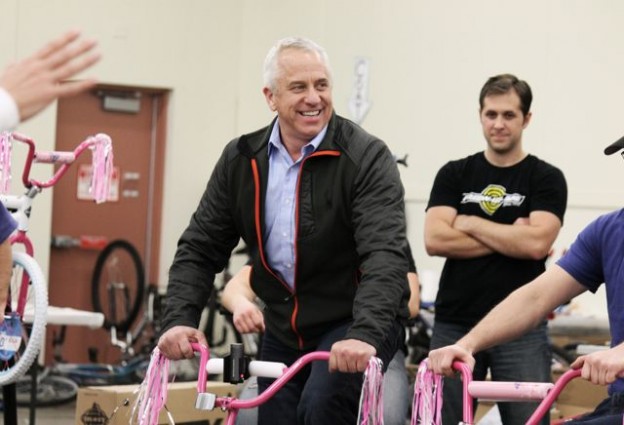
Local Bike Shops and Greg LeMond Sling Wrenches this Tuesday

free-emondmed-300x200Twin City bike shops and race teams sling wrenches with Greg LeMond this coming Tuesday, November 11th, from 6 to 8:30 p.m. If you have time come to Free Bikes 4 Kidz (FB4K’s) charity event for an evening of fun while volunteering to clean or wrench on some of the thousands of bikes donated, come check out the action.

free--trphy_n

Battling for the coveted trophy, that has been passed around the last couple years; the award is made from bicycle parts

Cheer on 3-time Tour de France champion, Greg LeMond, who is coming out of retirement for one more race on a 20″ Barbie bike –showing his blinding speed, jam-packed sprints and tassels. Throughout the evening Greg will challenge wrench-slinger-shootout bike mechanics and techies from United Healthcare Pro Cycling, Tonka Cycle & Ski, Freewheel Bike, Maple Grove Cycling and Penn Cycle. So get there early, help clean or repair some bikes for a while and watch the fun!

Enjoy food available from the taco truck, while sipping some local craft brews as you help, visit and watch the wrenching competition. For those that enter the evening’s raffle, you will have a chance to win three great prizes: a new Fat Tire Bike or your choice of any one of the 5,000 bikes in the FB4K’s warehouse.

If you can’t attend this Event, please donate here at: https://fb4k.com/donate/financial-donation/

Free Bikes 4 Kidz is a passionate group of cyclists who love giving as much as riding. It’s their goal to help every child feel the joys and freedom of riding his or her first bike. Through our bike philanthropy method, we aim to help our communities grow stronger and closer through the power of cycling. On October 11th, with help from Allina Health, they collected 5,000 bikes and have until December 5th to clean and refurbish all of them. To date, 1,500 are completed which means that there are approximately 3,500 to complete in a little over three weeks!

free-untitled

Help to make sure each kid has a bike before Christmas

Warehouse location is at:  5736 Main St. NE, Minneapolis, 55432 (right off of University Ave. and 694)

Warehouse/volunteer hours: M-Th 9-9, Fri/Sat 9-6 and Sun 12-6. Shifts are scheduled in 3-hour blocks but they can be flexible to accommodate schedules.  Registration at: www.fb4k.org/volunteer. Please note- once you enter your information, you’ll be brought to the calendar screen where you can see available volunteer slots for each shifts.