
by Bill Anderson

Cyclists enjoy a beautiful day riding with a flower garden in the background.
Having enjoyed another summer season of cycling with many great memories, it’s time to think about preparing your bike for winter storage. Unless you plan to pedal your two-wheel steed throughout the winter. If not, wouldn’t it be nice when the temperature warms next spring, you are ready to ride? And you are not cleaning and tuning up your bike when you should be riding next spring. Or even worse, waiting two to three weeks or more for your bike shop to get it ready for you.
Preparing your bike for storage
When putting your bike away for the winter, there are several things you will want to do to store it properly. Following the helpful tips listed below or taking it to your favorite bike shop will help you avoid future problems and ensure that it will be ready to ride next spring when the weather breaks.
These tips apply whether you’re putting your bike in your basement, garage, or storage unit. Many bike shops now offer winter storage if you don’t have a storage place at home and don’t want to rent an entire storage unit. Just don’t let your bike sit outside.
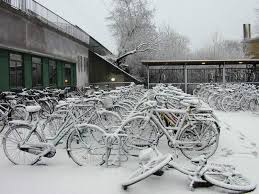
Bikes left outside over the winter
You would think this wouldn’t need to be mentioned, but visit any college campus in the upper Midwest in February and see dozens of beautiful high-end bikes out suffering in the cold and snow.
In any case, follow these pointers so you are ready to go when the weather warms up next spring:
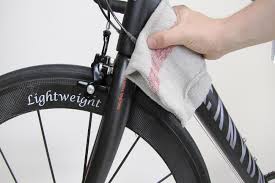
1. Wipe down the frame and inspect it

Inspecting the frame is important
Use a dry rag and a spritzer bottle, with water or a lite detergent mix, to wipe it down while inspecting it. While I’m not a fan of wet washing a bike with a water hose. Which can create problems if water gets down into your components. Be sure to wipe the bike dry to ensure all metal parts don’t rust.
The best way to do this is to take a brush to knock away any chunks of dried-on mud on your frame or wheels. Then, take a damp rag to your bike, wiping it all over to remove any remaining dust or dirt. Also, remove any grease or grime accumulated around your drive train or other areas where lubrication can attract dirt.
2. Inspect your frame
Look for cracks, signs of fatigue
Here’s a bonus hint. Wiping down your bike offers you a chance to inspect the frame thoroughly. While cleaning, look for cracks or metal fatigue, particularly near welded spots and on the bottom bracket, which supports much of your weight.
3. Cleaning your drivetrain
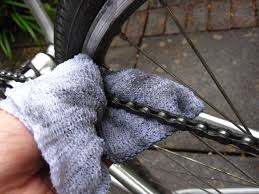
Wiping the chain is important
Now is an ideal time to clean and lube the cassette, chain, and crank to eliminate all the crud that may have accumulated over the riding season. Plus, a fresh coat of lubricant will help protect against rust. If you have several thousand miles on the chain or a lot of wear, this is the time to consider replacing it.
4. Lubricate the cables

Apply oil near cable housing and work in
To avoid problems that may pop up in the spring, with rusting or poor cable performance, take a few minutes to lubricate the cables that control your brakes and derailers. Apply a few drops of light lubricant on a rag and rub it on the exposed cable – lightly work through the cable housing. This will help keep your shifting mechanism in shape while eliminating stress on your cables.
5. Inspect tires, wheels, and brake pads

Tires should be free of cracks
While wiping down your tires, check your wheels for loose or broken spokes by spinning them and looking that they still spin true. Ensure your wheels spin straight, with no wobbling from side to side and no rubbing against the brake pads. If your wheels don’t spin straight, it’s probably time to take your bike in for wheel truing.
At the same time, inspect your brake pads for proper alignment and any excessive wear in the pads.
6. Then inflate the tires
Before putting your bike away, be sure to inflate your tires fully, especially if you store your bike on its wheels. If your tires are flat, the bike’s weight presses down through the rims on one spot on the rubber. Over several months, that can cause deterioration of your tire as the rubber can end up distorted and/or the tire can develop a weak spot in the sidewall. If you hang your bike from the ceiling by its wheels, having the recommended pressure in the tires is still good.
7. Wipe-down the tires, saddle, and handgrips
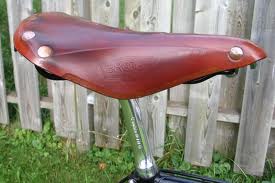
A conditioner will keep it soft
Now that you have cleaned and lubed your bike wipe down all the remaining components for any wear or misalignment. Take an optional step that mainly affects the appearance of the bike. Armor-All works well for your tires, rubber handgrips, and seat – if it has a leather, vinyl cover, or another smooth synthetic surface. Products like this are both a beautifier and protectant and will give a nice, clean, and shiny appearance while keeping the material soft. This only takes a few extra minutes and will be something you’ll be glad you did in the spring, as your bike will look sharp and ready to go.
8. Remove any batteries or charge to the recommended capacities
Remove any accessories with lead batteries, like front and rear lights, to avoid corrosion from battery acid leaking onto your bike while in storage. If the battery is hard to remove, as in the case of some Lithium Ion batteries on electric-assist bikes, charge it to the recommended capacity, normally around 85%. See “How to maintain an E-bike” for more information.
9. Clean out your panniers and trunk bags
If you choose to leave your bike bags on in storage, clean them and wipe them out. Ensure no food items are left inside, as you may find a family of rodents nesting there next spring.
10. Empty water bottles and Camelbaks
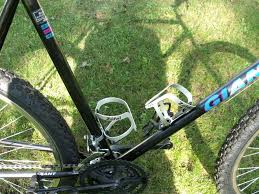
Clean and dry the insides of your bottles if you plan to store them on the bike
Take all your water bottles off your bike, or drain and give them with a light bleach rinse. Dumping out whatever is left in them since the last time you rode and running them through the dishwasher to get them nice and clean is best. When finished, leave the lids off to allow them to dry entirely inside.
If you have a Camelback or backpack canteen water carrier, flush the bladder with a very mild solution of vinegar and water, and then follow that up with several rinses of plain hot water, then leave the lid off to dry.
Now, as you sit in front of the window watching the snow fly, recalling all the memorable rides you had this year, you can rest assured that when the first opportunity to ride next spring comes, you are ready.
