Tag Archives: clipless pedal

A clipless pedal is a quick and easy upgrade to make your next ride better

by John Brown, HaveFunBiking.com

There is a simple equation that always holds true with clipless pedals: control = comfort. By securing your feet in place with a clipless pedal you can use muscles more efficiently, relieve excessive strain on your feet and be connected to your bicycle more directly. Read on to see how easy it is to learn to ride “clipless”.

Before the clipless pedal, riders would install baskets and straps (toe clips) on their pedals.

Before the clipless pedal, bicycle riders would install baskets and straps (toe clips) on their pedals.

Why would you call a pedal that you clip into “clipless”? Before the clipless pedal, riders would install baskets and straps (toe clips) on their pedals. Then, in the 1970s, a company called Look used ski binding technology to create a pedal that would retain a rider’s foot and allowing them to free themselves easily. This invention was called the “clip-less” pedal because it did away with the need for toe clips. Today, there are many clipless pedal designs. Each one is suited for a different riding style, but function similarly.

Float

While your leg cycles through a pedal stroke it is common for your foot to rotate slightly. That foot rotation is because most people’s joints aren’t perfectly aligned. Therefore, to compensate for a foot’s normal rotation, clipless pedals allow your foot to rotate within the pedal without releasing the pedal. That designed rotation is called float, and measured in degrees

Spring Tension

Clipless pedals use a retention mechanism to hold the cleat in place. This retention mechanism needs to have enough spring tension to hold the cleat under effort, while still allowing the rider to easily disengage. Some pedals have adjustable spring tension while others are fixed.

Cleat Material

The cleats is the item attached to your shoe that clips into your pedal. So, the cleat material has a large influence on how easily they clip in, float, and clip out. The most common cleat materials are brass, steel, and plastic. Brass is a great wearing material, that corrodes at a very slow rate and clips in and out incredibly smoothly. Steel on the other hand, has an even greater wear life, but corrodes more quickly. Finally, Plastic cleats wear very quickly, but can be designed to clip in and out smoother than any other material.

Offroad pedals

The requirements of an offroad pedal are that they need to work in all conditions, use a small cleat, and be durable enough for the occasional rock strike. Because of these requirements most offroad pedals and cleats are made of metal to be very durable. They also have bodies that are designed to clear mud and debris easily. Of all the clipless pedals on the market the most popular pedal is the SPD. SPD pedals have an engagement mechanism on both sides, with adjustable tension and use a steel cleat. Another very popular brand is the Crank Brothers Egg Beater series. These pedals engage on 4 sides, use a brass cleat, but have no adjustment for tension.

Another great option for offroad riders is a platform pedal with a clipless mechanism built in (see image). That platform gives the rider foot stability and the ability to pedal while they work to clip in. Many riders who are new to clipless pedals love this option because of the stability it offers if you are clipped in or not.

Path

The benefits of clipless are something all riders can enjoy. Therefore, even if you are riding bike paths or rail trails, clipless could be good for you. With that in mind, the most popular type of clipless for recreational riders is the ½ and ½ pedal. The ½ and ½ have a clipless mechanism on one side, and a flat pedal on the other. This makes them versatile enough to clip in on longer rides, or just pedal around in sneakers for short spins. Like Offroad riders, some recreational riders like a clipless platform pedals for their versatility and stability.

Competitive road

For competitive road cyclists, the requirements of pedals are very specific. They need their pedals to direct all their effort into the bike without compromise. Therefore, road pedals have a larger platform and cleat than other pedals. Because of the very large cleat, road shoes have almost no tread on them. Additionally, most road cleats are made of plastic so they can hold tight under effort, but release easily. For road pedals the most popular brands are Shimano and Look which operate similarly. They both use plastic cleats, and have adjustable tension. The unique Speedplay pedal is another very popular pedal for road bikes. Speedplay is unique because they incorporate the retention mechanism into the cleat rather than the pedal and offer the largest amount of float of any brand.

Shoes

While on the subject of pedals, we should also talk about cycling shoes. Cycling shoes have a stiff sole to disperse pedaling pressures along the entire length of your foot. For competitive riders, the key to a good shoe is the stiffness of that sole. For more recreational riders, it is important to consider comfort over efficiency. Determining comfort on cycling shoes is different than that of normal shoes. First off, in cycling shoes, your feet are trying to pull out of the shoe throughout the pedal stroke. This means that you want the shoes to fit as snug as possible. It is OK for your toe to feather the front of the shoe if you try. Second, most cycling shoes are made of synthetic materials, which stretch over time. This means that they will only get bigger as you use them.

Notice, the cyclist in blue has clipless pedal making each pedal stroke easier.

Notice, the cyclist in blue has clipless pedal making each pedal stroke easier.

Good pedals and shoes can make a big difference in how comfortable your ride is. Be sure to find the right product for you, and practice how to use them.

If you want to be more efficient on your bicycle, few things are as effective as the combination of clipless pedals and cycling shoes. Additionally, clipless pedals add to overall bike comfort.

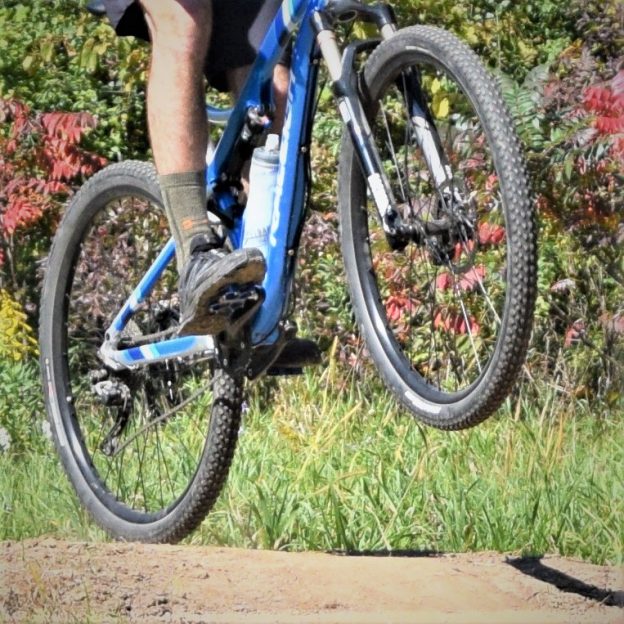
A simple 1-2-3 guide to using clipless pedals and shoes

by John Brown, HaveFunBiking.com

If you want to be more efficient on your bicycle, few things are as effective as the combination of clipless pedals and cycling shoes. Additionally, clip-in pedals add to overall bike comfort. As an example, there is a simple equation that always holds true: control = comfort. In the quest for more control of your bicycle, by securing your feet to the pedal your muscles work more efficiently. Connected to your bicycle more directly, you relieve excessive strain on your feet. Read on to see how easy it is to learn to ride “clipless”.

If you want to be more efficient on your bicycle, few things are as effective as the combination of clipless pedals and cycling shoes. Additionally, clipless pedals add to overall bike comfort.

If you want to be more efficient on your bicycle, few things are as effective as the combination of clipless pedals and cycling shoes. Additionally, clipless pedals add to overall bike comfort.

History of Clipless Pedals

Why would you call a pedal that you clip into “clipless”? To understand the name, it’s best to talk about what came before it. Before the clipless pedal, riders would install baskets and straps (toe clips) on their pedals (see below). A toe clip offers a lot of control but are difficult to get in and out of. In the 1970s a company called Look used ski binding technology to create a pedal that would retain a rider’s foot, giving them control, while also allowing them to free themselves easily. This invention was called the “clip-less” pedal because it did away with the need for toe clips.  Today, there are many clipless pedal designs. Each one is suited for a different riding style, but function similarly. When trying clipless pedals, find one that fits your needs.

Trying Clipless pedals explained

A pedal with toeclip (left) as well as a few brands of clipless pedals (right)

Pedal Benefits

A clipless pedal opens like a little jaw to accept a cleat that is mounted to your shoe. The pedal then closes tightly around that cleat, and releases only when the cleat is rotated. Being “clipped in” is helpful because you can train yourself to exert force downward, upward, forward, and backward as you pedal. Being able to control your pedal stroke completely adds efficiency and control. When it’s time to be free, a twist is all it takes to get out.

Shoe Benefits

A common discomfort among riders is something called “hotfoot”. “Hotfoot” is best described as a painful, burning sensation, or numbness in your foot while riding. Hotfoot is usually caused when two small bones in your foot, the sesamoid bones, (below) get compressed under pedaling forces.

To help alleviate this compression, cycling shoes have a very stiff sole to disperse pedaling pressures along the entire length of your foot. Cycling shoes also use a cycling-specific insole that counteracts your foots natural tendency to flatten under pressure, further equalizing force along the length of the foot. In contrast, normal sneakers and standard pedals centralize most of your pedaling efforts onto the sesamoid bones, causing a lot of discomfort.

How to Use Clipless Pedals

Getting In

The first hurtle when trying clipless pedals is clipping in. To clip into your pedals:

  • Step down onto the pedal with your heel slightly raised (Figure 1). The front of the cleat should be just under the ball of your foot and fit into the pedal first.
  • Next, press the ball of your foot down, and lower your heel to engage the pedal. You should hear a “click.” (Figure 2).
  • Million dollar tip: Don’t look down. You can’t see the bottom of your foot anyway, and clipping in is far easier if you feel your way. Looking usually makes the process more difficult.
Trying Clipless pedals engageent 1

Figure 1

Trying Clipless Pedals engagement

Figure 2

Getting Out

To clip out, kick your heel away from the bike. Try to keep your foot as level as possible. If you lift and kick your heel, it makes it more difficult for the pedal to release. While the motion needed to release a clipless pedal is not entirely natural, if you practice before and after your normal ride, it will be second nature in no time.

Trying Clipless pedals release

Clipping out

Practice

Find a quiet piece of road or path you are comfortable with then clip in completely. Pedal 10 feet, stop the bike, clip out and step down. Repeat this process for ten minutes then go for your ride. Once you get done with your ride, take ten minutes and do the same thing again. Keep doing this exercise for the first 30 rides. After that time, clipping in and out of your pedals will be second nature.

How to Get the Most Benefits from Clipless Pedals

Clipless pedals allow you to put more effort into each pedal stroke by pressing down as well as pulling up. To learn a complete pedal stroke try these exercises:

One Leg Drills

Find a piece of flat road or path, clip one foot out, hang that foot away from the bike, and pedal entirely with one leg. Initially you will find it difficult to go more than a few seconds per leg, but don’t get discouraged. Focus on the muscles it takes to turn those pedals around with only a single leg. When both legs are clipped back in, try to use those muscles in your normal pedal stroke.

High Cadence Drills

This drill is easiest to complete on a very gradual hill. Get into a gear that takes very little effort and try to pedal as quickly as possible. While pedaling, concentrate on pulling up on the pedals and keeping your upper body as still as possible.

When trying clipless pedals for the first time, the information above and practice will have you riding faster, longer and in greater comfort quickly.