Tag Archives: bike helmet

Take a look below at some of the most common and damaging cycling mistakes and solutions made by newbies and seasoned riders alike.

Solve common cycling mistakes easily for more fun

by John Brown, Brown Cycles

Mistakes are something humans can’t escape, but nobody is perfect. That said, we can try to eliminate some of the simple errors we may make without ever realizing we are proceeding down the wrong path. Consider taking a look below at some of the most common and damaging cycling mistakes made by newbies and seasoned riders alike.

Cycling Mistakes #1 – Wear your helmet only when you think it’s needed

Many riders make the mistake of thinking “I don’t need to wear a helmet, I’m only going around the block with the kids”. This mentality is often responsible for catastrophes. The truth is you never know when an accident can happen, so you should always be prepared. For example, the worst crash I have ever had was riding from a campsite, down a straight gravel path to the washroom. Before I knew it, I was smack dab on the ground faster than I could get my hands up to catch myself. The moral of the story Is to wear your helmet whenever you ride your bike.

mistakes

Helmets are always in style

#2 – Believing you have plenty of air in the tires without checking

Frequently, I see riders headed down the trail with tires so low you can hear the rim bouncing off the ground with each pedal stroke. Low tire pressure can lead to pinch flats and, more importantly, loss of control. The innertube that holds the air in your tire is naturally porous and loses air naturally over time. In fact, a tube can lose between 3-5 PSI a day. At its extreme, your tire could go from full pressure to less than half pressure in the span of one week. Be sure to protect your ride by checking tire pressure before each ride.

#3 – Lube the Chain After Every Ride

Believe it or not, an over-lubed chain is more damaging than an under-lubed chain. While I do not recommend riding around with a dry chain, knowing when to lube is essential. Having a ton of lube on your chain will not better protect it. In fact, too much lube will attract dirt and debris, creating a harsh slurry that covers and wears your drivetrain. The best way to lubricate your chain is to apply lube to the chain, allowing it to soak in for a minute, and then use a rag to wipe off as much excess as possible. When done, the chain should feel almost dry to the touch.

The right amount of lube is a great thing

#4 – Use the water hose to clean your bike

After a dusty or wet ride, many riders reach for the hose to spray dirt off the bike. Sadly, while the bike may look clean, it will be in worse shape than if it hadn’t been cleaned at all. Pressured water from a hose can displace grease and leave nothing behind. Now, with no grease, the bike wears out at an accelerated rate. Instead of using a hose, try a warm bucket of soapy water and a big sponge.

#5 – Bring water along only on some rides

Many times, riders will assume that because the weather is cool or a ride is short, they don’t need to bring water with them. Truth be told, the biggest drain on your energy while riding can be related to dehydration. Stay hydrated by bringing water or a sports drink along on all rides.

mistakes

Yay, Water!

#6 – Assume cycling shoes are only good for clipless pedals

If you don’t want to ride clipless pedals, I get that. There are many reasons clipless pedals are great, but at least as many reasons why they aren’t suitable for everybody. What you can do is use a cycling-specific shoe with your flat pedals. A cycling shoe has a stiff sole and additional arch support to disperse pedaling forces over the entire length of your foot. Therefore, you have more efficiency and less discomfort.

Mistakes in general

Overall, thinking about what you are doing before you ride your bike is a good idea. Make sure your bike is ready for the ride, be equipped to take care of yourself during the ride, and be prepared to reach out for help if needed. Once you go through that mental exercise, you will see the common cycling mistakes melt away. Have Fun!

About John Brown, the author

John operates Browns Bicycle in Richfield, MN as a lifelong cyclist and consummate tinkerer. It all started for him in grade school when the bike bug bit, and the fever still existed. Now, and over the past thirty years, he has worked at every level in the bike industry. He is starting, like most, sweeping floors and learning anything he can about bikes. He eventually graduated as a service manager and then as a store manager. Through the years, he has spent extensive time designing and sourcing bicycles and parts for some of the largest bike companies in the world. All the while focusing on helping as many people as possible enjoy the love of riding a bike. In that pursuit, he has taught classes (both scheduled and impromptu) on all things bikes. John also believes in helping every rider attain their optimal fit on the cycle of their dreams. Please feel free to stop in any time and talk about bikes, fit, and parts, or share your latest ride. You can also see John’s tricks and tips on the Brown Bicycle Facebook Page.
The summer is prime time for fun in the sun. Take a look at how to plan for an enjoyable, safe, and prepared bike trip this summer.

A guide to planning a safe and fun bike trip this summer

By John Brown

Now that summer is just about here, for fun in the sun, let’s plan a bike trip adventure. While hundreds of people flock to the lakes and local pools to cool down. Many, like myself, will find refreshing the soul on two wheels the best way to go. Please take a look below at how I plan for an enjoyable bike trip through the summer.

A Short Bike Trip

Just because you are limited on time doesn’t mean you need to miss out on riding your bike. You can have fun right around your neighborhood! I have found that a great way to plan a short ride is first to determine a destination point. That destination can be an ice cream parlor, a road you have driven down but never seen up close, or maybe a nearby water park? Once you pick your destination, try to link in some sections of a bike path, rail trail, or some quiet back streets or road, even though they may not be the most direct route to your destination. After you pick a destination and a route, the rest of the planned excursion tends to materialize easily.

What To Bring Along

For a short trip, pack water and the tools to fix a flat. These rides usually only last an hour or so but can do a lot to help your peace of mind.

Bike Trip

Ice cream is always a great mid-ride snack, whether it’s a long or short bike trip.

A Long Bike Trip

It takes a bit more planning on a longer bike trip, though it follows the same order as above. Pick your destination with several attractions or points of interest close to one another. Then, add some bike-friendly routes, and the rest of the planned bike trip will materialize. On longer trips, it is also important to make sure your bike Is working well. Lube the chain, adjust the brakes, check your fit, or drop it off at your local shop for service at least two weeks before you plan to depart.

For longer trips, I like to employ guide books (Like our Minnesota Bike/Hike Guide) to find the best places to ride. Once you determine the location, reach out to local businesses like bike shops, hotels, business associations, or tourism boards to find more details about the area. As I mentioned before, a bike guide is a great place to start planning and reach out to the local tourism bureau. Bike paths and trails have become a popular attraction for most towns. The visitor centers we list are more than happy to talk about their bike-friendly amenities and usually have the most up-to-date information. Also, consider using software programs like Ride with GPS, Map My Ride, and Strava for more route ideas.

Packing For A Longer Trip

Packing for a long trip is more involved than what a short trip normally requires. If you are driving a long distance or flying to get to the ride, you don’t want poor weather to keep you off your bike – so pack for the worst! For example, I once did a 24-hour long mountain bike race in West Virginia in July, and while the race started under sunny skies at 95 degrees, it was snowing on the top of the mountain that night. Please take a look at our comprehensive bike trip list for all the items you may be forgetting.

Bike safety

A great bike trip is a safe bike trip. There is no more important part of bike safety than a helmet that fits. While crashes are uncommon, they do happen, and a helmet is the best way to protect yourself from serious damage. Other than the helmet, practice riding safely with hand signals, situational awareness, and limited distractions to keep you out of trouble. If you are on a family trip, it’s also important to talk to your kids about bike riding safety.

Bring The Bike Lock

If your ride involves time stopping, maybe at a restaurant or ice cream parlor, be sure to lock your bike securely. Follow these three rules when locking your bike. One, Lock it to something secure. If the bike rack or a signpost you plan to lock your bike to isn’t secure, you are making a would-be bike thief’s job easier. Two, Lock the frame and at least one wheel of your bike. Locking just a rear wheel or front wheel makes it easy for someone to walk away with the rest of your bike. Three, Lock your bike in a well-trafficked area. Bike thieves will be less likely to try and take your bike with witnesses around.

It’s All About The Fun

The most important part about making a bike trip memorable; it is all about fun. We all have days that start late, roads that get closed, out of the blue rain falls, and generally stuff that happens. Remember that the bike trip is all about the ride, not necessarily the destination so enjoy your time in the saddle.

Bike Trip

Always keep it fun!

About John Brown, the author

As a lifelong cyclist and consummate tinkerer, John operates Browns Bicycle in Richfield, MN. It all started for him in grade school when the bike bug bit and that particular fever is still there. Now, and over the past thirty years, he has worked at every level in the bike industry. Starting, like most, sweeping floors and learning anything he could about bikes. He eventually graduated as a service manager and then to a store manager.  Through the years, he has spent extensive time designing and sourcing bicycles and parts for some of the largest bike companies in the world. All the while focusing on helping as many people as possible enjoy the love of riding a bike. In that pursuit, he has taught classes (both scheduled and impromptu) on all things bikes. John also believes in helping every rider attain their optimal fit on the bike of their dreams. Please feel free to stop in any time and talk about bikes, fit, parts, or just share your latest ride. You can also see more of John’s tricks and tips on the Brown Bicycle Facebook Page.
Common cycling mistakes are something we as humans can't escape, but nobody is perfect. That said, consider taking a look below at some of the most common and damaging cycling mistakes

Common cycling mistakes and the ways you can easily solve them

by John Brown, HaveFunBiking.com

Mistakes are something we as humans can’t escape, but nobody is perfect. That said,  what we can do is try to eliminate some of the simple errors we may make without ever realizing we are proceeding down the wrong path. Consider taking a look below at some of the most common and damaging cycling mistakes made by both occasional and seasoned cyclists.

Cycling Mistakes #1 – Only wear a helmet when you think it’s needed

Many riders make the mistake of thinking “I don’t need to wear a helmet, I’m only going around the block with the kids”. This mentality is often responsible for the catastrophe. The truth is you never know when an accident can happen, so you should always be prepared. As an example, the worst crash I have ever had was when riding from a campsite, down a straight gravel path to the washroom. Before I knew it, I was smack dab on the ground faster than I could get my hands up to catch myself. Moral of the story Is to wear your helmet any time you ride your bike.

mistakes

Helmets are always in style

#2 – Believing you have plenty of air in the tires without checking

Frequently, I see riders headed down the trail with tires so low you can hear the rim bouncing off the ground with each pedal stroke. Low tire pressure can lead to pinch flats, and more importantly, loss of control. The inner tube that holds the air in your tire is naturally porous and lose air naturally over time. In fact, a tube can lose between 3-5 PSI a day. At its extreme, your tire could go from full pressure to less than half pressure in the span of one week. Be sure to protect your ride by checking tire pressure before each ride.

#3 – Lube the Chain After Every Ride

Believe it or not, an over lubed chain is more damaging than an under the lubed chain. While I am not recommending that you ride around with a dry chain, knowing when to lube is important. Having a ton of lube on your chain will not protect it any better. In fact, too much lube will attract dirt and debris, creating a harsh slurry that covers and wears your drivetrain. The best way to lubricate your chain is to apply lube to the chain, allowing it to soak in for a minute and then use a rag to wipe off as much excess as possible. When done, the chain should feel almost dry to the touch.

The right amount of lube is a great thing

#4 – Use the water hose to clean your bike

After a dusty or wet ride, many riders reach for the hose to spray dirt off the bike. Sadly, while the bike may look clean, the bike will be in worse shape than if it hadn’t been cleaned at all. Pressured water that comes from a hose, can displace grease and leave nothing behind. Now, with no grease, the bike wears out at an accelerated rate. Instead of using a hose, try instead a warm bucket of soapy water and a big sponge.

#5 – Bring water along only on some rides

Many times, riders will assume that because the weather is cool, or a ride is short, they don’t need to bring water with them on a ride. Truth be told, the biggest drain to your energy while riding can be related to dehydration. Stay hydrated by bringing water or a sports drink along on all rides.

mistakes

Yay Water!

#6 – Assume cycling shoes are only good for clipless pedals

If you don’t want to ride clipless pedals, I get that. There are tons of reasons clipless pedals are great, but at least as many reasons why they aren’t right for everybody. What you can do is use a cycling specific shoe with your flat pedals. A cycling shoe has a stiff sole and additional arch support to disperse pedaling forces over the entire length of your foot. Therefore, you have more efficiency and less discomfort.

Mistakes in general

Overall, it is a good idea to think about what you are doing before you ride your bike. Make sure your bike is ready for the ride, be equipped to take care of yourself during the ride and be sure you are prepared to reach out for help if needed. Once you go through that mental exercise you will see the common cycling mistakes melt away. Have Fun!

The Genie Helmet is a revolutionary helmet that boasts a headlight and tail light as well as remote activated turn signals. Read on to see some more detail.

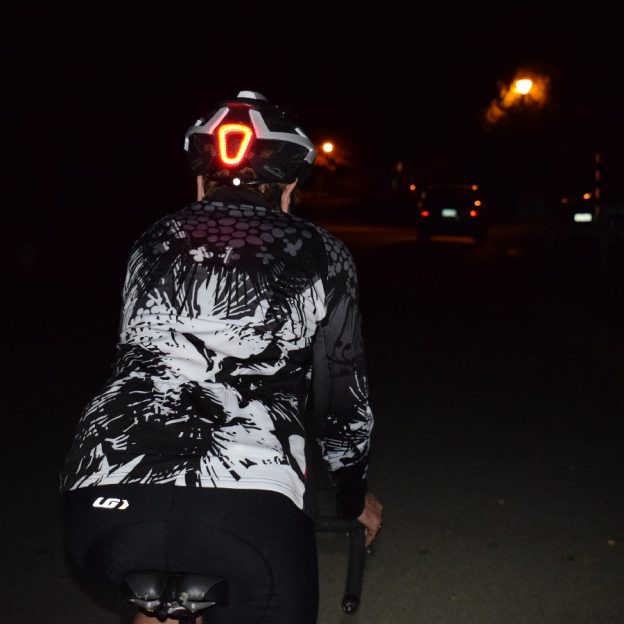
A first look at the revolutionary MagicShine Genie Helmet

by John Brown, HaveFunBiking.com

Recently, we reviewed a light from the wizards over at MagicShine, the MJ-900B. Along with the light they also included an amazing Genie helmet. The Genie is a revolutionary helmet that boasts a headlight and tail light as well as remote activated turn signals. Read on to see some more detail.

Genie Helmet out of the box

The Helmet is packaged in a relatively sturdy cardboard box with a foam liner to keep things stable. Within the box is the helmet, remote, instructions, screwdriver, battery cell, and a wedge shaped device. Once I read through the instructions, I saw that I needed to install the battery cell. In order to install the cell, I had to remove the battery cover on the top of the helmet. Removing the cover is done by loosening a single Philips head bolt and using the wedge device to pry the cover off.  With the battery cell installed, activating the light is as simple as pressing the power button once.

Genie

The MagicShine Genie out of the box

Genie Helmet functions

You can tell the helmets system is activated by looking at the rear blinker. Once the system is on, the rear blinker will be lit. In order to power the headlight or turn signals you simply press the corresponding remote button once. To change mode, you press the button again. Here is the only tricky part, In order to turn off the headlight or blinkers, you need to hold the button down for between 2-3 seconds.

Genie

Front light and turn signals with inset of remote

The Genie Helmet fit

The helmet is a one size fits all variety with a dial type retention device. The overall fit is a bit round for my head, so I felt a bit more pressure on the front of the helmet than I would prefer. That being said, I run into the same problem with Giro brand helmets, so I think it’s more an issue with my head than the helmet. It has ample padding throughout so the feel of the helmet is soft.

Genie

Ample, soft padding in the Genie helmet

How it feels

With so much going on within the Genie helmet, there is some added weight. Wearing the helmet feels just like when I attach a GoPro to my standard helmet. That weight can be a little strange at first, but like the camera, you will get used to it.

More to Come

Because there are many different head shapes, there will be more than one person trying out this helmet. We want to give the fit a thorough review. For the function of the helmet, I am really excited to see if cars respect the turn signals, how warm the headlight gets, and how long the battery lasts. Stay tuned for more info.