by Russ Lowthian, HaveFunBiking.com
For anyone unfamiliar with the bold north, biking, skiing, or walking on water is a fun outdoor winter activity when incorporating a few ice safety tips into the adventure. Mother Nature’s temperature swings in the upper Midwest will determine when to venture onto a frozen body of water. Usually, from mid to late December through February, venturing across a body of frozen water is a regular occurrence. This year, please take note. With above-normal temps so far this year, ice may be slow to form. Delaying many of the fun activities here on many of the lakes and streams. So, check the ice depth before you venture out!

Along with the proper clothing for a comfortable ride in the winter, here are some ice safety tips to ensure a safe time moving across a frozen lake or stream.
Ice safety tips – First and foremost, know the thickness of the ice.
There’s no way around it. While many visual cues can help you determine if it is safe to roll out or step onto the ice, the most reliable way is to measure the ice thickness.
You can use a few tools to measure the ice. An ice chisel can be stabbed into the ice until it penetrates the water. A cordless drill with a wood bit also works well to auger a hole to measure the thickness.
Ice safety tips – What is a safe thickness?
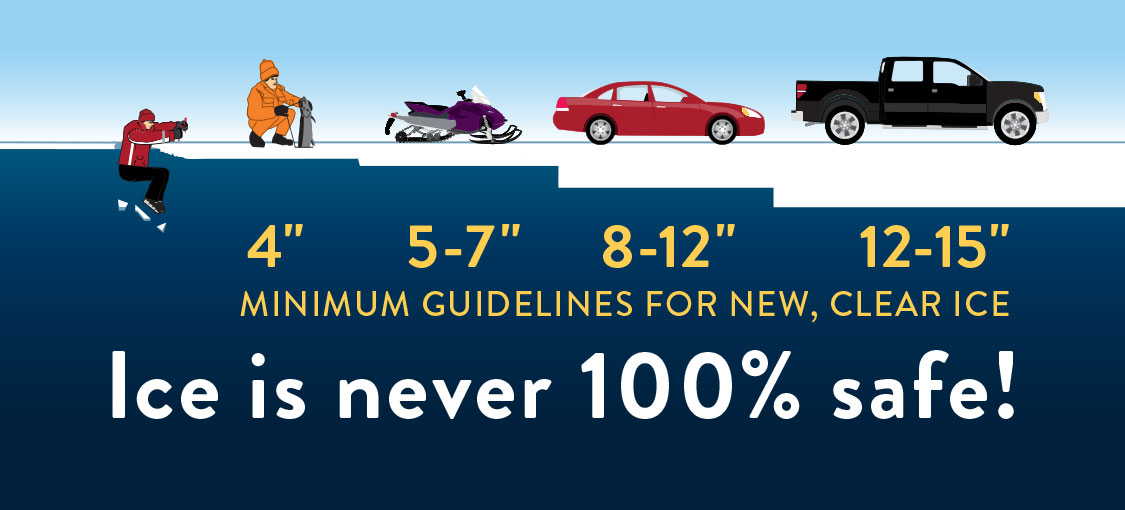
According to the Minnesota Department of Natural Resources states on ice thickness, any ice thickness less than four inches should be avoided at all costs. At four inches, the ice can support bicycling, cross-country skiing, ice fishing, and walking. At five to seven inches, the ice can sustain the weight of a snowmobile or an ATV, while eight to twelve inches are needed to support a small car’s weight. While these guidelines are generic, and ice conditions vary, the current chart is for newly formed ice. Make sure to read more on thickness before going out there.
Measuring in one place is not enough. Measure several areas (approximately 150 feet apart) to ensure the entire area is safe. Ice thickness can vary, even over a relatively small area—especially over moving water.
Ice safety tips – Assess the area visually.
A visual assessment can help supplement your measurement and support if you rely on someone else’s measurements.

Watch for signs of danger like cracks, seams, pressure ridges, dark areas (where the ice is thinner), and slushy areas—even slight slush signals that the icing isn’t freezing at the bottom. This tells you that the ice is progressively getting weaker.
Ice safety tips – The color of the ice
Check out the color of the ice. Clear, blue, or green ice thicker than four inches should be enough to bike on. White ice typically has air or snow trapped inside, weakening it. Dark ice might indicate that the ice is relatively thin—probably not thick enough for biking, hiking, or skiing.
The Fresher, the better!
New ice is typically stronger than older ice. The bond between ice crystals decays even in freezing temperatures as time passes. When the spring thaw begins, the ice weakens considerably. Heading out for one last ride across the ice can be tempting, but it is safest to say no. Even if ice fits the measurement criteria, it can still be hazardous.
More suggestions when venturing out on “safe ice.”
Along with knowledge of the thickness of the ice and a visual assessment, here are four more suggestions to help minimize the risk when biking on the ice:
- Carry ice picks and a rope
- Have a cell phone or personal locator beacon along
- Don’t go out alone; tell someone about trip plans and expected return time.
- Before heading out, inquire about conditions and known hazards with local experts.
Know the proper rescue techniques.
Anyone venturing on the ice outdoors should know the basic ice rescue technique. Kids should also be familiar with the protocol, so educate them beforehand. If someone in your party falls through the ice, the first thing to do is call 911. Anyone still on the ice should slowly lie down, distributing their weight over a larger area.
Reach the person in the water using a long-reaching assist— maybe a large stick, a rope, or a ladder if available. The person in the water should be instructed to kick and slowly ease their way out of the water. Once they reach the surface, they should crawl or roll away from the broken ice area.
Anyone on the ice, including the victim and rescuer, should avoid standing up until they are far away from the broken ice. As soon as possible, get the victim into dry clothing and treat them for hypothermia.
Hopefully, we can have some fun soon
Enjoy the ice safety tips for a safer true North experience!


